


Installing actiTIME
The instructions on this page should be followed if you want to install actiTIME v2021.0 or higher.
Before installing actiTIME, make sure your server meets the system requirements.
To install the previous version of actiTIME, please refer to the instructions provided here.
actiTIME Self-Hosted starting from v2021.0 is installed using Docker containers.
A Docker container image is a lightweight, standalone, executable package of software that includes everything necessary to run an application: code, runtime, system tools, system libraries and settings. See more information on Docker here.
- Install Docker according to the instructions provided for your OS:
- Docker Desktop—if you are using Windows 10+, Windows Server 2019+;
- Docker Engine and Docker Compose – if you are using one of the Linux distributions.
- Copy the actiTIME installation package (.tar.gz archive) onto your machine.
Extract files from the archive into the actiTIME directory of your choice using the following command:$ tar -xf [archive_name].tar.gz -C [directory]
The '.tar.gz' file format is a combination of TAR packaging followed by a GNU zip (gzip) compression. It is commonly used in the Unix-like operating systems.
In order to extract files from a '.tar.gz' archive in Windows you need to:
- Install Git for Windows application.
- Go to the actiTIME installation folder where the package archive is located.
- Right-click inside the actiTIME installation folder and click the ‘Git Bash Here’ option. The Git terminal will be launched.
- Type the following command into the Git terminal and press the 'Enter' key on the keyboard
(archive name in the square brackets should be replaced by your archive's name).
Alternatively, the files can be extracted from an archive using one of the archivers (for example, 7-Zip).
The archive contains several files and folders, so make sure you have extracted all of them but not just a ‘.tar’ archive (if so, extract files from a ‘.tar’ archive). - Choose the URL of your actiTIME installation: it can be the default one or configured manually.
With the default URL, your actiTIME can be accessed at all available IPs of your machine, on the port ‘80’ and via HTTP protocol, so the URL of your installation can look like:- http://localhost:80
- http://127.0.0.1:80
- http://[hostname]:80 etc.
With the manually configured URL, you can set up your installation URL the way you need.
3.1 If you choose to use the default URL, proceed to Step 4.
3.2 If you choose to configure the URL, create or edit a ‘user.config’ file in the actiTIME directory and define the necessary parameters. This file is a text file but please note that it must have a ‘.config’ file extension (not ‘.txt’ or similar).
The following parameters should be configured if you want to change the default URL:
- LISTEN_HOST—an IP address where actiTIME can be accessed.
- Default value—all available IPs (‘0.0.0.0’).
- LISTEN_PORT—an open port by which actiTIME can be accessed.
- Default value—’80’ (in the HTTP mode).
Here is an example of a ‘user.config’ file:
LISTEN_HOST=0.0.0.0
LISTEN_PORT=8080
These parameters form the following URL of your actiTIME installation:
http://LISTEN_HOST:LISTEN_PORT
To configure actiTIME to work via secure connections (HTTPS), please refer to: I want to configure actiTIME to work via secure connection (HTTPS).
- 4. Choose the way your data will be stored: using a MySQL server running within a Docker container or using an external MySQL server.The default option is to use a MySQL server running within a Docker container. In this case, you do not have to install and configure a separate MySQL server to operate the actiTIME database – MySQL server will be installed automatically within a container. For better performance while interacting with big databases, we recommend using an external MySQL server.
4.1 If you choose to use a MySQL server running within a Docker container, proceed to Step 5.
4.2 If you choose to use an external MySQL server, follow the instructions below.
-
- Install MySQL server on your machine (see the download links here).
- Create a new user with all privileges to administer the database in MySQL.
For example, run the following queries in MySQL:CREATE USER 'user'@'%' IDENTIFIED BY 'password';
GRANT ALL ON *.* TO 'user'@'%' WITH GRANT OPTION;
- Allow actiTIME to create stored functions in its database.
For example, run the following query in MySQL under the ‘root’ user account or under any other user account with SUPER privilege:SET GLOBAL log_bin_trust_function_creators = 1;
If necessary, you can revert this configuration change to the original value after having actiTIME installed.
- Create or edit the ‘user.config’ file in the actiTIME directory.
The following parameters should be configured in the ‘user.config’ file if you want to connect to the external MySQL server:- MYSQL_HOST—the host name or IP address of the server where MySQL is running.
- Do not set this parameter to the ‘127.0.0.1’ or ‘localhost’ value. On Windows OS, you can use the ‘host.docker.internal’ value instead.
- MYSQL_PORT—the port number used by MySQL.
- Optional parameter, default value – ‘3306’.
- MYSQL_SCHEMA—the name of a database to be created by actiTIME.
- Optional parameter, default value – ‘actitime’.
- MYSQL_USER—the name of the user who has all the necessary privileges to administer the database.
- MYSQL_PASSWORD—the password of the MYSQL_USER.
Here is an example of a ‘user.config’ file:
MYSQL_HOST=192.168.1.105
MYSQL_PORT=3306
MYSQL_SCHEMA=actitimedb
MYSQL_USER=user
MYSQL_PASSWORD=password
- MYSQL_HOST—the host name or IP address of the server where MySQL is running.
-
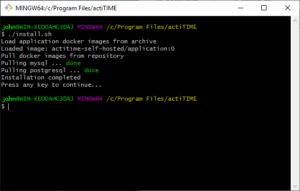
- 5. Run the ‘install.sh’ script from the actiTIME directory.
$ ./install.sh
Running shell scripts (.sh files) in Windows requires Git for Windows to be installed.
To run a script in Windows:
- Go to the actiTIME installation folder.
- Right-click inside the actiTIME installation folder and click the ‘Git Bash Here’ option. Git terminal will be opened.
- Type into the Git terminal the ‘./’, the script name, and the file extension (without spaces), and press Enter on the keyboard.
For example:
$ ./install.sh
- 6. Run the ‘start.sh’ script from the actiTIME directory.$ ./start.sh
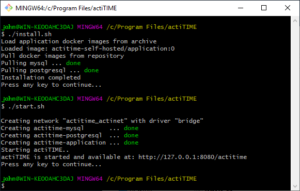
The installation procedure is completed.
actiTIME has started at the URL specified in the terminal.
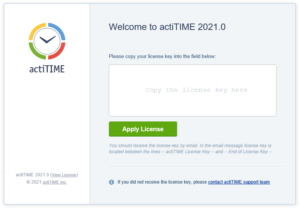
You can check the availability of your actiTIME by proceeding to this URL. Enter your license key for the installed version and log in to actiTIME.
Upgrading actiTIME
If you already have actiTIME installed and want to update it to a newer version, do not use the installation script. Instead, please refer to the Upgrading actiTIME section.
The installation script (`install.sh`) is intended for fresh installations only. Using it on an existing installation may cause data loss or configuration conflicts.
Reinstalling actiTIME
If during installation you see the “‘actitime.config’ file already exists. It will be overwritten” message, it indicates one of the following situations:
- actiTIME is already installed in the selected directory—you should use the upgrade process instead (see the Upgrading actiTIME section).
- actiTIME was partially installed during the previous installation attempt, but the process was not completed.
- actiTIME was removed using `uninstall.sh`, but configuration files remain in the `work/` directory.
What Happens When You Overwrite the Configuration
If you choose to overwrite `actitime.config`(answer “y” to the prompt), the following situations will occur:
For Internal MySQL Database
- New MySQL passwords will be generated (`MYSQL_PASSWORD` and `MYSQL_ROOT_PASSWORD`).
- The existing MySQL data directory (`work/mysql_data`) will still contain databases created with the old passwords.
This will cause authentication errors when starting actiTIME
Solution: You will need to either restore the old password from the configuration backup (`work/actitime.config.backup_YYYYMMDDHHMM`) or reinstall in a different directory and restore your database backup.
For External MySQL Database do it using `user.config`. Then the configuration will be updated according to the credentials specified in your `user.config` file.
Important: Verify that the credentials in `user.config` match those used in your previous installation! If credentials differ, you may encounter connection errors or lose access to your database.
Solution: Ensure `user.config` contains the same MySQL host, port, schema, user, and password that were used previously.
Before proceeding with reinstallation, follow the recommendations below:
- Run `./status.sh` to check if actiTIME is currently running.
- If it is installed and running, use the upgrade process instead.
If you previously uninstalled actiTIME:
- Check if you have a database backup in `work/backups/` directory
- Consider installing to a different directory to avoid configuration conflicts.
- If installing in the same directory, answer “n” when prompted to overwrite `actitime.config` to preserve existing credentials.
If you have to overwrite the configuration:
- Ensure you have a database backup.
- For internal MySQL: Be prepared to restore the old password from the configuration backup or reinstall in a new directory.
- For external MySQL: Verify all credentials in `user.config` match your previous installation.
