


Upgrading actiTIME
The instructions on this page should be followed if you want to upgrade actiTIME to v2021.0 or higher.
Before upgrading actiTIME, make sure your server meets the system requirements.
To upgrade actiTIME to v2020.2 or lower, please refer to the instructions provided here.
Choose the type of upgrade you want to perform:
Upgrading from v2021.0 or Higher
These instructions should be followed if you have actiTIME v2021.0 or higher installed and need to upgrade it to a newer version.
- Back up your database.
- Copy the installation package (a .tar.gz archive) of the new actiTIME version to the current actiTIME directory, i.e. the folder where the actiTIME files are stored.
- Extract the files from the archive into the current actiTIME directory using the following command:
$ tar -xf [archive_name].tar.gz -C [directory]
The '.tar.gz' file format is a combination of TAR packaging followed by a GNU zip (gzip) compression. It is commonly used in the Unix-like operating systems.
In order to extract files from a '.tar.gz' archive in Windows you need to: - Install Git for Windows application. - Go to the actiTIME installation folder where the package archive is located. - Right-click inside the actiTIME installation folder and click the ‘Git Bash Here’ option. Git terminal will be launched. - Type the following command into the Git terminal and press the 'Enter' key on the keyboard (archive name in the square brackets should be replaced by your archive's name).$ tar -xf [archive_name].tar.gz
Alternatively, the files can be extracted from an archive using one of the archivers (for example, 7-Zip).
The archive contains several files and folders, so make sure you have extracted all of them but not just a '.tar' archive (if so, extract files from a '.tar' archive).If you are extracting the files from the archive via GUI, then make sure that you choose to replace all duplicate files with the new ones.
- Run the ‘upgrade.sh’ script from the actiTIME directory.
$ ./upgrade.sh
Running shell scripts (.sh files) in Windows requires Git for Windows to be installed.
To run a script in Windows: - Go to the actiTIME installation folder. - Right-click inside the actiTIME installation folder and click the ‘Git Bash Here’ option. Git terminal will be opened. - Type into the Git terminal the ‘./’, the script name, the file extension (without spaces) and press Enter on the keyboard. For example:$ ./install.sh
- Run the ‘start.sh’ script from the actiTIME directory.
$ ./start.sh
The upgrade procedure is completed.
actiTIME has started at the URL specified in the terminal.
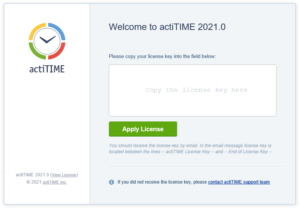
Check the availability of your actiTIME by proceeding to this URL. - Enter your license key for the installed version and log in to actiTIME.
Upgrading from v2020.2 or Lower
These instructions should be followed if you have actiTIME v2020.2 or lower installed and need to upgrade it to a newer version.
actiTIME Self-Hosted starting from v2021.0 is installed using Docker containers.
A Docker container image is a lightweight, standalone, executable package of software that includes everything necessary to run an application: code, runtime, system tools, system libraries and settings. See more information on Docker here.
We’ve stopped support for MS Access databases. actiTIME versions starting from 2019 work with MySQL databases only.
You have to switch to MySQL to upgrade actiTIME to the newer version. Please contact actiTIME Support Team to convert actiTIME database from MS Access to MySQL.
We have done our best to ensure that your data stays safe. However, it is strongly recommended to perform the following actions prior to upgrading actiTIME:
1. Make a backup of the actiTIME installation folder.
2. Back up your actiTIME database.
You need local administrator privileges to upgrade actiTIME.
Choose the type of upgrade you want to perform:
Upgrading Auto-Installation of actiTIME
To upgrade the auto-installation of actiTIME (versions up to 2020.2), follow the instructions below.
- Install new actiTIME version according to this guide.
During the installation process, you must choose the way your data will be stored: using a MySQL server running within a Docker container or using an external MySQL server. If you do not want to install, configure and maintain a separate MySQL server, choose the MySQL server running within a Docker container.
Do not enter your license key after the installation is completed.
- Back up your current actiTIME’s database (MySQL backup (‘.sql’ file) is required).
The backup instructions for your current actiTIME version can be found here. - Stop your current actiTIME.
- Put the database backup file named as ‘actitime_data.sql’ to the directory where the files of the new actiTIME version (which was installed on Step 1) are stored.
- Run the ‘restore_db.sh’ script from the new actiTIME directory.
$ ./restore_db.sh actitime_data.sql
Running shell scripts (.sh files) in Windows requires Git for Windows to be installed.
To run a script in Windows: - Go to the actiTIME installation folder. - Right-click inside the actiTIME installation folder and click the ‘Git Bash Here’ option. Git terminal will be opened. - Type into the Git terminal the ‘./’, the script name, the file extension (without spaces) and press Enter on the keyboard. For example:$ ./install.sh
The data from the backup file will overwrite and replace all the data already existing in the connected database.
- Enter your license key for the installed version and log in to actiTIME.
- After the successful upgrade of actiTIME, you can remove old actiTIME (v2020.2 or lower) directories but we strongly do recommend keeping the database backup.
To uninstall the previous version of actiTIME, please refer to the instructions provided here.
The upgrade procedure is completed.
Check the availability of your actiTIME. To find out actiTIME URL, refer to: At what URL can actiTIME be accessed?
Upgrading Custom Installation of actiTIME
To upgrade the custom installation of actiTIME (Windows or Unix, versions up to 2020.2), follow the instructions below.
- Install Docker according to the instructions provided for your OS:
- Docker Desktop – if you are using Windows 10+, Windows Server 2019+;
- Docker Engine and Docker Compose – if you are using one of the Linux distributions.
- Copy the installation package (a .tar.gz archive) of the new actiTIME version onto your machine.
- Extract the files from the archive into an empty directory of your choice (this directory will be the actiTIME installation directory) using the following command:
$ tar -xf [archive_name].tar.gz -C [directory]
The '.tar.gz' file format is a combination of TAR packaging followed by a GNU zip (gzip) compression. It is commonly used in the Unix-like operating systems.
In order to extract files from a '.tar.gz' archive in Windows you need to: - Install Git for Windows application. - Go to the actiTIME installation folder where the package archive is located. - Right-click inside the actiTIME installation folder and click the ‘Git Bash Here’ option. Git terminal will be launched. - Type the following command into the Git terminal and press the 'Enter' key on the keyboard (archive name in the square brackets should be replaced by your archive's name).$ tar -xf [archive_name].tar.gz
Alternatively, the files can be extracted from an archive using one of the archivers (for example, 7-Zip).
The archive contains several files and folders, so make sure you have extracted all of them but not just a '.tar' archive (if so, extract files from a '.tar' archive). - Choose the URL of your actiTIME installation: it can be the default one or configured manually.
With the default URL, your actiTIME can be accessed at all available IPs of your machine, on the port ‘80’ and via HTTP protocol, so the URL of your installation can look like:- http://localhost:80
- http://127.0.0.1:80
- http://[hostname]:80 etc.
With the manually configured URL, you can set up your installation URL the way you need.
4.1 If you choose to use the default URL, proceed to Step 5.
4.2 If you choose to configure the URL, create or edit the ‘user.config’ file in the actiTIME directory and define the necessary parameters. While creating this file, please note that it must have a ‘.config’ file extension (not ‘.txt’ or similar).
The following parameters should be configured in the ‘user.config’ file if you want to change the default URL:
- LISTEN_HOST – an IP address where actiTIME can be accessed.
- Default value – all available IPs (‘0.0.0.0’).
- LISTEN_PORT – an open port by which actiTIME can be accessed.
- Default value – ’80’ (in the HTTP mode).
Here is an example of a ‘user.config’ file:
LISTEN_HOST=0.0.0.0
LISTEN_PORT=8080
These parameters form the following URL of your actiTIME installation:
http://LISTEN_HOST:LISTEN_PORT
To configure actiTIME to work via secure connections (HTTPS), please refer to: I want to configure actiTIME to work via secure connection (HTTPS).
There is also a possibility to include an additional parameter into your URL: CONTEXT_PATH.
CONTEXT_PATH – optional name for actiTIME installation (empty by default).
If ‘CONTEXT_PATH’ is specified in the ‘user.config’ file, then the URL of your actiTIME installation will be like the following one:
http://LISTEN_HOST:LISTEN_PORT/CONTEXT_PATH
This can be helpful if you are upgrading from a custom version of actiTIME and want to keep the URL of your current actiTIME installation.
- Choose the way your data will be stored: using a MySQL server running within a Docker container or using an external MySQL server.
The default option is to use a MySQL server running within a Docker container. In this case, you do not have to install and configure a separate MySQL server to operate the actiTIME database – MySQL server will be installed automatically within a container.For better performance while interacting with big databases, we recommend using an external MySQL server. You should also choose the external MySQL server option if you want to continue using your current MySQL server which is connected to the previous custom version of actiTIME.
5.1 If you choose to use a MySQL server running within a Docker container, follow the instructions below.
- Stop your Tomcat server where actiTIME is currently running.
- Back up your current actiTIME’s database (MySQL backup (‘.sql’ file) is required).
The backup instructions for your current actiTIME version can be found here. - Put the database backup file named as ‘actitime_data.sql’ to the new actiTIME directory, i.e. the folder where the files of the new actiTIME version are stored (see Step 3).
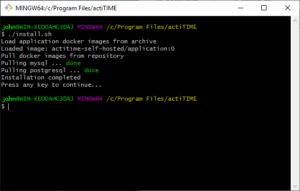
- Run the ‘install.sh’ script from the new actiTIME directory.
$ ./install.sh
Running shell scripts (.sh files) in Windows requires Git for Windows to be installed.
To run a script in Windows: - Go to the actiTIME installation folder. - Right-click inside the actiTIME installation folder and click the ‘Git Bash Here’ option. Git terminal will be opened. - Type into the Git terminal the ‘./’, the script name, the file extension (without spaces) and press Enter on the keyboard. For example:$ ./install.sh
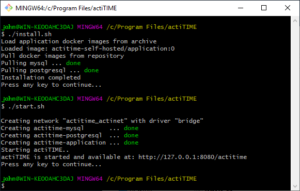
- Run the ‘start.sh’ script from the new actiTIME directory.
$ ./start.sh
- Run the ‘restore_db.sh’ script from the new actiTIME directory.
$ ./restore_db.sh actitime_data.sql
The upgrade procedure is completed.
actiTIME has started at the URL specified in the terminal.
Check the availability of your actiTIME by proceeding to this URL and go to Step 6.5.2 If you choose to use an external MySQL server and want to connect to the existing database, follow the instructions below.
- Stop your Tomcat server where actiTIME is currently running.
- Allow actiTIME to create stored functions in its database.
For example, run the following query in MySQL under the ‘root’ user account or under any other user account with SUPER privilege:SET GLOBAL log_bin_trust_function_creators = 1;
If necessary, you can revert this configuration change to the original value after having actiTIME upgraded.
- Create or edit the ‘user.config’ file in the actiTIME directory and define the necessary parameters.
The following parameters should be configured in the ‘user.config’ file if you want to connect to the external MySQL server:- MYSQL_HOST – the host name or IP address of the server where MySQL is running.
- Do not set this parameter to the ‘127.0.0.1’ or ‘localhost’ value. On Windows OS, you can use the ‘host.docker.internal’ value instead.
- MYSQL_PORT – the port number used by MySQL.
- MYSQL_SCHEMA – the name of a database to be used by actiTIME.
- MYSQL_USER – the name of the user who has all the necessary privileges to administer the database.
- MYSQL_PASSWORD – the password of the MYSQL_USER.
Here is an example of a ‘user.config’ file:
MYSQL_HOST=192.168.1.105
MYSQL_PORT=3306
MYSQL_SCHEMA=actitimedb
MYSQL_USER=user
MYSQL_PASSWORD=password
Where can I find connection parameters to my existing database?
Custom installations of actiTIME (Windows or Unix) with versions up to 2020.2: the necessary parameters are stored in the ‘<old actiTIME installation directory>\WEB-INF\classes\com\actimind\actitime\AT.properties’ file. MYSQL_USER and MYSQL_PASSWORD are specified in the 'DBUser' and 'DBPassword' strings.
The 'DBurl' string contains the MYSQL_HOST, MYSQL_PORT and MYSQL_SCHEMA values: DBurl=jdbc:mysql://<MYSQL_HOST>:<MYSQL_PORT>/<MYSQL_SCHEMA> - MYSQL_HOST – the host name or IP address of the server where MySQL is running.
- Run the ‘install.sh’ script from the new actiTIME directory, i.e. the folder where the files of the new actiTIME version are stored (see Step 3).
$ ./install.sh
Running shell scripts (.sh files) in Windows requires Git for Windows to be installed.
To run a script in Windows: - Go to the actiTIME installation folder. - Right-click inside the actiTIME installation folder and click the ‘Git Bash Here’ option. Git terminal will be opened. - Type into the Git terminal the ‘./’, the script name, the file extension (without spaces) and press Enter on the keyboard. For example:$ ./install.sh
- Run the ‘start.sh’ script from the new actiTIME directory.
$ ./start.sh
The upgrade procedure is completed.
actiTIME has started at the URL specified in the terminal.
Check the availability of your actiTIME by proceeding to this URL and go to Step 6. - Enter your license key for the installed version and log in to actiTIME.
- After the successful upgrade of actiTIME, you can remove old actiTIME (v2020.2 or lower) directories but we strongly do recommend keeping the database backup.
To uninstall the previous version of actiTIME, please refer to the instructions provided here.If your upgraded actiTIME is configured to use an external MySQL server previously used by your old actiTIME, you have to keep it intact - do not uninstall it.
