


Troubleshooting
This section provides the answers to frequently asked questions and helps to fix the most common troubles occuring while installing and maintaining actiTIME v2021.0 and higher.
The ‘Troubleshooting’ section for the previous versions of actiTIME can be found here.
Common Problems:
What package of actiTIME am I using?
At what URL can actiTIME be accessed?
How can I check actiTIME status?
Some elements of actiTIME interfaces do not work properly
Users cannot log in to the actiTIME mobile app
actiTIME does not send email notifications
actiTIME Maintenance – Installation & Upgrade:
I want to configure actiTIME to work via secure connection (HTTPS)
I want to move actiTIME to another server
I want to change configuration settings for actiTIME
I want to use external MySQL server instead of internal
I get a ‘Docker storage driver unsupported’ error
I get a ‘No connection with MySQL server’ error
I get a ‘’log_bin_trust_function_creators’ global variable should be enabled’ error
I get a ‘User declined directory sharing’ error
I get an ‘Access Denied’ error
The time in the actiTIME logs and database dump is incorrect
How can I enable BIOS-level hardware virtualization?
How can I collect data for actiTIME support team?
Uninstalling and Reinstalling Issues
Warning Message During Installation
MySQL Access Denied Error After Configuration Overwrite
MySQL Failed to Start – Initialization Error
If you cannot find a solution to your problem, please contact our support team at support@actitime.com.
Common Problems
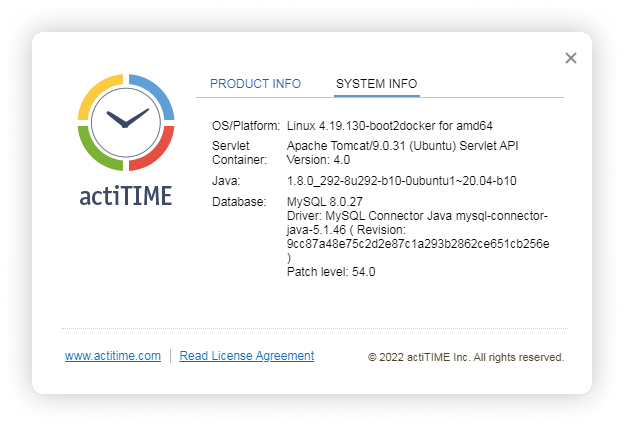
What package of actiTIME am I using?
To find out what actiTIME package or version you are using, open the ‘Help’ menu in actiTIME and select ‘About your actiTIME’.

Your package and version will be displayed on the ‘Product Info’ tab.

Environment details will be displayed on the ‘System Info’ tab.
At what URL can actiTIME be accessed?
To check the actiTIME URL, run the ‘status.sh’ script from the actiTIME directory.
Running shell scripts (.sh files) in Windows requires Git for Windows to be installed.
To run a script in Windows:
- Go to the actiTIME installation folder.
- Right-click inside the actiTIME installation folder and click the ‘Git Bash Here’ option. Git terminal will be opened.
- Type into the Git terminal the ‘./’, the script name, the file extension (without spaces) and press Enter on the keyboard.
For example:
$ ./install.sh
The script will display the current status of the actiTIME components and the URL where actiTIME is available. For example:
$ ./status.sh
postgresql      - OK
mysql           - OK
application     - OK
actiTIME is started and available at: http://localhost:80/
The URL of your actiTIME installation is formed by the ‘LISTEN_HOST’ and ‘LISTEN_PORT’ parameters which are defined in the ‘user.config’ file in the actiTIME directory during the installation process:
http://LISTEN_HOST:LISTEN_PORT
How can I check actiTIME status?
To check actiTIME status, run the ‘status.sh’ script from the actiTIME directory.
Running shell scripts (.sh files) in Windows requires Git for Windows to be installed.
To run a script in Windows:
- Go to the actiTIME installation folder.
- Right-click inside the actiTIME installation folder and click the ‘Git Bash Here’ option. Git terminal will be opened.
- Type into the Git terminal the ‘./’, the script name, the file extension (without spaces) and press Enter on the keyboard.
For example:
$ ./install.sh
The script will display the current status of the actiTIME components and the URL where actiTIME is available.
If a component works properly, then the ‘OK’ status will be displayed next to it. For example:
$ ./status.sh
postgresql      - OK
mysql           - OK
application     - OK
actiTIME is started and available at: http://localhost:80/
If there are any troubles affecting the actiTIME components, the corresponding notes will be displayed instead of the ‘OK’ status.
Some elements of actiTIME interfaces do not work properly
If some interface elements in your actiTIME are not displayed correctly or do not work properly, make sure you are using a supported browser.
The supported browsers are: the recent versions of Google Chrome, Microsoft Edge, Mozilla Firefox and Safari. Correct operation of actiTIME is not guaranteed in other browsers.
Users cannot log in to the actiTIME mobile app
Error: Cannot Connect to Server / actiTIME server address is invalid / Sync Request Timed Out / Request Timed Out.
Solution: Make sure that the actiTIME account URL is entered correctly and actiTIME is accessible at this address via your web browser.
To check your actiTIME account URL, refer to: At what URL can actiTIME be accessed?
Note: If you want your users to be able to log in to the actiTIME mobile app outside your local network, your actiTIME must also be accessible from the external networks (check your firewall settings).
Error: Incorrect username or password.
Solution: Make sure that the username and password are entered correctly and actiTIME can be accessed via web browser using the same credentials. One can also try using the ‘Forgot your password?’ option or asking the actiTIME administrator to set up a new password.
Error: Cannot Connect to Server. SSL certificate provided by the server is invalid.
Solution: Make sure that all intermediate certificates are included into the SSL certificate chain. For more details, refer to: I want to configure actiTIME to work via secure connection (HTTPS).
actiTIME does not send email notifications
To enable actiTIME to send email notifications, email settings should be configured in the ‘Email Settings’ section of the ‘General Settings’ interface of actiTIME.
Do not specify the 'localhost' and '127.0.0.1' values in the 'Outgoing Mail Server (SMTP)' field - if you do so, the email notifications will not be sent.
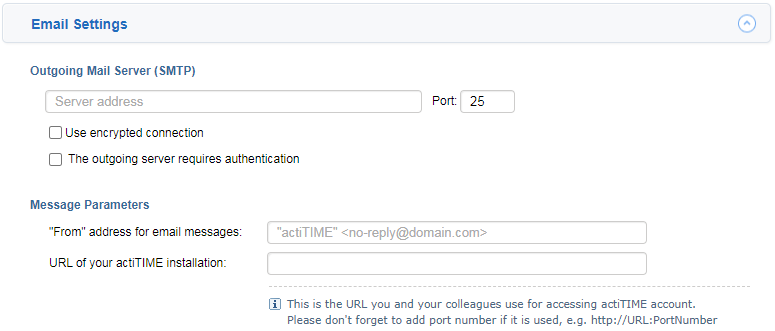
Fill in the following mandatory fields:
- Outgoing mail server (SMTP) – name or address of your mail server;
- Port – mail server port (usually 25);
- “From” address for email messages – address from which the notifications will be sent;
- URL of your actiTIME installation – address you use to log in to actiTIME (ex. http://<IP address or computer name>:8080). This address is required to enable links from email messages back to actiTIME;
- Error Processing – email address of your system or network administrator who will be notified if actiTIME detects issues when sending email messages.
If you don’t know what are the correct values, please consult your System or Network Administrator.
actiTIME is not available
If actiTIME is not available:
- Make sure that you are using the right URL to access your actiTIME.
To check your actiTIME URL, refer to: At what URL can actiTIME be accessed? - Make sure that actiTIME components work properly.
To check actiTIME status, refer to: How can I check actiTIME status? - Make sure that Docker service is running.
To run Docker:- for Windows 10+, Windows Server 2019+: start up the Docker Desktop application.
- for Linux distributions: make sure that Docker service is running.
It is advised to configure the necessary applications to run automatically at system startup if possible to keep the Docker service running all the time.
actiTIME works slowly
To improve actiTIME performance, you can try the following options:
-
- Restart actiTIME.
- Run the ‘stop.sh’ script from the actiTIME directory.
$ ./stop.sh
Running shell scripts (.sh files) in Windows requires Git for Windows to be installed.
To run a script in Windows:
- Go to the actiTIME installation folder.
- Right-click inside the actiTIME installation folder and click the ‘Git Bash Here’ option. Git terminal will be opened.
- Type into the Git terminal the ‘./’, the script name, the file extension (without spaces) and press Enter on the keyboard.
For example:
$ ./install.sh
- Run the ‘start.sh’ script from the actiTIME directory.
$ ./start.sh
- Run the ‘stop.sh’ script from the actiTIME directory.
- (For Windows) Configure the resources to be used by Docker on your machine – Docker Desktop must be set to use at least 4GB of your host’s RAM (the ‘memory’ parameter).
- If you use WSL 2 backend, refer to this guide.
- If you use Hyper-V backend, refer to this guide.
The more data actiTIME stores, the more RAM Docker Desktop requires.
- Provide the server, where actiTIME is installed, with more RAM.
A minimum of 8GB RAM is required for actiTIME to work properly. The more data actiTIME stores, the more RAM it requires.
- Restart actiTIME.
- If you are using a MySQL server running within a Docker container, try to use an external MySQL Server.
To change the type of server from internal to external, refer to: I want to use external MySQL server instead of internal.
actiTIME Maintenance – Installation & Upgrade
I want to configure actiTIME to work via secure connection (HTTPS)
To configure actiTIME to work via secure connections (HTTPS), define the following parameters in the ‘user.config’ file located in the actiTIME directory:
- HTTPS_ENABLED – HTTPS mode.
- This parameter must be set to ‘true’ value (possible values: true | false).
- SSL_CRT_PATH – path to the SSL certificate file.
- To avoid trust errors such as ‘SSL certificate is invalid’, ‘Your Connection Is Not Private’, ‘Not Secure’, etc., make sure that a complete intermediate certificate chain has been installed. If the authority provides a bundle of chained certificates, they should be concatenated to the signed server certificate. See more details here: SSL Certificate Chains.
- The certificate must be in the PEM format.
- The path must be provided in Unix-style (using forward slashes ‘/’).
- SSL_KEY_PATH – path to the SSL certificate’s key file.
- The path must be provided in Unix-style (using forward slashes ‘/’).
Please note that if the port (the ‘LISTEN_PORT’ parameter) is not specified explicitly in the ‘user.config’ file, then it will be set to ‘443’ value automatically in the HTTPS mode (‘80’ value is the default one in the HTTP mode).
Here is an example of a ‘user.config’ file:
LISTEN_HOST=0.0.0.0
LISTEN_PORT=443
HTTPS_ENABLED=true
SSL_CRT_PATH=path/to_cert
SSL_KEY_PATH=path/to_key
When properly configured, these parameters form the following URL of your actiTIME installation:
https://LISTEN_HOST:LISTEN_PORT
The settings in the ‘user.config’ file can be applied during the initial actiTIME installation process or later (to change the configuration settings later, refer to: I want to change configuration settings for actiTIME).
I want to move actiTIME to another server
To move actiTIME to another server, follow the instructions below.
If you are currently using a MySQL server running within a Docker container:
- Stop actiTIME.
Run the ‘stop.sh’ script from the actiTIME directory.$ ./stop.sh
Running shell scripts (.sh files) in Windows requires Git for Windows to be installed.
To run a script in Windows:
- Go to the actiTIME installation folder.
- Right-click inside the actiTIME installation folder and click the ‘Git Bash Here’ option. Git terminal will be opened.
- Type into the Git terminal the ‘./’, the script name, the file extension (without spaces) and press Enter on the keyboard.
For example:
$ ./stop.sh
- Back up your database on your current server. You will need the backup file later.
- Install actiTIME on your new server.
- Restore the actiTIME database on your new server using the backup file previously created.
- Uninstall actiTIME on your current server.
If you are currently using an external MySQL Server and want to continue using it:
- Stop actiTIME.
Run the ‘stop.sh’ script from the actiTIME directory.$ ./stop.sh
Running shell scripts (.sh files) in Windows requires Git for Windows to be installed.
To run a script in Windows:
- Go to the actiTIME installation folder.
- Right-click inside the actiTIME installation folder and click the ‘Git Bash Here’ option. Git terminal will be opened.
- Type into the Git terminal the ‘./’, the script name, the file extension (without spaces) and press Enter on the keyboard.
For example:
$ ./stop.sh
- Back up your database on your current server.
- Install actiTIME on your new server.
When installing actiTIME, set the same connection parameters to the external MySQL server you are currently using in the ‘user.config’ file.Your existing external MySQL server must allow connections from your new server where actiTIME is being installed.
- Uninstall actiTIME on your current server.
Do not uninstall your external MySQL server.
If you are currently using an external MySQL Server and want to use another MySQL server:
- Stop actiTIME.
Run the ‘stop.sh’ script from the actiTIME directory.$ ./stop.sh
Running shell scripts (.sh files) in Windows requires Git for Windows to be installed.
To run a script in Windows:
- Go to the actiTIME installation folder.
- Right-click inside the actiTIME installation folder and click the ‘Git Bash Here’ option. Git terminal will be opened.
- Type into the Git terminal the ‘./’, the script name, the file extension (without spaces) and press Enter on the keyboard.
For example:
$ ./stop.sh
- Back up your database on your current server. You will need the backup file later.
- Install actiTIME on your new server.
When installing actiTIME, set the connection parameters to a new external MySQL server in the ‘user.config’ file. - Restore an actiTIME database on your new server using the backup file previously created.
- Uninstall actiTIME on your current server.
After having successfully moved your actiTIME to the new server, do not forget to provide your users with the new link to access actiTIME.
I want to change configuration settings for actiTIME
Configuration settings for actiTIME (URL, database connection parameters, etc.) are defined in the ‘user.config’ file.
To change configuration settings, follow the instructions below.
For actiTIME v2022.0 and higher:
- Run the ‘stop.sh’ script from the actiTIME directory.
$ ./stop.sh
Running shell scripts (.sh files) in Windows requires Git for Windows to be installed.
To run a script in Windows:
- Go to the actiTIME installation folder.
- Right-click inside the actiTIME installation folder and click the ‘Git Bash Here’ option. Git terminal will be opened.
- Type into the Git terminal the ‘./’, the script name, the file extension (without spaces) and press Enter on the keyboard.
For example:
$ ./stop.sh
- Define new configuration settings (URL, database connection parameters, etc.) in the ‘user.config’ file.
- Run the ‘start.sh’ script from the actiTIME directory.
$ ./start.sh
New settings will be applied to actiTIME.
For the previous versions of actiTIME (up to v2021.1) you will need to reinstall actiTIME completely:
- Uninstall actiTIME.
Do not forget to back up your database prior to uninstalling. - Install actiTIME using the updated ‘user.config’ file where the new parameters (URL, database connection parameters, etc.) are configured.
I want to use external MySQL server instead of internal
For actiTIME v2022.0 and higher:
Important: Switching from an external MySQL server to an internal one is not recommended and should only be done if you are experiencing issues with your external MySQL server. This process will create a new internal MySQL database, and you will need to restore your data from a backup.
To change the type of server from internal to external you will have to change configuration settings for actiTIME.
For more details, refer to: I want to change configuration settings for actiTIME.
For actiTIME v2021.0 and v2021.1:
To change the type of server from internal to external you will have to reinstall actiTIME.
- Copy the ‘user.config’ file from the current actiTIME directory to a new directory. You will need this file later.
- Back up your database. You will need the backup file later.
- Uninstall the existing actiTIME version: $ ./uninstall.sh The Docker environment should be kept intact:
- Install actiTIME in the directory of your choice.
When installing actiTIME:- Insert the ‘user.config’ file copied from your current actiTIME installation directory to the new one. This action allows you to use the same actiTIME configuration you have been using previously. Do not copy the ‘user.config’ file with MySQL connection parameters, or remove/comment out all MySQL-related parameters (MYSQL_HOST, MYSQL_PORT, MYSQL_SCHEMA, MYSQL_USER, MYSQL_PASSWORD, MYSQL_ROOT_PASSWORD) from ‘user.config’ if you want to preserve other settings.
- Choose using an external MySQL server and set the connection parameters to it in the ‘user.config’ file. The installation script will detect that MySQL parameters are not specified and will automatically configure internal MySQL with default settings (MYSQL_HOST=mysql, MYSQL_PORT=3306, MYSQL_SCHEMA=actitime, MYSQL_USER=actitime). New passwords for internal MySQL will be automatically generated during installation.
- Restore the actiTIME database using the backup file previously created.
Docker Desktop does not start
Error: Hardware assisted virtualization and data execution protection must be enabled in the BIOS.
Solution: Make sure that the BIOS-level hardware virtualization is enabled in the BIOS settings of your server. For more details, refer to: How can I enable BIOS-level hardware virtualization?
Error: WSL 2 is not installed. Install WSL using this PowerShell script (in an administrative PowerShell) and restart your computer before using Docker Desktop:
Enable-WindowsOptionalFeature -Online -FeatureName
$(“VirtualMachinePlatform”, “Microsoft-Windows-Subsystem-Linux”)
Solution: Make sure that the following Windows features are turned on: ‘Windows Subsystem for Linux’ and ‘Virtual Machine Platform’. You can turn it on using the PowerShell script provided in the error message or turn it on manually using the Control Panel.
In order to do this, go to Control Panel > Programs > Programs and Features > Turn Windows features on or off and turn the ‘Windows Subsystem for Linux’ and ‘Virtual Machine Platform’ features ON. After this, restart your computer for Docker Desktop to work correctly.
Note: If you are using Windows Server 2019+, you have to turn on only the ‘Windows Subsystem for Linux’ feature.
Error: Docker Desktop – Access Denied.
Solution: Docker Desktop displays this error if a Windows user is not part of the ‘docker-users’ group. If your admin account is different from your user account, add your user account to the ‘docker-users’ group. Run Computer Management as an administrator and navigate to Local Users and Groups > Groups > docker-users. Right-click to add the user to the group. Log out and log back in for the changes to take effect.
I get a ‘No connection with MySQL server’ error
Error: No connection with MySQL server on [MYSQL_HOST:MYSQL_PORT]. Review connection parameters.
Solution: Double-check the ‘MYSQL_HOST’ and ‘MYSQL_PORT’ parameters defined in the ‘user.config’ file in the actiTIME directory.
Note: Do not set the ‘MYSQL_HOST’ parameter to the ‘127.0.0.1’ or ‘localhost’ value. On Windows OS, you can use the ‘host.docker.internal’ value instead.
I get a ‘’log_bin_trust_function_creators’ global variable should be enabled’ error
Error: ‘application’ failed with error. ‘log_bin_trust_function_creators’ global variable should be enabled for proper operation of actiTIME. Please refer to actiTIME documentation on the website (Admin Guide – ‘Troubleshooting’ section).
Solution: Allow actiTIME to create stored functions in its database. To do this, run the following query in MySQL under the ‘root’ user account or under any other user account with SUPER privilege:
SET GLOBAL log_bin_trust_function_creators = 1;
Note: If necessary, you can revert this configuration change to the original value after having the required procedure completed (actiTIME installation, actiTIME upgrading, restoring actiTIME database).
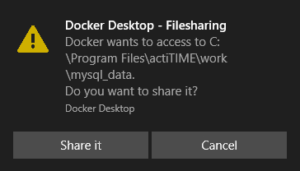
I get a ‘User declined directory sharing’ error
Error: Error response from daemon: user declined directory sharing [directory].
Solution: This error may occur after running the start.sh script if you do not give Docker access to the necessary files. Next time when asked to provide Docker with this permission, you should click on the ‘Share it’ button very quickly to provide access or the script will fail again. You may be asked to share files several times.
I get an ‘Access Denied’ error
Error: ERROR 1227 (42000): Access denied; you need (at least one of) the SUPER or SET_USER_ID privilege(s) for this operation.
Solution: Allow connections from any host or at least from ‘host.docker.internal’.
For example, run this command in MySQL:
GRANT ALL PRIVILEGES ON [MYSQL_SCHEMA].* TO '[MYSQL_USER]'@'%' IDENTIFIED BY '[MYSQL_PASSWORD]' WITH GRANT OPTION;
FLUSH PRIVILEGES;
where:
- [MYSQL_SCHEMA] – name of a database;
- [MYSQL_USER] – name of the user who has all the necessary rights to administer the database;
- [MYSQL_PASSWORD] – password of the MYSQL_USER.
I get a ‘Docker storage driver unsupported’ error
Error: Your Docker is using unsupported storage driver
Solution: Docker Desktop must use the ‘overlay2’ storage driver for actiTIME to work properly. If you see this error, you need to change the storage driver settings in Docker Desktop.
If your operation system is Windows, you can use one of the following methods:
Method 1. Using Docker Desktop Settings (Recommended)
- Open Docker Desktop.
- Click on the settings (gear) icon.
- Navigate to the Docker Engine.
- Deselect the ‘Use containerd for pulling and storing images’ box.
- Click Apply & Restart.
Method 2: Using the settings-store.json file
If you cannot access Docker Desktop settings, you can modify the configuration file directly:
- Close Docker Desktop completely.
- Navigate to the Docker Desktop settings directory on Windows: `%APPDATA%\Docker\settings-store.json`
- Open the settings file in a text editor.
- Find the UseContainerdSnapshotter paramater and set it to false: “UseContainerdSnapshotter”: false
- Save the file.
- Restart Docker Desktop.
The ‘containerd’ snapshotter uses a different storage driver that is not compatible with actiTIME. By disabling it, Docker Desktop will use the default ‘overlay2’ storage driver, which is required for actiTIME to function correctly.
For Linux use the instruction from the official website.
Before following the procedure ensure you meet all the prerequisites.
-
- Stop Docker: sudo systemctl stop docker
- Copy the contents of /var/lib/docker to a temporary location: cp -au /var/lib/docker /var/lib/docker.bk
- If you want to use a separate backing filesystem from the one used by /var/lib/, format the filesystem and mount it into /var/lib/docker. Make sure to add this mount to /etc/fstab to make it permanent.
- Edit /etc/docker/daemon.json. If it doesn’t yet exist, create it. Assuming that the file was empty, add the following contents.
- Start Docker: sudo systemctl start docker. The Docker won’t start if the daemon.json file contains invalid JSON.
- Verify that the daemon is using the overlay2 storage driver. Use the docker info command and look for Storage Driver and Backing filesystem.
{
“storage-driver”: “overlay2”
}docker info
Containers: 0
Images: 0
Storage Driver: overlay2
Backing Filesystem: xfs
Supports d_type: true
Native Overlay Diff: true
<…>
Docker is now using the overlay2 storage driver and has automatically created the overlay mount with the required lowerdir, upperdir, merged, and workdir constructs.The time in the actiTIME logs and database dump is incorrect
The time in the actiTIME logs and database dump may differ from your local time zone, as the time in these files is always provided in the UTC format which is used within the Docker container. Currently, this setting cannot be changed.
How can I enable BIOS-level hardware virtualization?
BIOS-level hardware virtualization should be enabled for operating Docker Desktop application on Windows OS. While most recent processors support hardware virtualization, not all computer vendors enable this feature as shipped from the factory.
To learn if the BIOS-level hardware virtualization is enabled on your computer, go to Task Manager > [More details] > Performance tab and check the ‘Virtualization’ feature. For Docker Desktop to operate correctly, this feature must be enabled.
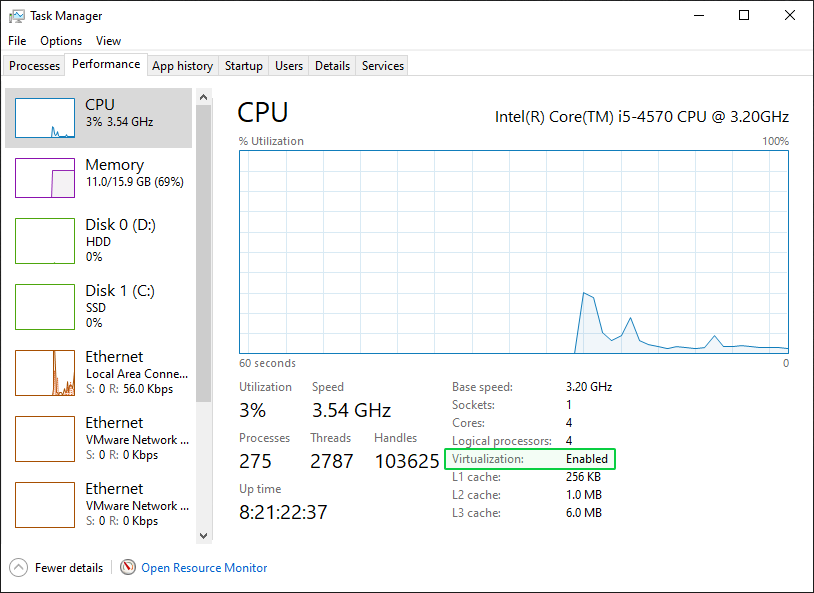
If the ‘Virtualization’ feature is not enabled, try the following:
- Reboot your computer.
- Right when the computer is coming up from the black screen, press Delete, Esc, F1, F2, or F4. Each computer manufacturer uses a different key but it may show a brief message at boot telling you which one to press. If you miss it the first time, reboot and try again. It helps to tap the key about twice a second when the computer is coming up. If you are not able to enter the BIOS via this method, consult your computer manual.
- In the BIOS settings, find the configuration items related to the CPU. These can be under the headings Processor, Chipset, or Northbridge.
- Enable virtualization; the setting may be called VT-x, AMD-V, SVM, or Vanderpool. Enable Intel VT-d or AMD IOMMU if the options are available.
- Save your changes and reboot.
If you are unable to find the Virtualization settings in your BIOS, it may mean that your processor does not support them. For Intel processors you can try to check it using Intel Processor Identification Utility.
How can I collect data for actiTIME support team?
actiTIME support team may ask you to provide some additional information on your installation and system to resolve your issue as soon as possible.
Additional information can be collected in either way:
-
- Automatically
To collect data automatically, run the ‘collect-support-data.sh’ script from the actiTIME directory.$ ./collect-support-data.sh
Running shell scripts (.sh files) in Windows requires Git for Windows to be installed.
To run a script in Windows:
- Go to the actiTIME installation folder.
- Right-click inside the actiTIME installation folder and click the ‘Git Bash Here’ option. Git terminal will be opened.
- Type into the Git terminal the ‘./’, the script name, the file extension (without spaces) and press Enter on the keyboard.
For example:
$ ./install.sh
The script will create an archive (‘support_data_[Date].tar.gz’) with the necessary information.
Send this archive to actiTIME support team for further investigation.Automatic collection is available in the most recent actiTIME versions only. If there is no 'collect-support-data.sh' script in the actiTIME directory, then you should collect the data manually.
- Manually
- Automatically
The following data should be collected manually:
-
-
- Name of the directory actiTIME is installed / is being installed into (for example, C:\Users\smith\Desktop\actitime);
- Version of actiTIME installed / being installed (for example, 2022.0);
- Previous version of actiTIME if you are trying to upgrade it (for example, 2019.1);
- Operating system (for example, Windows 10 Professional build 19043);
- If applicable, all error files (files with a ‘.err’ file extension);
- If applicable, the ‘user.config’ file;
- If applicable, the ‘actitime.config’ file from the ‘/work’ directory;
-
Send all collected information and files to the actiTIME support team for further investigation.
Uninstalling and Reinstalling Issues
If you have accidentally or intentionally run `uninstall.sh` and then attempted to reinstall actiTIME using `install.sh`, you may encounter the some issues.
Warning Message During Installation
Symptom: During installation, you see the “‘actitime.config’ file already exists. It will be overwritten” message.
This means:
- You previously had actiTIME installed in this directory.
- The `uninstall.sh` script removed containers and application files but preserved the `work/` directory containing configuration files.
- The existing `work/actitime.config` file will be replaced with a new configuration.
Solution:
- If you answered “n” (no) to overwriting: The installation will be aborted, and you can proceed with restoring your previous configuration.
- If you answered “y” (yes) to overwriting: Continue reading the sections below for potential issues and solutions.
MySQL Access Denied Error After Configuration Overwrite
Error: After agreeing to overwrite `actitime.config` and starting actiTIME, you encounter “‘application’ failed with error. MySQL server access denied for user ‘actitime’. Review MySQL credentials.”
When you overwrite `actitime.config`, new MySQL passwords are generated. However, the MySQL data directory (`work/mysql_data`) still contains databases created with the old passwords, causing authentication failure.
Solution:
For Internal MySQL Database
You can resolve the issue using one of the following methods:
Method 1: Restore Password from Configuration Backup
- Stop actiTIME (if running): `./stop.sh`
- Locate the configuration backup file, it backup was created automatically when you agreed to overwrite `actitime.config.`Look for files named `work/actitime.config.backup_YYYYMMDDHHMM` (where YYYYMMDDHHMM is the date/time of backup).
- Open the backup file: `work/actitime.config.backup_YYYYMMDDHHMM` and find the`MYSQL_PASSWORD=…` line.
- Copy the password value
- Open the current configuration: `work/actitime.config.`
- Replace the `MYSQL_PASSWORD` value with the one from the backup to restore the old password.
- Save the file.
- Start actiTIME: `./start.sh.`
Method 2: Reinstall actiTIME in a New Directory with Database Backup (Recommended)
- Ensure you have a database backup:
- Check the `work/backups/` directory for backup files created during uninstallation.
- If no backup exists, you may need to start with a fresh database.
- Extract actiTIME archive to a new directory (different from the current one).
- Perform fresh installation in the new directory: Run `./install.sh` in the new directory. Answer “n” when prompted to overwrite configuration (if such prompt appears).
- Copy your database backup file to the new directory.
- Run the `./restore_db.sh <backup_file>` in the new directory.
- Start actiTIME: `./start.sh.`
For External MySQL Database
Verify credentials in `user.config`:
- Open the`user.config` file
- Check that the following parameters match your previous installation:
`MYSQL_HOST` – MySQL server hostname or IP address
`MYSQL_PORT` – MySQL server port (usually 3306)
`MYSQL_SCHEMA` – Database name
`MYSQL_USER` – MySQL username
`MYSQL_PASSWORD` – MySQL password
Ensure database access:
- Verify that the specified user has proper permissions on the database.
- Test connection using MySQL client tools if necessary.
If credentials are correct but error persists:
- Check MySQL server logs for additional error details.
- Verify network connectivity to the MySQL server.
- Ensure MySQL server is running and accessible.
MySQL Failed to Start – Initialization Error
Symptom: After agreeing to overwrite `actitime.config` and starting actiTIME, you encounter: “‘mysql’ failed to start. Unknown error occurred while mysql initializing.”
You may aslo see various MySQL errors in the logs indicating configuration conflicts or incompatibilities.
This error occurs when there is a mismatch between MySQL configuration parameters and the existing MySQL data directory.
This typically happens when:
- You upgraded from an older version of actiTIME and then reinstalled.
- The MySQL data directory was created with different configuration settings than those currently specified.
- There are version or configuration incompatibilities between the existing MySQL data and the new MySQL configuration.
Solution:
- Stop actiTIME:`./stop.sh`
- Check the `work/backups/` directory for backup files. Backups are typically created automatically during uninstallation if actiTIME was running. Backup files are named: `actitime.sql.backup_YYYYMMDDHHMMSS.`
- Extract actiTIME archive in the new directory: Run `./install.sh` in the new directory. Answer “n” when prompted to overwrite configuration (if such prompt appears).
- Copy your database backup file to the new directory.
- Run the `./restore_db.sh <backup_file>` in the new directory.
- Start actiTIME: `./start.sh.`
If errors continue after following the above steps:
- Collect support data using `./collect-support-data.sh,`
- Contact actiTIME support with the collected data and error details.
- Provide information about: your previous actiTIME version, steps you performed (uninstall, reinstall), and the error messages and logs.
Prevention:
- Always create a database backup before uninstalling. Run the`./backup_db.sh <backup_file>` before executing `uninstall.sh.`
- When reinstalling after uninstallation, use a new directory to avoid configuration conflicts.
- Preserve configuration when possible. If reinstalling in the same directory, answer “n” when prompted to overwrite `actitime.config` to preserve existing credentials.
- Use upgrade process instead of reinstall. If you want to update actiTIME, use `upgrade.sh` instead of uninstalling and reinstalling.
