


Managing Users
User management in actiTIME requires permission to “Manage Accounts & Permissions.” It gives access to all system users and the entire work scope by default. Anyone with this permission is generally considered an admin user.
As an admin user, you can:
- Access and edit other users’ account information
- Manage their permissions
- Invite new users to the system
- Group them into departments and time zone groups
- Create new departments and time zone groups
- Disable or delete user accounts for terminated employees
Additionally, if you also have the “Manage Scope of Work” permission, you can:
- Assign work to any user in the User List → Work Assignments
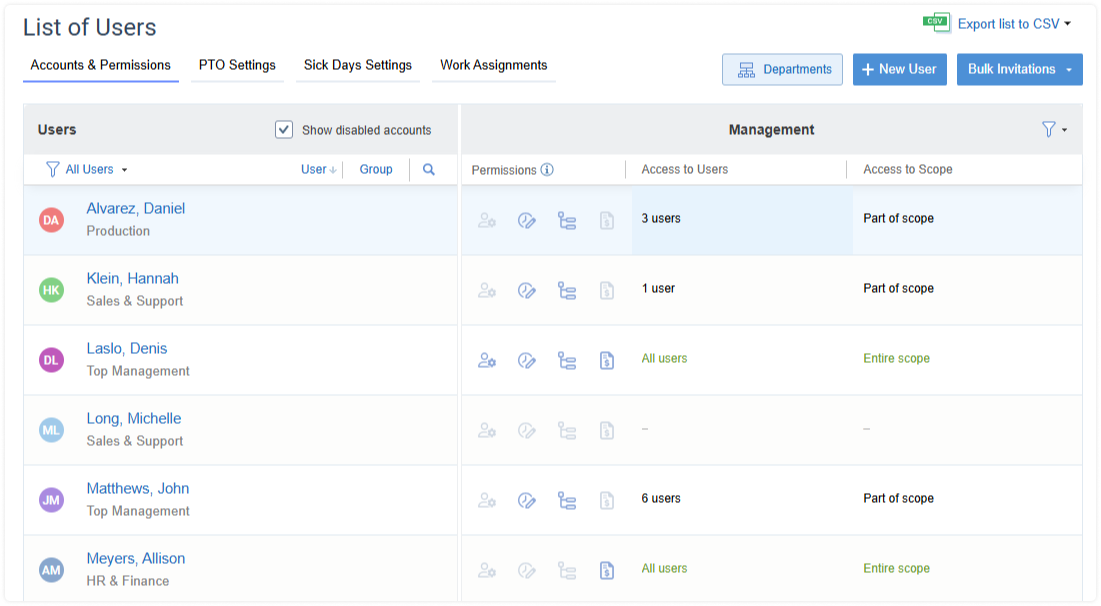
The Users tab is where you can review and manage all system users, as well as invite new ones:
When inviting new users, you can see the number of remaining accounts above the list of users.
Note that to increase the user count, you need to have the “Manage License” permission. Here’s how you can do it:
- Go to Settings (top right corner) → Licenses menu in your actiTIME. Here, you can view your license duration and current user count.
- Next, you have two options:
- To add more users in your current license period, click the Add User Accounts button.
- To add more users starting from the next license period, click Extend License. On the next screen, you will be able to change the number of users as required.
- Proceed to the next screen where you can enter payment details and arrange your purchase.
Here’s an overview of the PTO Settings tab and its option
How to Manage User Accounts
When you click the Users tab of the top menu, all the registered system users show up in the user list. From here, you can:
- Invite new users
- Manage accounts of existing users
- Disable and enable accounts
- Group users by departments and time zone groups
Any of these actions requires the “Manage Accounts & Permissions” right.
If you only have the “Manage Scope of Work” permission, then the Users tab gives you only one management option:
- Grant your team members access to work assignments
If you have the “Manage Cost & Billing Data” permission, it gives you only one, but very important user management option:
- Edit cost of work rates for your team members
User accounts marked with ![]() icon are integrated with actiPLANS, a leave time management tool.
icon are integrated with actiPLANS, a leave time management tool.
Regular users can access the list of users in the Accounts & Permissions tab without editing it. If you don’t want them to view this information, you can enable a special setting in the Settings → General Settings → Data Access Restrictions.
Inviting New Users
There are three ways to invite new users to actiTIME Online:
- Add users one by one – This is helpful when you need to create just a few new users and fully configure their accounts before inviting them to the system.
- Invite new users in bulk – This option requires you to fill out a simple bulk invitation form with basic user data (e.g., names, emails, permission templates). It speeds up the invitation process, yet if you need to add more info to users’ accounts (e.g., their hire dates and time zones), you will have to do it manually afterward.
- Import user data through CSV – This method allows you to create new users in bulk by uploading all the necessary data from a CSV document. Such import is much faster than adding new users one by one, and it doesn’t call for any further data edits like the simplified bulk invitation option described above.
To add users individually:
- Click the + New User button (top right of the Users screen).
- Fill out user details, such as first name, last name, and email.
- Use the option Copy settings from… and select a user whose settings you’d like to take, or configure everything from scratch.
- Define user’s permissions in the Permissions tab.
- Next, click Save & Send Invitation. Your colleague will receive an email with the link to access actiTIME and configure their password. This is a necessary step in order to activate their account.
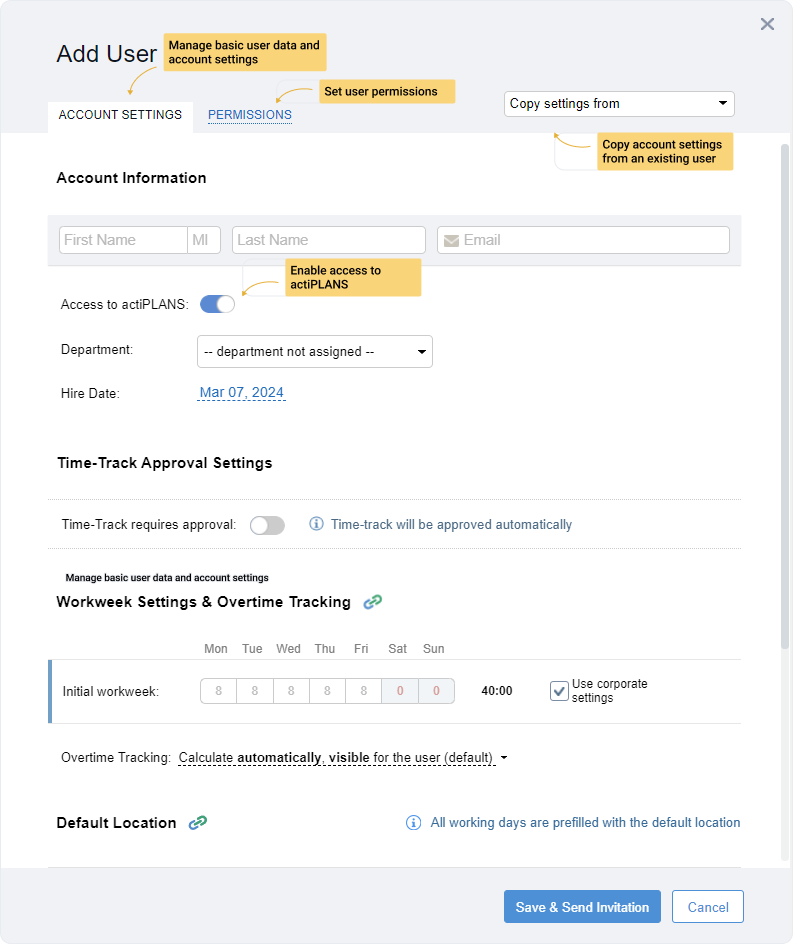
Note that you can edit this data later at any time. For more details, see the Managing User’s Account Data.
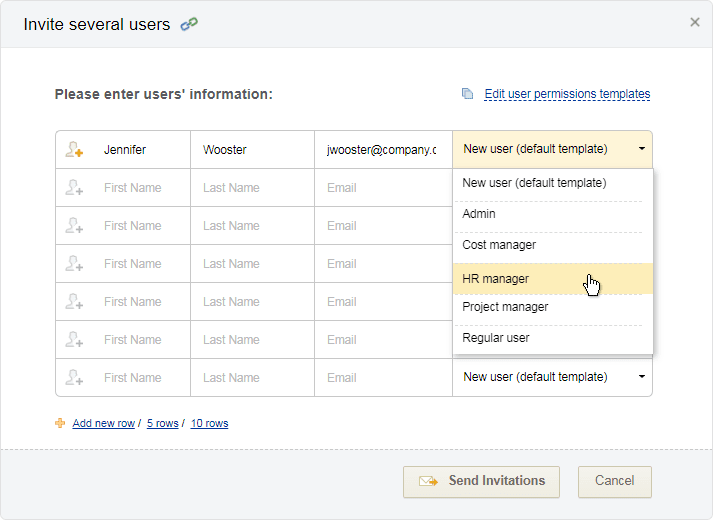
To invite multiple users at once, proceed as follows:
- Open Bulk Invitations → Invite Several Users.
- In the invitation form, enter users’ first and last names and emails.
- Apply the permission template by choosing it from the drop-down menu. You can also review and modify templates right away by clicking the Edit user permissions template option.
- Click the Send Invitations button. Each of your coworkers will receive a personal invitation to the system to activate their account.
New users’ profiles will be instantly added to the user list. You can then configure users’ personal settings, such as hire date, workweek schedule or pay rates:
- Go back to the User List → Accounts & Permissions.
- Click on the user in question and edit their account settings.
Lastly, to import user data from a CSV file, follow these steps:
- Click Bulk Invitations → Import Users from CSV
- Download our sample CSV to organize your user data correctly
- Upload the created file to the system
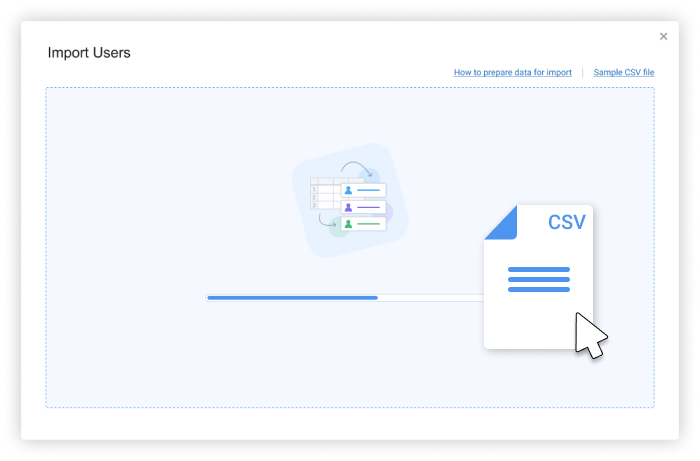
Once the import process is completed, new users will immediately appear in the Users interface, where you may edit or delete their accounts whenever needed.
Enabling, Disabling and Deleting Users
In the Account Settings tab of a user profile, you can enable, disable and delete system users.
To disable or enable a user, turn off or on their access to actiTIME:
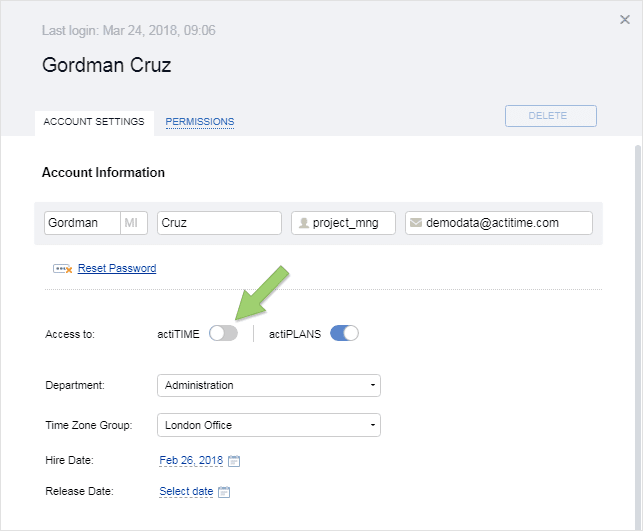
When you disable a user:
- They cannot access actiTIME. Disable a user if you don’t want them to see and edit any data in the system (e.g. employees who left the company).
- They are not included in the total user count. Disable an unnecessary user account to free up a user seat.
- All their time-tracking data and comments are kept in the system for reporting purposes. This is to ensure that your historical reports are correct.
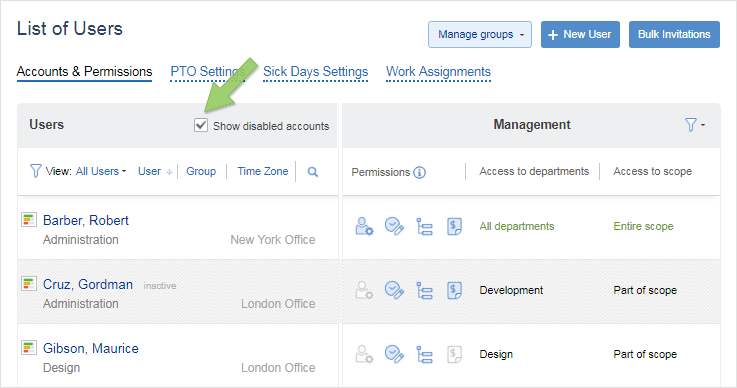
Disabled user accounts are marked with a gray background. Use the checkbox in the Users interface to see disabled accounts:
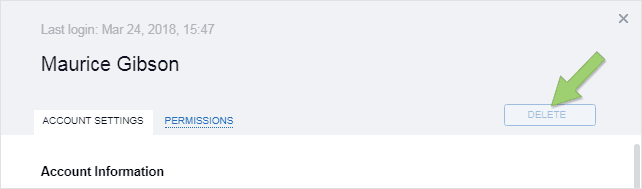
To delete a user, use the button in the top right part of the user’s Account Settings.
Managing User’s Account Data
To manage user account information, go to the User List → Accounts & Permissions tab and click the user in question. The account settings panel will open.
Here you can edit the following parameters:
- Basic account data: first, middle and last name, username and email. You can also reset the user’s password by clicking the Reset Password link.
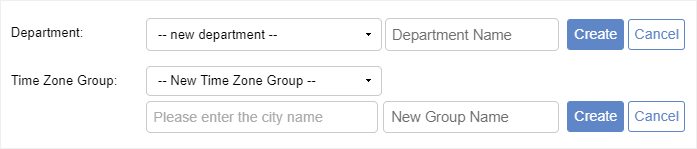
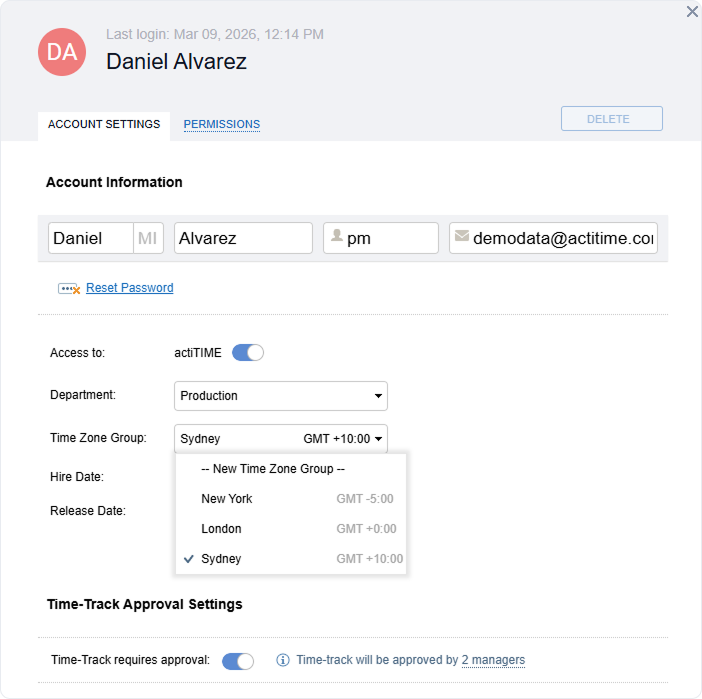
- Department and time zone group – You can keep the department unassigned. Time zone group, if not assigned specifically, is set to the default group as configured in the Settings → General Settings. Both for departments and time zone groups, you can choose from the existing ones or create a new group right in the user’s account settings.
- Hire and release date – By default, the hire date is set to the day when a user’s account has been created, but you can change it at any time.
- Approval settings – Here you can choose whether a user’s time-track will be approved by their manager or automatically.
- Workweek schedule – Tick the checkbox Use corporate settings to apply the system setting or configure an individual schedule. Simply click on the cell to edit the number of work hours on each day:
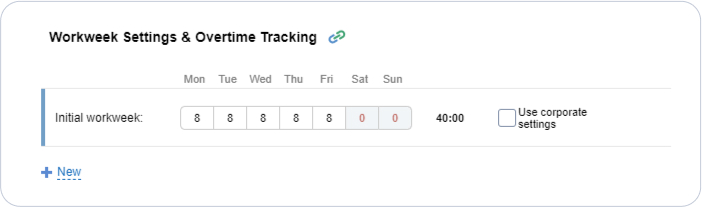
New schedules are applied from the day they have been edited.
- Overtime setting – Tick the checkbox Use corporate settings to apply the system setting, or choose an individual overtime calculation mode for the user. This setting is available when Overtime Registration feature is enabled in the Turn Features On / Off interface. Overtime calculation mode can be one of the following:
- Disabled – Overtime is not calculated, and the section for entering overtime is hidden in the user’s Enter Time-Track interface.
- Automatic calculation, hidden from the user – Overtime is calculated and can be seen on reports, but the section displaying overtime is not shown in the user’s Enter Time-Track interface.
- Automatic calculation, visible for the user – The section displaying overtime is shown in the user’s Enter Time-Track interface, but the user cannot modify the automatically calculated values.
- Allow user to enter overtime manually – The section displaying overtime is shown in the user’s Enter Time-Track interface, and the user can enter the overtime manually.
- Default location – Locations are the bespoke entities helping you track where your employees work every day. In the Locations interface, you can add multiple custom locations to your account and establish one of them as a default option for the entire team. Besides, it’s possible to set a default location for each user individually. You can do so via the Default Location section of user settings.
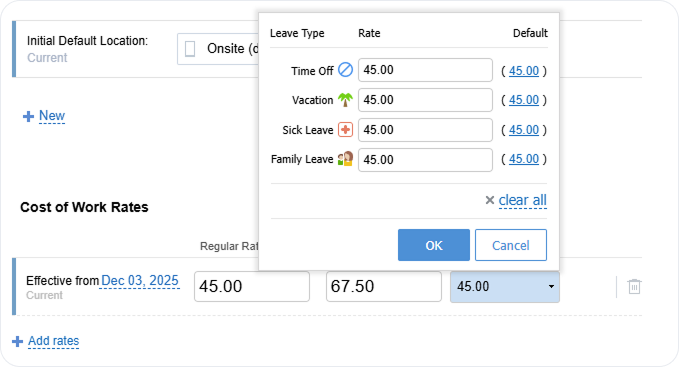
- Cost of work rates – These hourly rates can be used for calculating salaries, leave pay and overtime pay. They are available when the User Rates & Cost of Work Report feature is enabled in the Turn Features On / Off interface. The available cost of work rates include:
- Regular rate – Rate for the regular working hours.
- Overtime rate – Rate for the overtime hours. Note that it can be entered only when overtime tracking is enabled for the user.
- Leave time rates – Rates for all active leave types registered in the system.
New rates are applied starting from the date they have been edited.
- User permissions – Use the Permissions tab to grant and revoke user’s permissions, allowing them to access certain work scope and user information. For more details, see How to Manage Permissions section.
How to Manage Permissions
Watch our short video on how to manage user permissions in actiTIME.
User permissions are used to control what exactly functionality and data users are allowed to access in actiTIME. There are no specific roles: you are free to set up any permission sets as required for your process.
However, for easier reference we will also use the following terms:
- Regular users who only have the “Enter Time-Track” permission.
- Managers who have one or several management permissions. They might also have a team assigned to them (but not necessarily).
- Admin users who have the “Manage Accounts & Permissions” or “Manage System Settings” permissions, or both.
To manage other users’ permissions, you need to have the “Manage Accounts & Permissions” right.
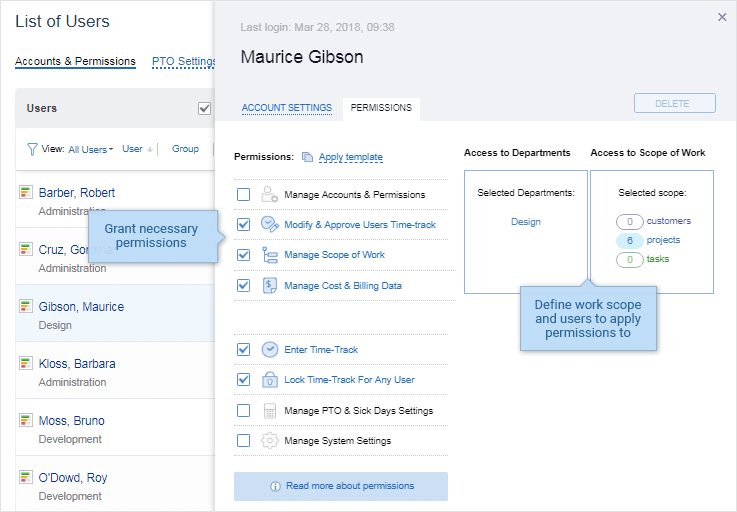
The Users tab is where you can grant, revoke or edit existing permissions. Click the user’s name and go to the Account Settings → Permissions.
First, there is a group of four management permissions. Each of them can be applied to the specific work scope and users.
- Create new users
- Manage user profiles
- Manage user permissions
- Run all time reports
- Run the Custom Fields Report
All system users and the entire work scope (by default)
- Create, edit and delete customers, projects and tasks within the assigned scope
- Assign work to your team members
- Run selected time reports
- Run the Custom Fields Report
- Create and edit time budgets for customers, projects, and tasks within the assigned scope
- Access, edit and approve timesheets of your team members
- Run the Custom Fields Report and all time reports for your team members
- Run cost & billing reports for your team members
- Edit users’ cost of work rates for your team members
- Edit types of work for tasks within assigned scope
- Run the Custom Fields Report and several time reports
- Create and edit time, cost, and billing budgets for customers, projects, and tasks within the assigned scope
Cells marked with * (asterisk) mean that access levels for these permissions can be additionally modified in the General Settings → Data Access Restrictions.
To grant permission:
- Tick the checkbox next to the required permission.
- Configure access to specific users by clicking Access to Users and selecting specific users or teams.
For the “Manage Scope of Work” permission, you can skip this step altogether if the user doesn’t need the ability to assign work to other users.
- Configure access to specific scope of work by clicking Access to Scope of Work and selecting specific customers, projects or tasks. If a user has the “Enter Time-Track” permission, this scope will be automatically added to a user’s work assignments.
Note that when you set up access to users and scope, this setting is applied to all four permissions.
Other permissions that don’t have configurable access to work scope and users include the following:
- Enter work and leave time in the timesheet
- Run personal time reports
- Run the Custom Fields Report with personal data
Selected scope defined in work assignments and own data*
- Modify leave balance settings for all users
- Run selected time reports
- Configure the system settings and features
- Manage integration with actiPLANS
Cells marked with * (asterisk) mean that access levels for these permissions can be additionally modified in the General Settings → Data Access Restrictions section.
You can also give permission to manage the actiTIME license.
How else you can manage access to system data
Once you have set up permissions for all users, you can additionally fine-tune access levels in the Data Access Restrictions section of the General Settings. This requires the “Manage System Settings” permission.
Here you can extend or restrict access to certain information as described in the table below:
In the Enter Time-Track and View Time-Track interfaces, managers can see only total hours for tasks that are not included in their permission scope.
In the Enter Time-Track and View Time-Track interfaces, managers can see all time-track details for all tasks, no matter whether these tasks belong to the manager’s scope or not.
In the Lock Time-Track interface, managers with the “Lock Time-Track” permission see only time totals without details on specific tasks.
In the Lock Time-Track interface, managers with the “Lock Time-Track” permission see all time-track details for all users.
Regular users don’t see any other users in the Account Settings interface. Managers can see users from their team only.
In the Users interface on the Account Settings tab, anyone can see the list of all users.
In the Enter Time-Track and View Time-Track interfaces, managers with the “Modify & Approve Users’ Time-Track” permission can view and edit time-track of all users from their team (both auto- and manually approved).
In the Enter Time-Track and View Time-Track interfaces, managers with the “Modify & Approve Users’ Time-Track” permission can edit time-track only for manually approved users from their team.
Who can grant permissions and define permission scope?
Managers with the “Manage Accounts & Permissions” right can grant permissions to any user and decide what scope and what team a user will be able to access under these permissions.
Who can configure additional data visibility settings?
Admin users with the “Manage System Settings” right can configure data visibility levels in the Data Access Restrictions section of General Settings.
How to Manage Paid Time Off and Sick Days Settings
- How to manage individual leave balance settings
- How to configure automatic accrual rules
- How to set the rejection of leave requests on a low balance
- How to correct balance manually
- How edited leave time affects users’ PTO & sick days balances
Paid Time Off (PTO) and Sick Days mean paid leave time provided to an employee as a part of the employment contract. Each employee may have two separate banks of earned leave time. In actiTIME, such banks are called balances:
- PTO balance
- Sick days balance
Leave types available in the system can be tied to one of these balances (or to neither of them).
To make use of these features, make sure that PTO Balance Calculations and Sick Days Balance Calculations are turned ON in the Turn Features On / Off interface.
There are two different ways how you can manage leave balance settings:
- In Settings → General Settings interface. Here you can configure system settings that can be applied to all users by default. It requires the “Manage System Settings” permission.
- In the PTO Settings and Sick Days Settings tabs of the user list. Here you can:
- Set up individual leave accrual rules
- View leave balance history
- Manually adjust the balances
- Turn the PTO or Sick Days controls off for selected users
Any of these actions requires the “Manage PTO & Sick Days Settings” permission.
To configure leave pay rates, go to the User List → Account Settings tab and open a user’s profile. This requires “Manage Accounts & Permissions” or “Manage Cost & Billing Data” rights.
How to manage individual leave balance settings
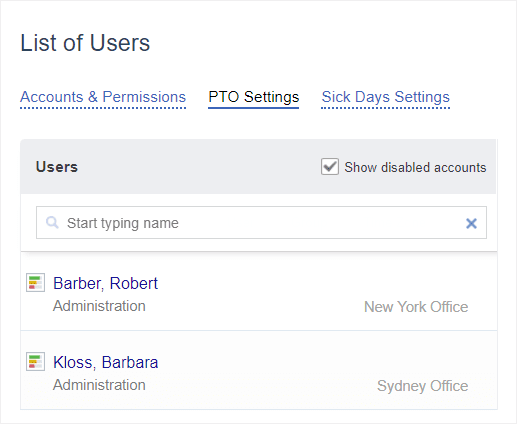
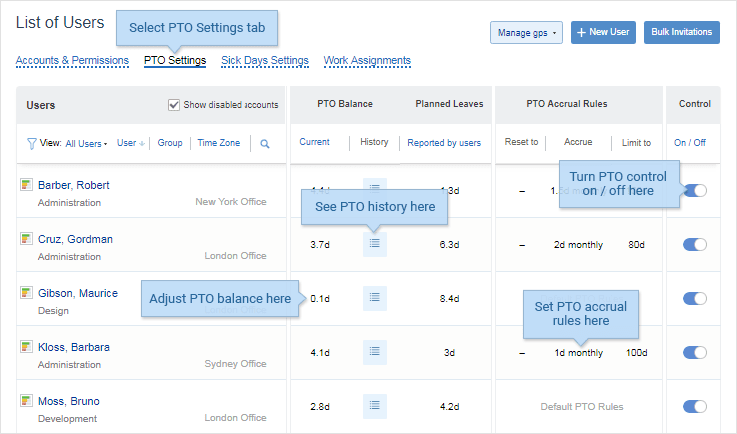
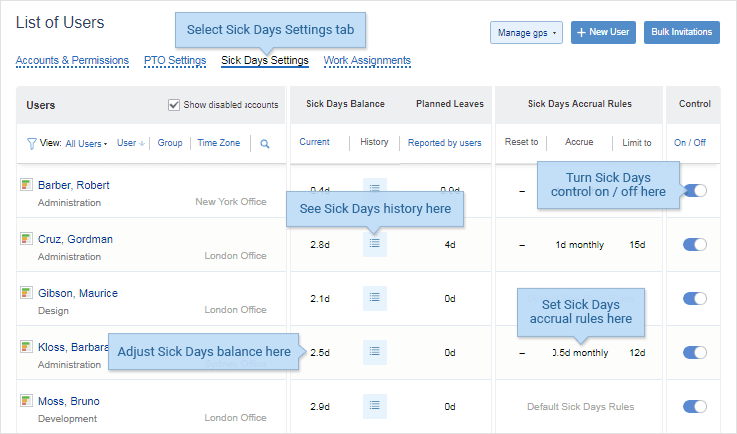
To manage users’ PTO settings, go to the User List → PTO Settings tab. Here’s what you can do:
- Find the user in question by typing their name in the search box or choosing them in the user selector.
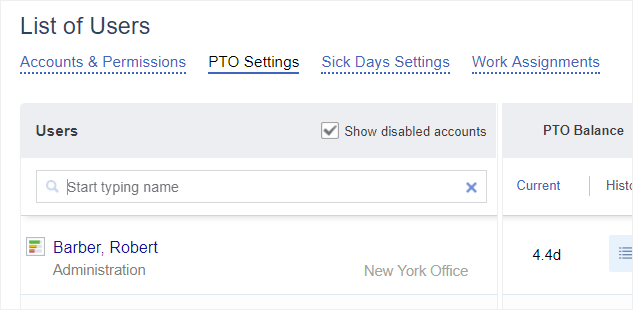
- Group users by departments or time zones for easier management.
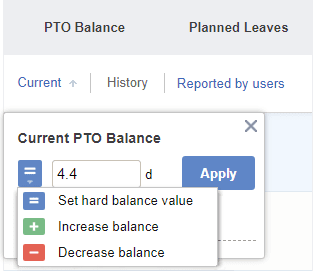
- Adjust the balance manually by clicking the cell with the current balance and selecting one of the options as shown below. Enter the required value and click Apply.
- Review the PTO Balance History by clicking the
 icon and exporting it to PDF.
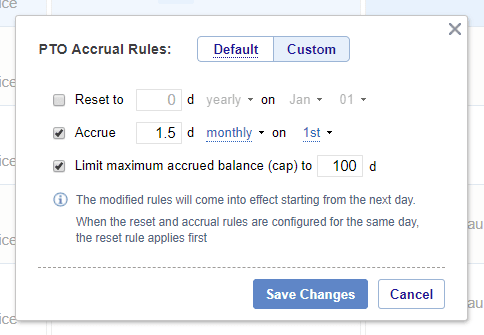
 - Configure accrual rules by clicking the rules cell and switching to the Custom tab. Enter the values as required and click Save Changes. Note that new rules will be applied the next day. For more details, read How to configure automatic accrual rules below.
- Turn the PTO control on or off by clicking the switcher. Note that you can turn the PTO control on, and switch the Sick Days control off for any user, and vice versa. This won’t affect other users’ settings.
Here’s an overview of the PTO Settings tab and its options:
To manage users’ Sick Days Settings, go to the User List → Sick Days Settings tab. The controls and layout are identical to the PTO Settings tab.
How to configure automatic accrual rules
When you initially set up the system, you might need to adjust a user’s leave balances manually. After you configure accrual rules, all further calculations will be done automatically.
Accrual rules for PTO and sick days are set up in the corresponding tab of the Users interface. For both balances, the same options are available:
- Scheduled accrual of leave time (weekly, biweekly, monthly, yearly or on hire date). The system will periodically add the specified amount of days to a user’s balance. If you set the balance to be increased every 31st day of the month, then the actual accrual will be made on the last day of the month.
- Reset of leave time (yearly on or hire date). The system will reset user’s leave balance to the specified value (either 0 or some positive one). You can use this rule to give leave days to user in advance, for example, 12 days of PTO at the beginning of the year.
- Cap accrued leave time (limit maximum of accrued days / hours). Once a user’s leave balance reaches the set limit, all extra days earned above the limit will be discarded.
You can configure any combination of accrual rules. When all three rules trigger together on the same day (for example, on January 1), they are applied in the following order:
- Reset rule
- Accrual rule
- Leave time cap
Note that if you adjust any of these rules, the change will take effect on the following day after the changes were made.
How to set the rejection of leave requests on a low balance
If you don’t want employees to submit new leave requests when they don’t have enough time off accrued, you may set any preferable balance limit for their leave requests via General Settings → PTO Balance / Sick Days Balance → Balance limitation:
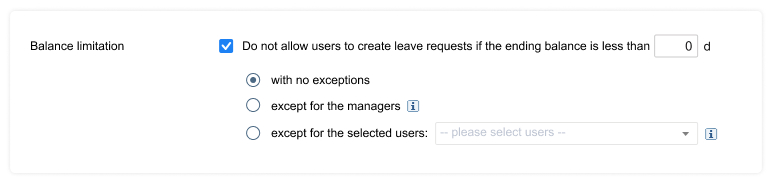
If the ending balance in a user’s leave request exceeds the specified balance threshold, it gets automatically rejected.
Besides, you can choose to whom the balance limitation rules will be applied:
- All users
- Selected users
- All users except managers
How to correct balance manually
Both for PTO and sick days, there are three types of manual corrections:
- Set hard balance value – Same thing as if the Reset rule has been applied. Use this correction when you know exactly how many PTO or sick days the user should have on the present date. Note that any leave time entered retrospectively before the hard balance adjustment will not affect the balance.
- Increase balance – Same thing as if an accrual rule has been applied. The current balance of the user is increased automatically for a certain number of days (hours). You may want to use this type of balance adjustment when you need to compensate employee overtime hours with PTO or sick days.
- Decrease balance – You can decrease the current balance of a user for a certain number of days (hours). You may want to use this type of PTO balance adjustment for an employee when this employee worked less time than expected in the previous period and did not create a leave time request for the missing time.
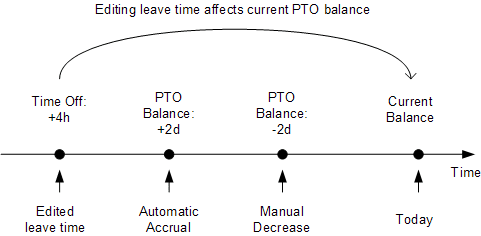
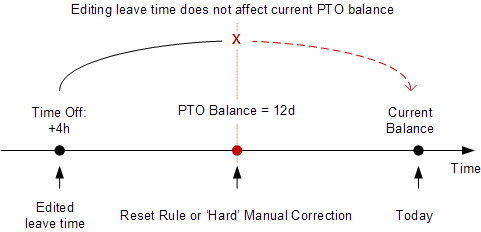
How edited leave time affects users’ PTO & sick days balances
Users can update, remove or add leave time in the Enter Time-Track interface. This can affect user’s leave balances when both conditions are met:
- No reset rules were triggered between the corrected leave time and the present date.
- There have been no manual “hard value” corrections in this period.
Here is how the balances can be affected:
- Additional leave time recorded for the past dates will be subtracted from the current PTO or sick days balance
- Decreased (or removed leave time) will be added (returned) to the current PTO or sick days balance
Likewise, leave time edits in the past will not affect the current PTO or sick days balance if:
- The reset rule was triggered between the corrected leave time and the present date, or
- There has been a manual “hard value” correction in this period.
Events that affect user’s PTO or sick days balances:
- The user records leave time for a leave type which is tied either to PTO or sick days balance.
- One of the automatic accrual rules is triggered.
- Manual correction of user’s PTO or sick days balance is made in the Users interface.
How to Manage Departments
When the Departments feature is turned ON in the system settings, you can join users into departments.
Each actiTIME user can belong to one department at a time. Users that are not associated with a specific department are referenced as “Users Without Department.” If you need additional grouping, for example by location, you can use the Time Zone Groups for that.
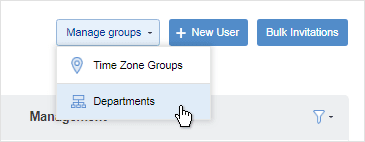
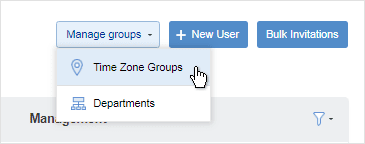
To manage departments, go to the Users tab, click the Manage Groups button (top right of the screen) and select Departments.
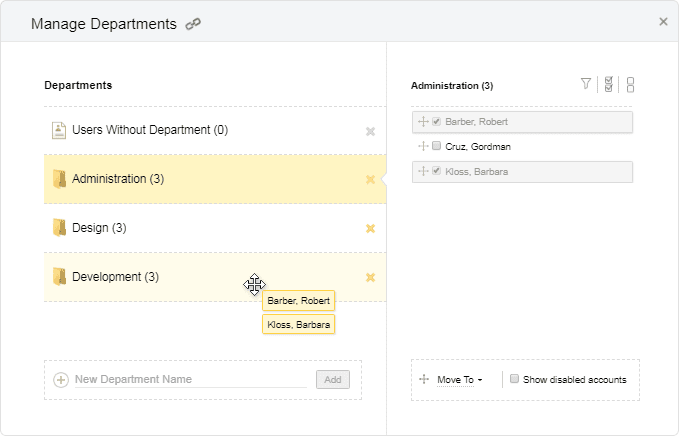
In the Manage Departments popup window, you can:
- Create new departments
- Rename and delete existing departments
- Move users between departments
Any of these actions requires the “Manage Accounts & Permissions” right.
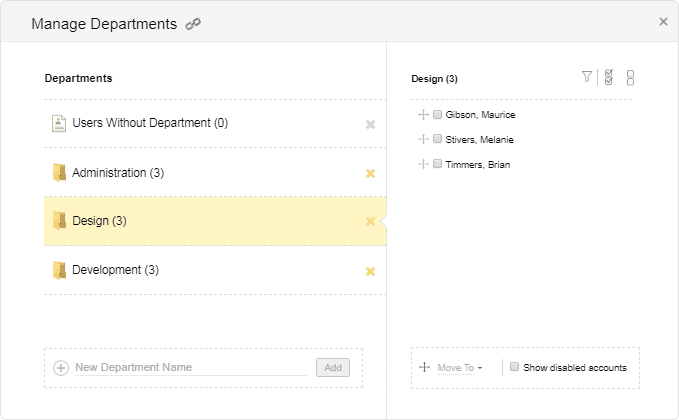
The left part of the popup lists all departments in alphabetical order. The number in brackets indicates how many active users there are in a department.
The right part of the popup lists all users from a specific department in alphabetical order. By default, only active users are shown. To view department members with disabled access, select the Show disabled accounts option below the user list.
Department is the default name.
You can enter a custom name for your departments in the system settings (e.g. Locations, Cost Centers, etc.) The specified name will be used in all actiTIME interfaces for referencing departments. See the Basic System Settings section for more information.
Create New Department
To create a new department:
- Click Manage Groups → Departments in the Users interface.
- Type the name of the new department in the text box at the bottom of the interface. Note that each department should have a unique name.
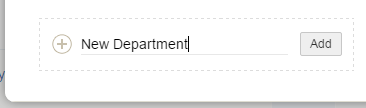
- Click Add or press the Enter key on the keyboard. The new department will be created and shown in the list of departments. Now you can add members to the newly created department.
Rename Department
To rename a department:
- Click Manage Groups → Departments in the Users interface.
- Click on the department name to edit.

- Edit the department name in the text box. Note that each department should have a unique name.
- Press the Enter key or click on the checkmark icon to save the modifications.
If you decided not to edit the selected department, click on the cross icon or press Escape on your keyboard.
Move Users Between Departments
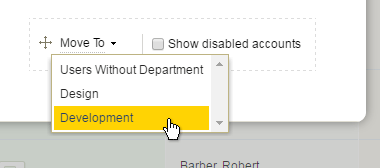
To move users from one department to another:
- Click Manage Groups → Departments in the Users interface.
- Select the department you want to move users from.
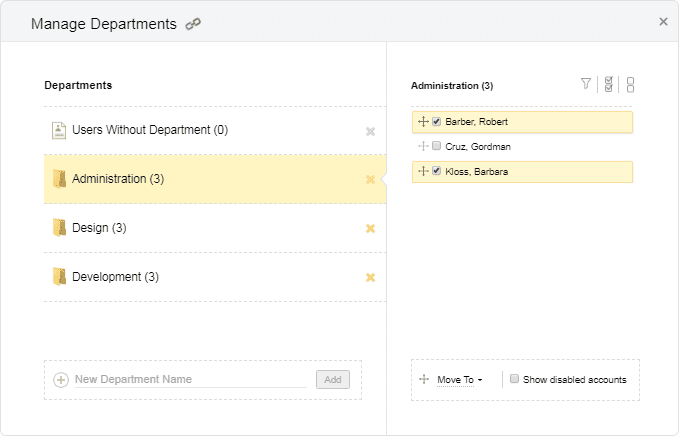
- In the right part of the interface, select the users to move and then drag and drop them to the target department.
Alternatively, select the target department in the Move To menu at the bottom of the interface.
Delete Department
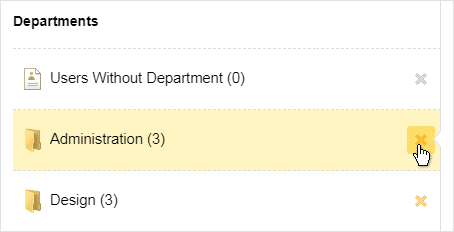
To delete a department:
- Click Manage Groups → Departments in the Users interface.
- Click on the cross icon next to the department name and confirm the deletion. Any users from this department will be moved to the Users Without Department group.
How to Manage Time Zone Groups
When the Time Zone Groups feature is enabled in the system settings, you can distribute users by time zone groups. This feature is useful for companies that have offices in different locations and need to group employees by offices.
Time zone groups provide an additional data grouping in reports so that you can compare and analyze time-track, cost and billing data of your company’s local offices.
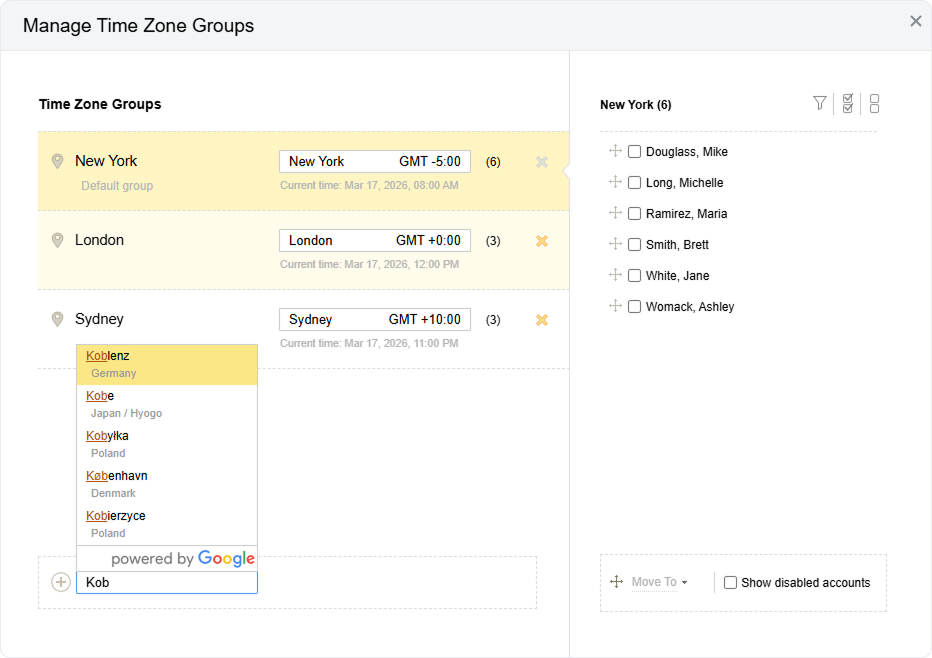
To manage time zone groups, go to the Users tab, click the Manage Groups button (top right of the screen) and select Time Zone Groups:
In the Manage Time Zone Groups pop-up window, you can:
- Create new time zone groups
- Rename and delete existing ones
- Move users between the groups
Any of these actions requires the “Manage Accounts & Permissions” right.
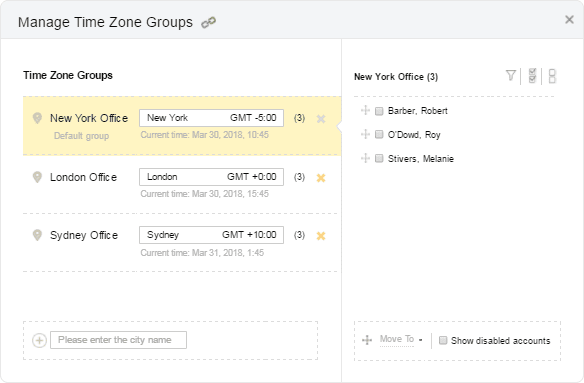
The left part of the popup lists all time zone groups in alphabetical order, starting with the default group. The number in brackets indicates how many active users there are in the group.
The right part lists all users within the selected group. By default, only active users are shown. If you need to see all users, select the “Show disabled accounts” checkbox in the bottom part of the window.
Default Time Zone Group
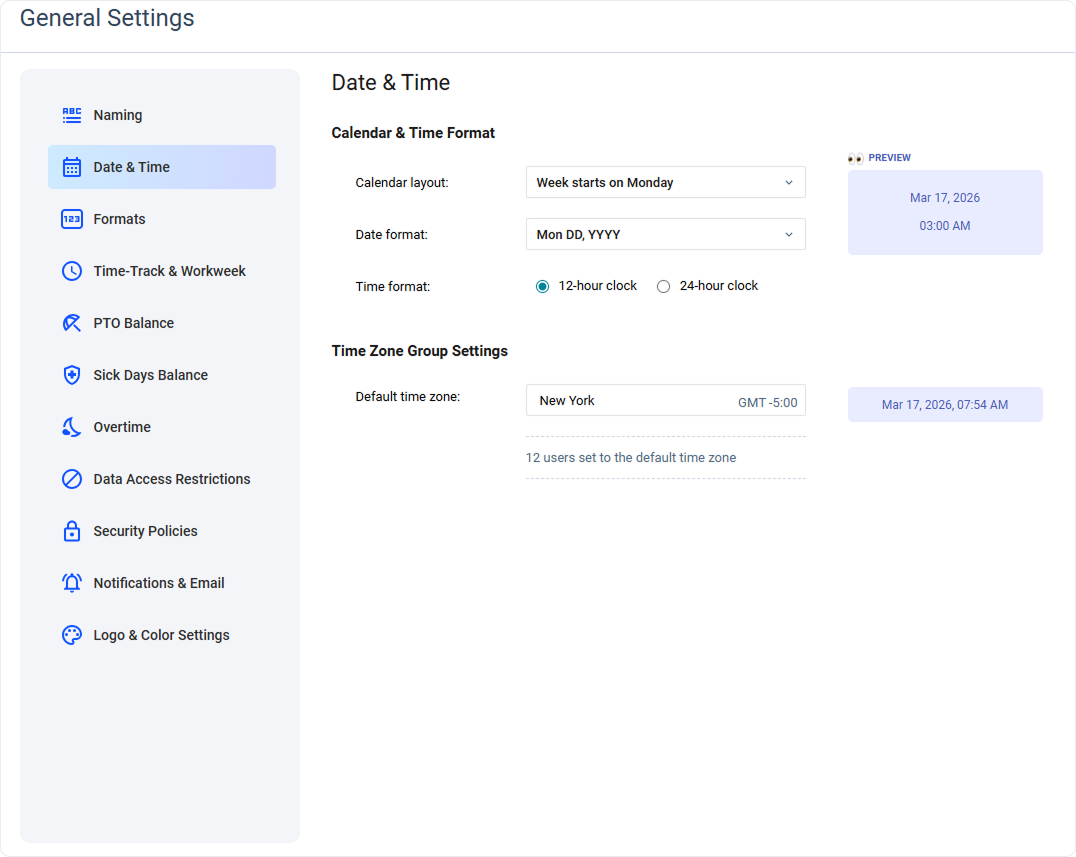
The default time zone group is set up in the Settings → General Settings → Date & Time. It is automatically applied to all new users added to the system.
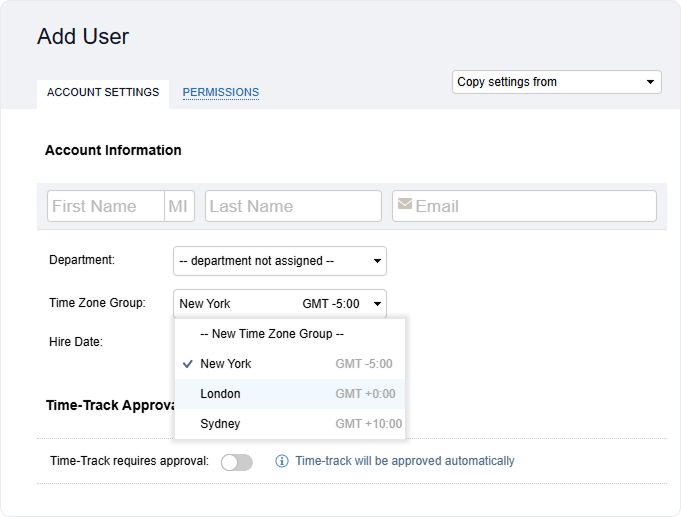
When creating a new user, you can also set up a time zone group different from the default one. In the Add User interface, select an existing time zone group or create a new one.
Create New Time Zone Group
To create a new time zone group:
- Click Manage Groups → Time Zone Groups in the Users interface.
- Start typing the city name in the text box at the bottom of the interface. Then select the city from the suggested list and click Add.
You can also create a new time zone group directly in the User’s Account Information panel when selecting user’s time zone group.
Modify Time Zone Groups
To modify an existing time zone group:
- Click Manage Groups → Time Zone Groups in the Users interface.
- Click on the time zone group to edit its name.
- Click on the displayed time zone (right box) and start typing the city name to select the new time zone.

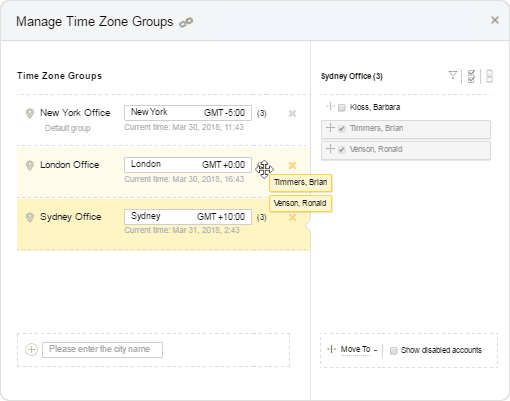
Move Users Between Time Zone Groups
To move users to another time zone group, you can use the Move To button in the bottom of the interface.
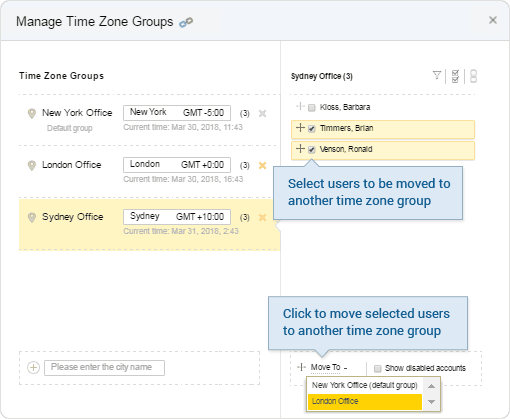
Or drag and drop selected users to another time zone group:
Delete Time Zone Groups
Click on the ![]() symbol to delete the time zone group and confirm the deletion. Any users from this group will be automatically moved to the default time zone group.
symbol to delete the time zone group and confirm the deletion. Any users from this group will be automatically moved to the default time zone group.
Please note that you cannot delete the default time zone group.
How to Export User Data
You can export information about the selected users in any (or all) datasets.
All the datasets include critical data points such as First Name, Middle Name, Last Name, Username, and Email. Other information in the list depends on the selected dataset.
Account Settings
- actiTIME Account (active/inactive)
- actiPLANS Account (active/inactive)
- Department
- Time Zone
- Hire Date
- Release Date
- Time-Track Approvers
- Current Workweek (h)
- Current Default Location
- Permissions
PTO&Sick Days
- PTO/Sick Days Control (on/off)
- Planned Leaves
- Current PTO/Sick Days Balance (d)
- PTO/Sick Days Accrual Rules
To export Account Settings data, you need the Manage Accounts & Permissions permissions. To export the PTO&Sick Days data, you need the Manage PTO & Sick Days Settings permissions.
1. Navigate to the Users tab.
2. Select the users you want to include in your CSV file by switching between All Users and Selected Users in the View column and ticking the respective boxes.
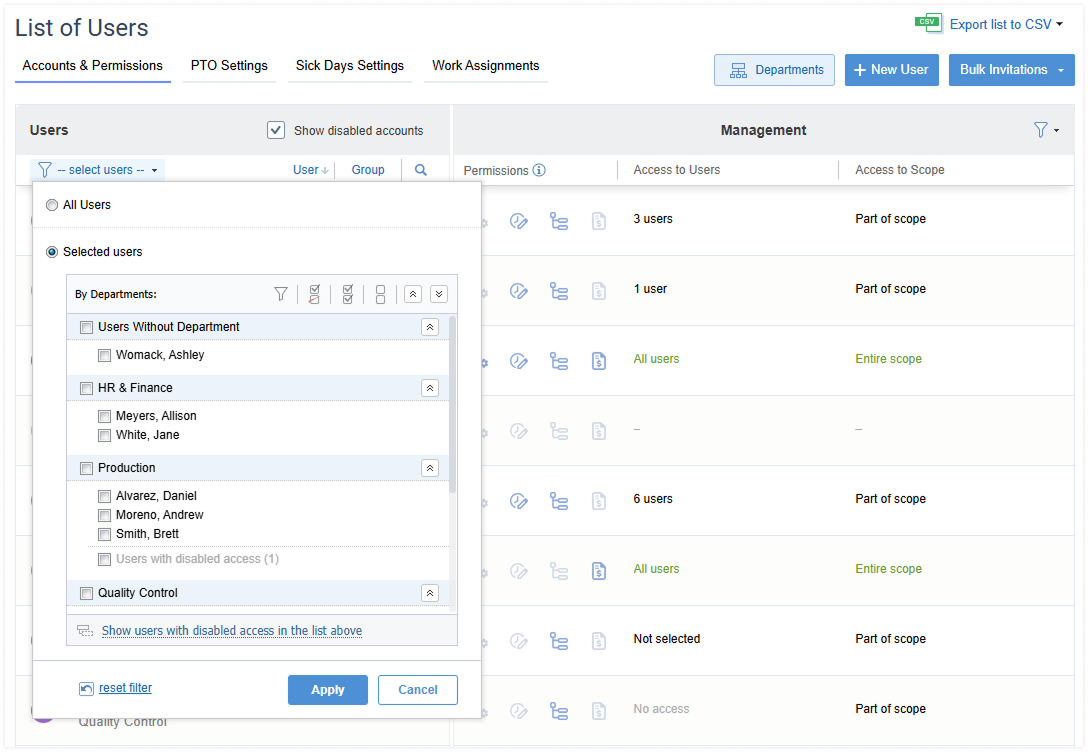
3. Click Export List to CSV and select the datasets to be exported. The download will start automatically.
Still have questions? Let us help you.
