Managing Timesheets
Watch our short video to learn how to track time and see your time-track results in actiTIME:
The web version of actiTIME has four key interfaces for managing your time tracking data:
- Enter Time-Track – It allows users to make manual time entries for the assigned tasks and supports two disparate data view formats – Timesheet View and Calendar View – which offer slightly different approaches to time tracking.
- View Time-Track – It allows regular users to review their reported time summaries or export them to PDF. Users with manager permissions can review their colleagues’ data here as well.
- Lock Time-Track – This interface is only available to users with manager permissions. It lets them lock others’ time entries in order to prevent further data editing.
- Approve Time-Track – Here, managers can approve / reject their employees’ timesheet data. Regular users don’t have access to this interface.
In addition to the above, actiTIME lets you:
- Record time and make comments manually or via an automatic timer in the mobile app.
- Track time using an automated timer extension for Google Chrome.
Timesheet View

The Timesheet View of the Enter Time-Track interface has a standard weekly timesheet format. Here, you can make a list of all the tasks you plan to work on during the week and then record the overall amount of time spent on each of them day by day in the designated slots.
The interface displays information on users’ total working time and overtime. Plus, it lets them track their leave time and locations in the upper section of the timesheet and attach comments to individual time entries.
Besides, the timesheet displays such vital task-related information as deadlines, estimates, progress statuses, etc. Each user has the option to either include or exclude these details in and from the view and choose one of many task-sorting variants.
To select which parameters you want to display, click on the Settings icon in the upper right corner of the screen and tick the respective boxes in the menu that opens.
Calendar View

This interface has a weekly calendar format with time cards and lets users log the exact time they started and stopped to work on different tasks.
Just like the Timesheet View, the Calendar View displays the info on users’ total working time, overtime, and leave time both for the entire week and on a day-by-day basis. You can also choose which task details to see on your time cards and add comments to them if necessary.
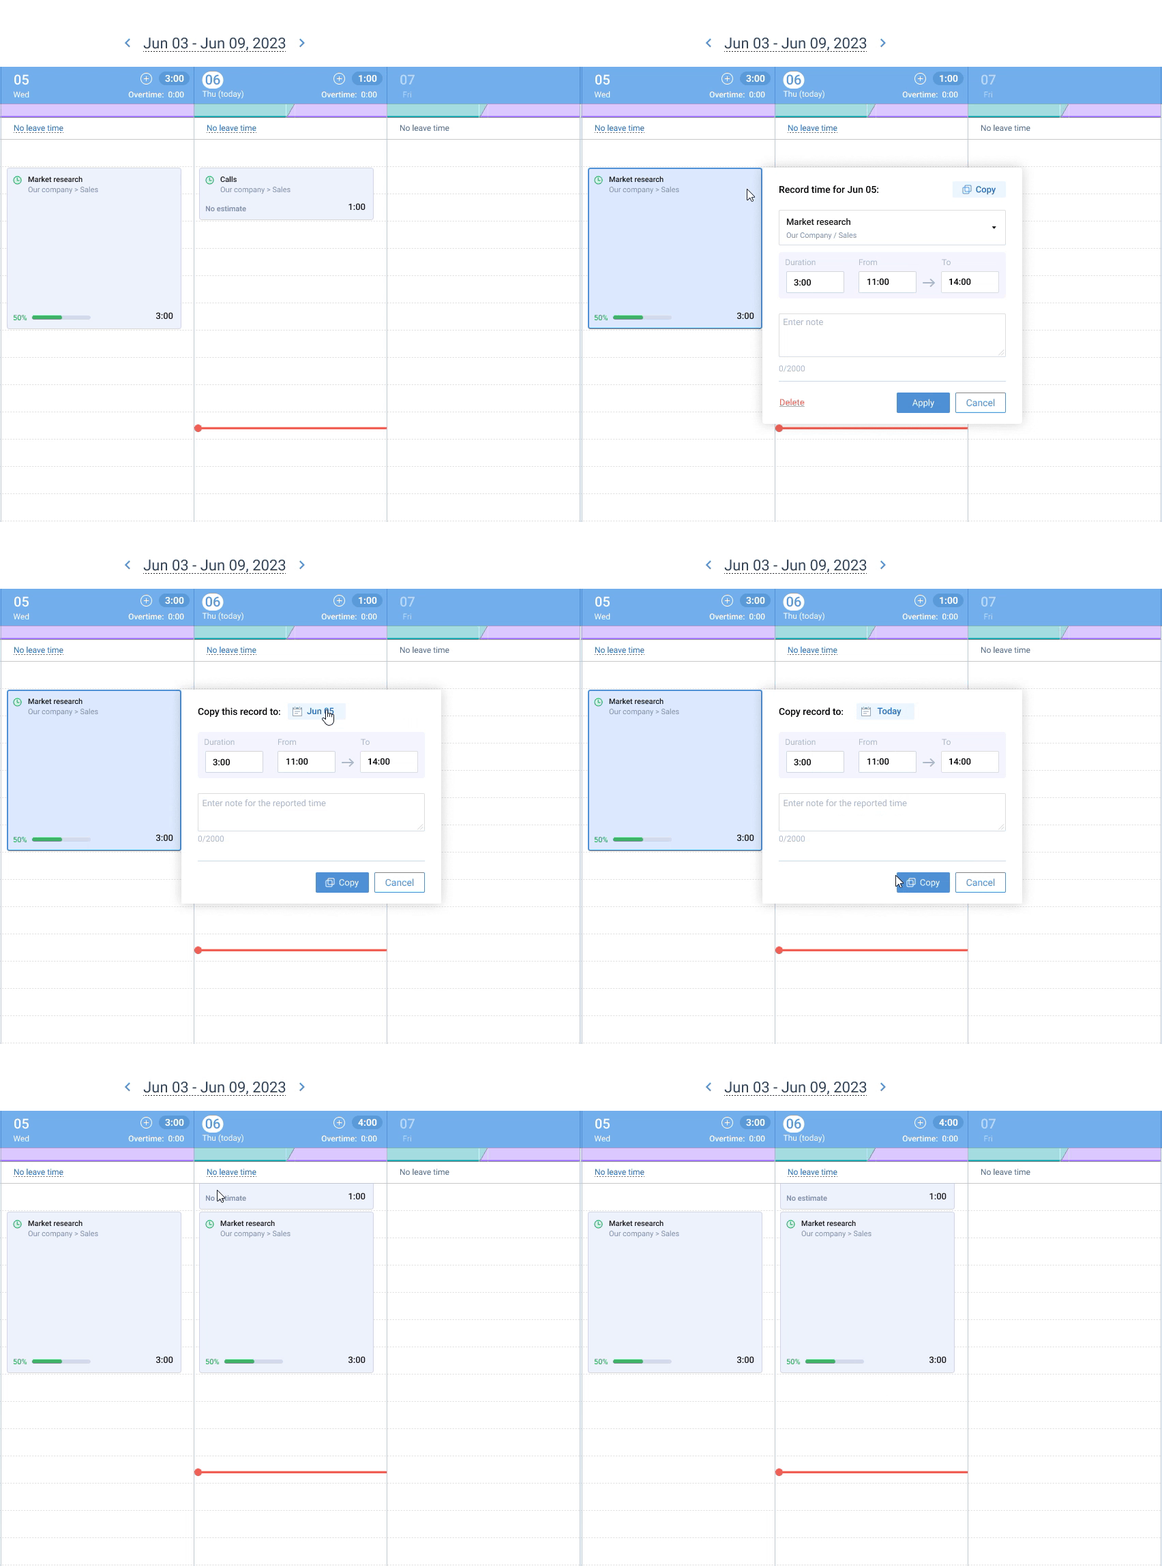
The created time cards are easy to move around the calendar thanks to the drag-and-drop feature. Besides, you can replicate already created time cards, which is convenient in case you work a similar amount of time on the same tasks throughout the week.
To make this happen:
- Click on the time card you want to duplicate.
- Hit the Copy button.
- Choose which date you want to paste the copied time card to.
- Modify the duration + the start and end time of the task, if necessary.
- Press the Copy button once more to save the results.
How to Enter & Submit Your Time
- Add Tasks to Your Weekly Timesheet / Calendar
- Add Tasks from the Previous Week
- Add Time Entries & Comments
With actiTIME, you can track work and leave time hours. Users with “Enter Time-Track” permission can enter work time for tasks assigned to them and track leave time for different leave types.
Add Tasks to Your Weekly Timesheet / Calendar
To start tracking working time, you need at least one open task assigned to you. And to add a task to the Timesheet View, you may choose one of the following options:
- Add task by name: Type the task name in the search box.
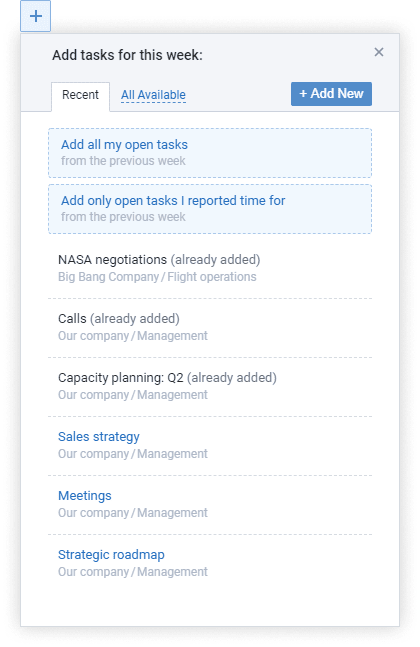
- Choose from Recent Task: Click the + button right next to the search box and choose a task from the Recent tab.
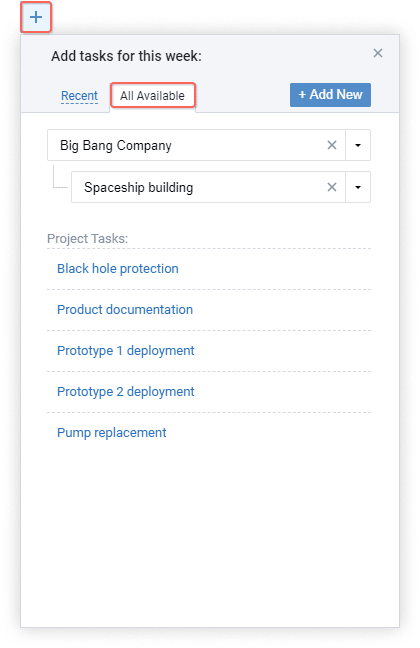
- Choose from All Available Tasks: Click the + button right next to the search box and then the All Available Tasks tab, select from the list of customers and projects and choose a task.
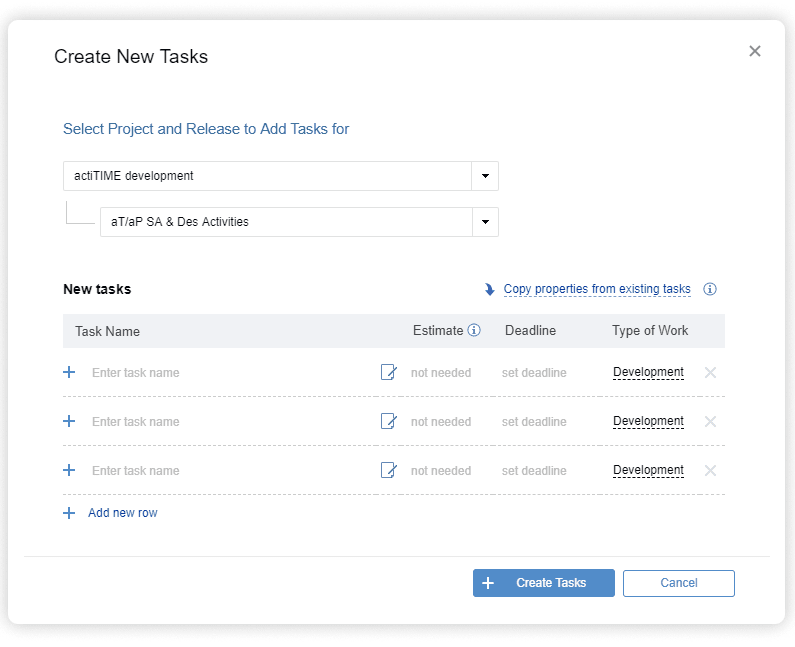
- Create a new task in the Enter Time-Track interface: Users with “Manage Scope of Work” permission are allowed to create new tasks. Click the + button right next to the search box, hit + Add New and set up one or more tasks in bulk. Hit the + Create Tasks button when you are done.
- Add a new task from the Tasks interface: It’s also possible to add new tasks to timesheets right from the Tasks interface. Open the task profile and click the Add to Timesheet button in the upper right corner of the window.

To add a task to the Calendar View, click on the + button either next to the necessary date or in a preferable time slot on the calendar and then choose one of the following options:
- Select an item from the list of recent tasks / all available tasks
- Add new tasks by clicking on the + Add New if you have the “Manage Scope of Work” permission

Add Tasks from the Previous Week
If you are going to work on the same tasks from the previous week, you can either add them manually or set up the default way to start a new week via the Timesheet View:
Add Tasks Manually
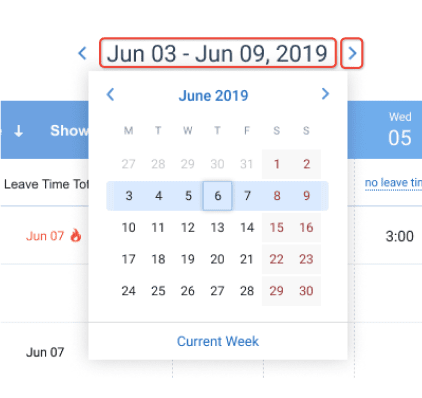
Step 1/2: Choose an upcoming week using arrows around the week dates or click the dates and choose a week from the calendar.
Step 2/2: Choose one of the options: “Only open tasks I reported time for” or “All my open tasks.”
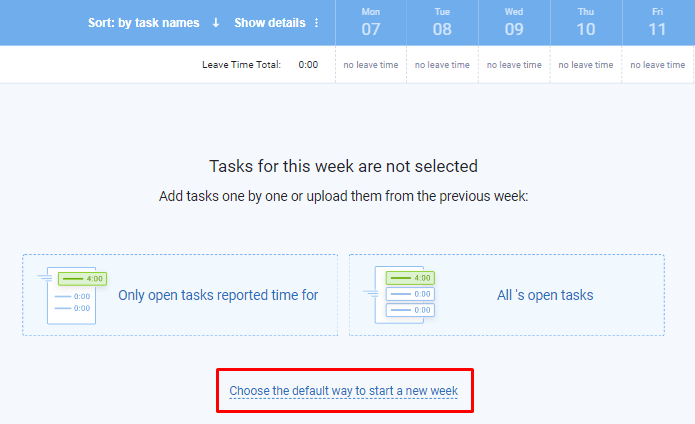
If there is only “All my open tasks” option: This means that there are no open tasks with logged time on your previous week’s timesheet that can be added to the selected week.
If there are no available options: This means that there are no open tasks on your previous week’s timesheet that can be added to the selected week.
Note:
In case you added an unnecessary task or tasks to the timesheet by accident using any of the abovementioned methods, you may easily rewind the action by clicking the Undo button.

Set Up the Default Way to Start a New Week
If you work on the same tasks every week, you can set up the default way to start a new week.
Step 1/2: Open a new weekly timesheet and click “Choose the default way to start a new week.”

Step 2/2: In the My Profile tab select “Always keep all tasks from the previous week” and save changes when you’re done.

Organize Your Tasks
Once your tasks are added to the Timesheet View, you have the option to arrange them in a way that is comfortable for you.
To set the sorting parameters and select exactly which parameters you want to display and whether you want to see your tasks grouped by Customers and Projects, click on the Settings icon in the upper right corner of the screen and tick the respective boxes in the menu that opens.
Available sorting options include the following:
- Name
- Project Name
- Customer Name
- Workflow status
- Deadline
- Priority
- Custom field
Available task details include the following:
- Workflow status
- Priority
- Customer & project name
- Estimate
- Variance
- Deadline
- Value
- Code
- Number of Comments
As for the Calendar View, you can choose to display the following task information on your time cards there:
- Estimate
- Estimate vs. progress variance (mh or %)
- Deadline
- Time interval
- Custom attributes
- Priority
- Additional details
Add Time Entries & Comments
Time Entry Formats
Using the Timesheet View, you can enter the number of hours and minutes in one of these formats:
- In HH:MM format: 2:30 means 2 hours and 30 minutes
- In decimal format: 2.5 means 2 hours and 30 minutes
After you finish editing a time entry, click anywhere on the page to save changes.
As for the Calendar View, it also allows you to log working hours using time intervals in two of the following formats:
- 24-clock format (e.g., from 9:00 to 17:00)
- 12-clock format (e.g., from 9 AM to 5 PM)
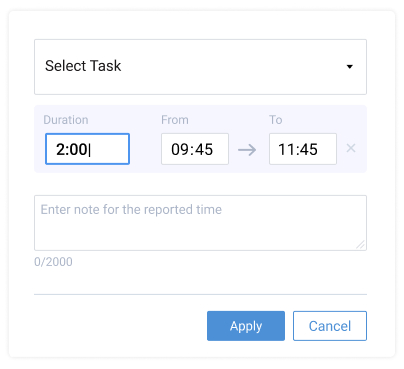
Admin users can set one of these options as a default clock format via General Settings → Date & Time Settings.
Comment Your Time Entries
If you hover above time entries in the Timesheet View, you’ll notice a comments icon. Click it to add a note. After you finish editing, click anywhere on the page to save changes.
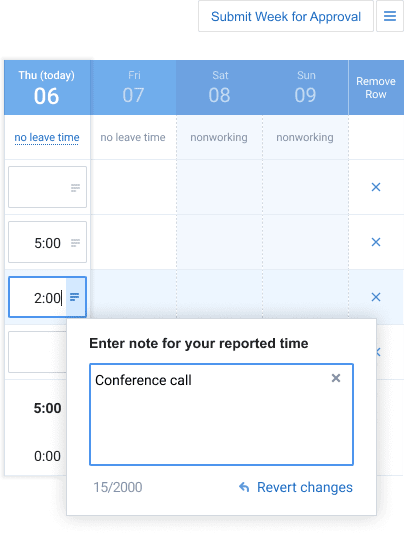
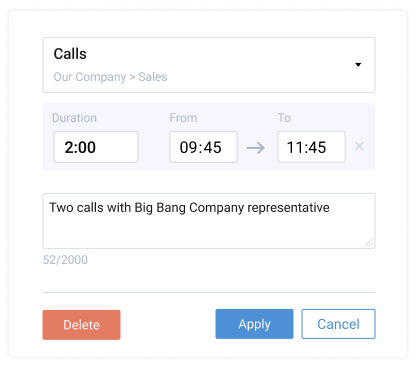
To add a comment to a time card in the Calendar View, either click on the already existing time card and write a note in the opened window or begin to create a new time card and add your note during the process.
Once done, click the Apply button to save changes.
Add Leave Time
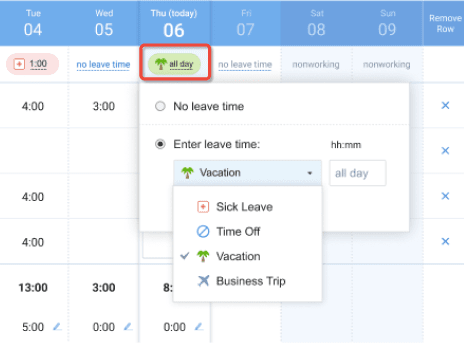
To enter leave time click the “No leave time” field.
Select “Enter leave time” option, choose from available leave types and enter absence time in HH:MM or decimal format. When you are done, click anywhere on the page to save changes automatically.
When a date is set as a PTO blackout day, users are not allowed to log time off for that date unless you grant some of them permission to do so via Data Access Restrictions.

Besides, you can allow users to log specific leave types during PTO blackout periods by specifying if it should be blocked or not via Leave Type settings:

Track Locations
Along with time off, you can schedule different locations (or other custom work-related entities, such as employee shifts, business events, etc.) in your actiTIME timesheet or calendar. Unlike leave types that clarify the reasons for employee absence, locations indicate where (or how and when) each team member is supposed to work.
To submit a location, an employee needs to:
- Click on the Locations section under the necessary date.
- Press + Add location to choose which item to schedule.
- Indicate how many hours to schedule it for.
- Click the Save button once done.

Submit Timesheet / Calendar for Approval
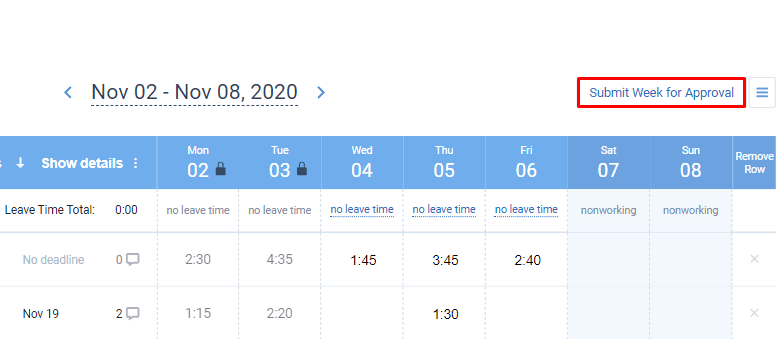
When your weekly timesheet / calendar is filled out, you may submit it for manager approval with a single click of the button if your company’s policy implies it.
Review Timesheet Summary and PTO & Sick Days Balances
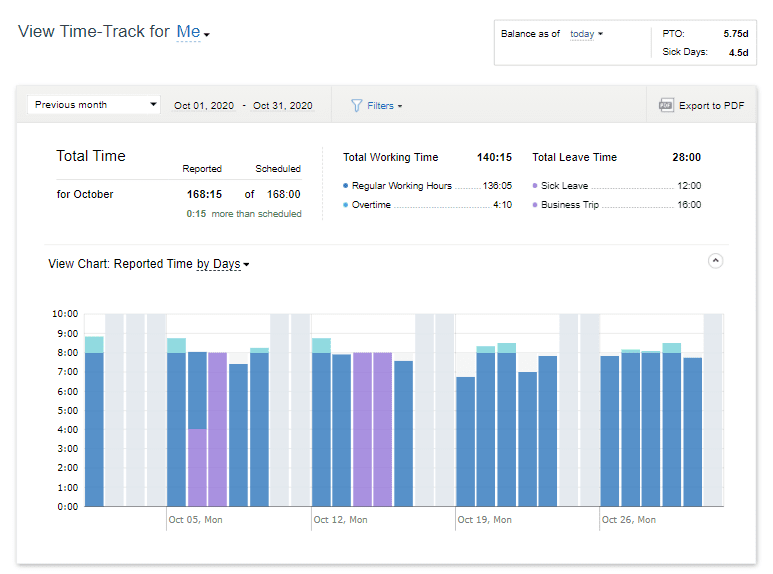
To review your time-track summary and current PTO and sick days balances, go to the View Time-Track tab. Set up a custom date range and use filters to adjust the view.
Note: The PTO and Sick Days balance above the chart is displayed as of the beginning the selected date.
Time Tracking Browser Extension
actiTIME offers a handy time tracking extension for web browsers – Time Management Assistant. It allows you to record online activities and the time spent on them in a fully automated way. It also features a one-click timer and a few productivity reports.
You can use the extension as a free stand-alone tool for personal productivity management or in sync with your actiTIME account.

Mobile Timesheet App
actiTIME also offers a native mobile app for iOS and Android where you can track work hours with notes and review your time log.

Learn more about what actiTIME mobile app can do here.
What if I can’t find any tasks in the list of available tasks?
In this case, no tasks have been assigned to you yet. Contact your manager and ask them to assign necessary tasks to your account.
What if I can’t enter leave time?
There are a few possible reasons for that:
- The Leave Time Tracking feature has been disabled.
- There are no available leave types in the system.
- This day is set up as a nonworking day.
- Your actiTIME is integrated with actiPLANS and therefore you are not be able to enter future leaves in actiTIME. In this case you can request and indicate future leaves in your actiPLANS account.
Contact your actiTIME administrator to enable necessary leave types. For more instructions, visit the Configuring actiTIME section.
How to Modify & Approve Users’ Time Entries
This video shows the approval and locking functionality of actiTIME in action, and demonstrates how you can review, edit, approve and lock your assigned users’ timesheets.
- Edit Assigned Users’ Time Entries
- Review Assigned Users’ Time Entries
- Approve Time Entries
- Grant Approving Permission
Every user can edit or delete their time entries as long as their timesheet or calendar hasn’t been locked.
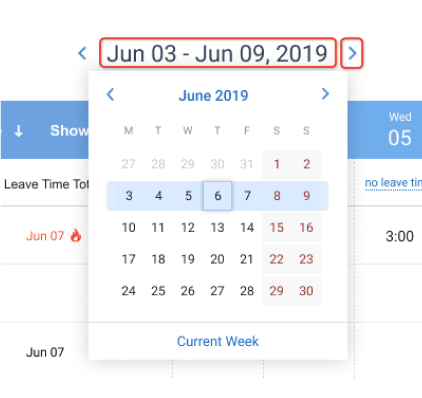
To see your time entries for the previous week, use navigation arrows or click on the dates located in the upper middle section of the interface and choose a week from the drop-down calendar as shown in the screenshot below:
If you edit an approved or rejected timesheet, its status will be rolled back to “Not Ready.”
Edit Assigned Users’ Time Entries
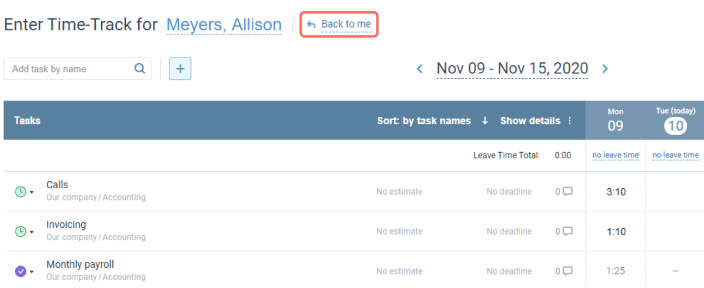
Managers with “Modify & Approve Users’ Time-Track” permission can review and edit time records of users assigned to them. To do that, go to the Enter Time-Track interface, click Me and use the drop-down menu to select from the list of users.

After you select a user, you’ll see their time entries and will be able to edit them as your own.
Note that managers can edit time entries only for tasks that belong to their management scope.
To go back to your timesheet / calendar, click Back to me right next to the user selector.
Review Assigned Users’ Time Entries
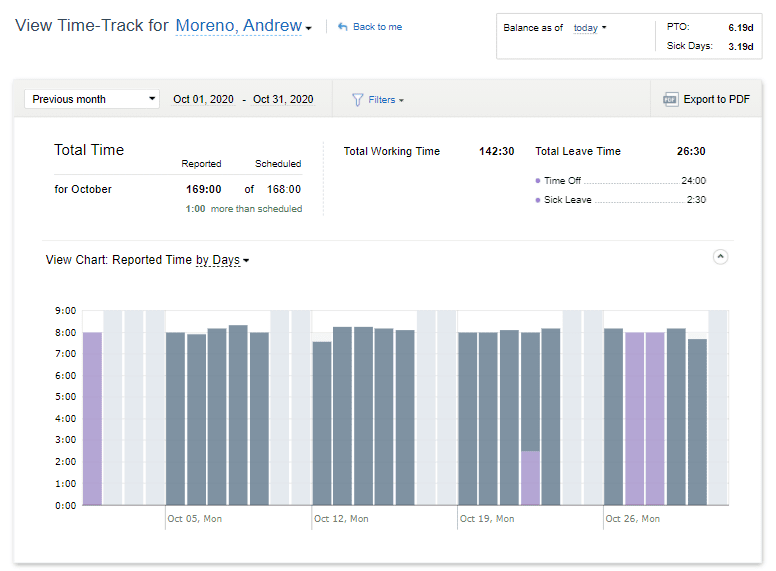
Managers can also review time entries of other users in the View Time-Track interface. Use the user selector to choose from a list of users assigned to you and change chart and time-track details settings to adjust the view.
Note: The PTO and Sick Days balance above the chart is displayed as of the beginning the selected date.
Approve Time Entries
Thanks to the Time-Track Approval feature, you can make sure that your team members’ time logs are correct.
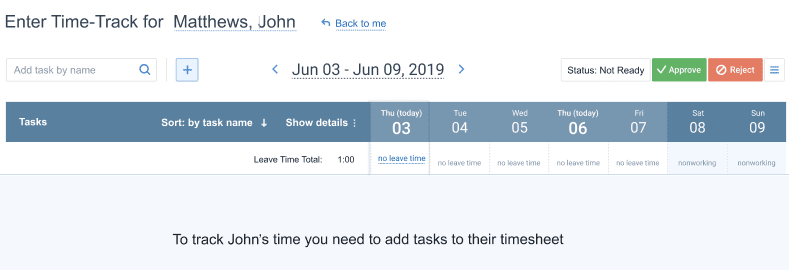
To enable this feature, go to Settings → Turn Features On / Off → Click on the slider next to Time-Track Approval.
There are two ways of how managers can see and manage timesheets submitted for approval:
- Directly from the Enter Time-Track interface. Select a user using the user selector, approve or reject their times entries either via the Timesheet View or the Calendar View. Their time-track status will be updated instantly.
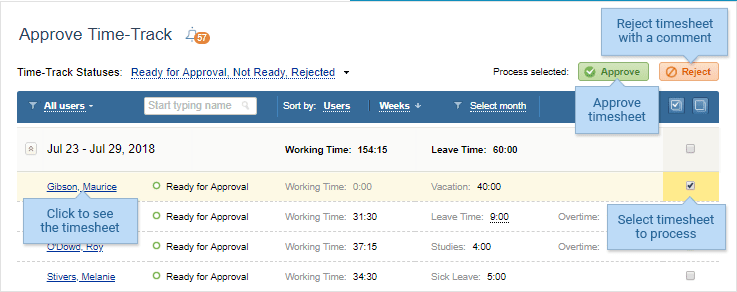
- From the Time-Track tab → Approve Time-Track interface.For more convenience, you can filter timesheets by status or search users by their names. Select one or several timesheets and click Approve or Reject.
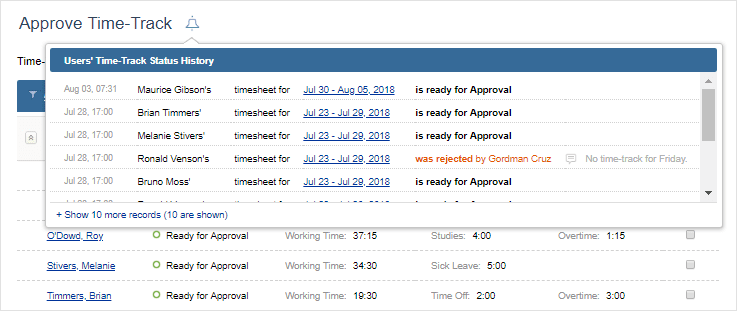
If you would like to see the approval history, click the bell icon next to Approve Time-Track:
To review user’s entries before approval, click on their name, and you’ll be forwarded to their weekly Enter Time-Track interface.
Managers can view automatically approved timesheets of their team at any time. If you need a manager to edit automatically approved timesheets, go to Settings → General Settings → Data Access Restrictions and enable the option “Allow managers to modify time-track of users configured for automatic approval.”
Grant Approving Permission
Managers can assign approvers by granting users the right to “Modify & Approve Users Time-Track” and assigning subordinating users to them.
Any user can be assigned multiple approvers. However, they only need to get one approval from any of them. For more data security, you may want to grant the permission to “Lock Time-Track.”
To see who can approve a user’s timesheet, go to Users → Accounts & Permissions. Select the necessary user from the list, scroll down to the Time-Track Approval section and click on the number of managers if there are any.

If you turn off the switch, the timesheet will be approved automatically.
How to Lock Time
Timesheets can be locked from any modifications after they are approved, invoiced, or when a particular financial period is over. Only managers with the “Lock Time-Track for Any User” permission can perform this action.
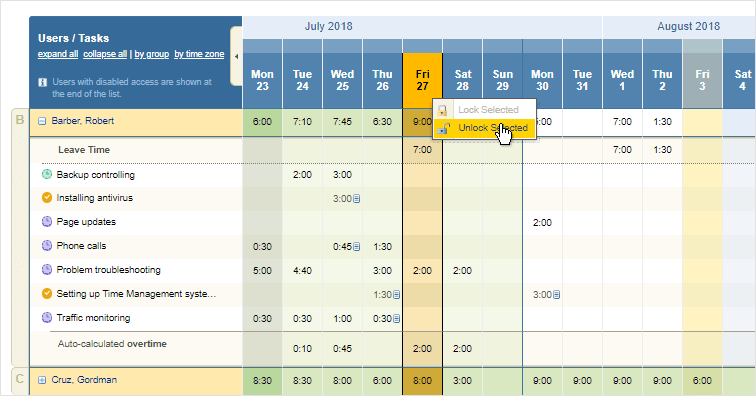
To lock a timesheet, open Time-Track → Lock Time-Track interface. You have several options:
- Lock selected records – Click on a cell or select several cells for particular users and click “Lock Selected.”
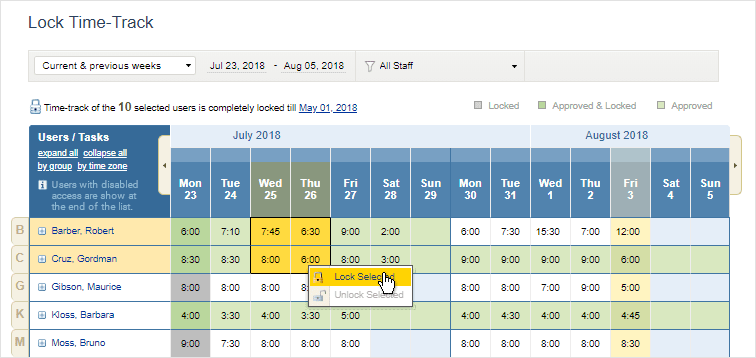
- Lock several days for all users – Select the dates you’d like to lock and click “Lock Selected.”

- Lock all days until a specific date – move your cursor above the date row until you reach the necessary date and click “Lock all dates till…”

Before locking timesheets, you can also review detailed information on working and leave time. Click on the user name to expand the timesheet details:
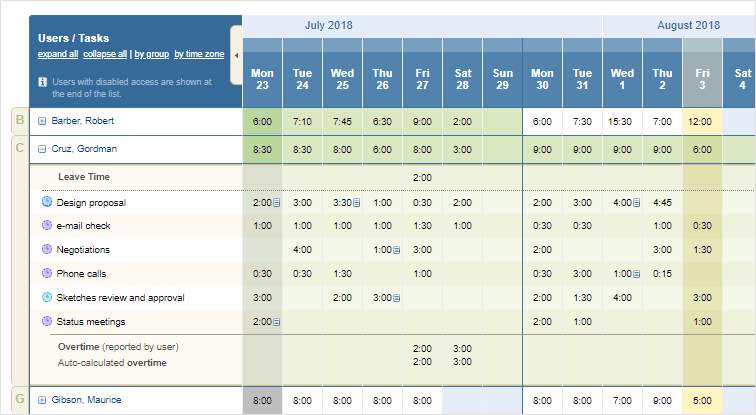
If you don’t want managers to see detailed entries in the Lock Time-Track interface, you can turn on a special setting. Go to Settings → General Settings → Data Access Restrictions and enable the option “Hide time-track details in the Lock Time-Track interface.”
Locked entries cannot be deleted or modified. If any corrections are needed, managers can unlock them the same way:
What if I can only see totals in the Lock Time-Track section?
Data visibility is regulated by a special setting in the General Settings menu. If you think you need access to those details, please contact your actiTIME administrator to change this setting.
Still have questions? Let us help you.


