Time tracking plays many vital roles in contemporary business management. It helps increase team productivity, maximize savings, hold employees accountable, and more. Project managers also use time tracking to monitor task progress and avoid schedule overruns. For this reason, it is an indispensable feature in many project management software products.
Jira is not an exception. This top-notch project management tool is highly esteemed by businesses of all sorts since it enables them to run projects effectively from the very start to the end and, meanwhile, achieve excellent performance outcomes. Jira incorporates time tracking functionality. Besides, it supports the integration with actiTIME, which allows for exceptional progress tracking experience and performance control.
In this piece, we’ll discuss Jira time tracking with actiTIME and its advantages over other approaches.
How Do You Track Time in Jira?
If you’re not familiar with Jira and want to learn more about this tool, check out this article – there, we described its main features and purposes in some detail. But for now, we will focus on Jira’s time tracking functionality that can be applied to practice in three ways:
- Native time tracker – Jira has a manual-entry hour tracking feature that lets users record time spent on work and observe compliance with original task estimates.
- App integrations – It is possible to find hundreds of interesting apps and plug-ins at Atlassian Marketplace. They can be integrated with Jira, as well as many other Atlassian products.
- Chrome extensions – Plenty of time tracking solutions offer access through Chrome extensions while also supporting the integration with Jira. And if you’re already using a time tracking app, there’s a high chance that it does so too.
Each of these methods has its advantages, yet time tracking with the actiTIME Chrome extension can provide you with far and away more holistic experience and accurate results than other approaches.
Let’s briefly explore why.
Why Jira Time Tracking with actiTIME Is Better?
actiTIME is a high-quality piece of timesheet software with a plethora of handy features for:
- Productivity analysis and improvement
- Adoption of more streamlined work processes (e.g., invoicing, payroll, PTO accrual, etc.)
- Efficient scope and task management, and much more
As for the core feature of actiTIME – time tracking – it’s particularly good for project progress monitoring, billable hours capturing and identification of behavior inefficiencies. Hours can be tracked only manually in the desktop version of actiTIME, but the Time Management Assistant allows you to do that automatically.
Automatic time tracking produces some superior benefits compared to the manual-entry mode. It lets you:
- Obtain more accurate and honest time tracking data,
- Free up to several hours a week that would otherwise be used to fill in timesheets,
- Work productively on primary project tasks without distractions on manual time tracking.
If you’re worried that your employees don’t fill out their timesheets correctly and that your business suffers due to the loss of billable hours because of this, automatic time tracking and actiTIME Timer are an effective solution to your problem. The tool will also help if you’re not very good at tracking hours on your own and keep forgetting when exactly you’ve commenced working on tasks – actiTIME Timer will make precise records for you, providing a truthful summary of your time use behaviors.
Jira Time Tracking with actiTIME
The process of time tracking with Jira-actiTIME integration is very simple. Just follow these six steps to set it up:
- Download and install the extension from the Chrome web store.
- Sign into the extension with an email or an actiTIME account or start a free trial if you don’t have one.
- Indicate which websites and online tools (Jira and more) you need to track, as described in our User Guide.
- Configure your own automatic data sync settings if you want to export the collected data to actiTIME,
- Proceed with your Jira tasks while Time Management Assistant will keep a super-accurate record of your online activities and the exact time spent on them.
It’s also possible to synchronize the creation of different entities in Jira and actiTIME using Zapier.
Just choose what you want to sync (e.g., Jira issues + actiTIME tasks or Jira projects + actiTIME projects), configure your Zap, test it and switch it on. After that, new issues and projects will be automatically created in your Jira account whenever you add a new task or project to actiTIME (or vice versa).
Find out more about Zapier-enabled Jira-actiTIME integration and its benefits here. 👈
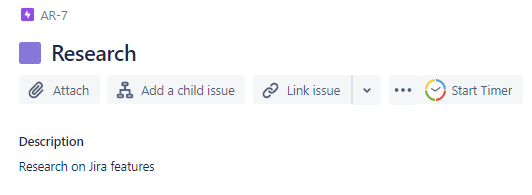
5. Track it!
To commence tracking hours for any Jira task with actiTIME, you need to locate it in the Issues interface and click on the Start Timer button:
After that, the only thing left is choosing the data sync option. Click on the short-cut name of your Jira task (e.g., <Task for AR-3> like in the example below) and select an actiTIME task that will be synchronized with the new time entry:

When this step is completed, every time entry made with actiTIME Timer in Jira will be safely submitted to your actiTIME timesheet. There, you may review and edit it manually at any moment.
6. See how much time is spent on different issue types
actiTIME’s custom fields functionality allows you to create unique task categories and log non-standard task attributes into the system. It lets you group different kinds of work in a more convenient way, track time for meaningful sets of tasks and better understand how you distribute your resources across them.
For example, you can categorize actiTIME tasks by issue types available in Jira Work Management by default: bug, task and subtask. Then, after enough time entries are submitted to the system, you may run the Custom Fields Report to analyze productivity results for each of these three custom groups of work:
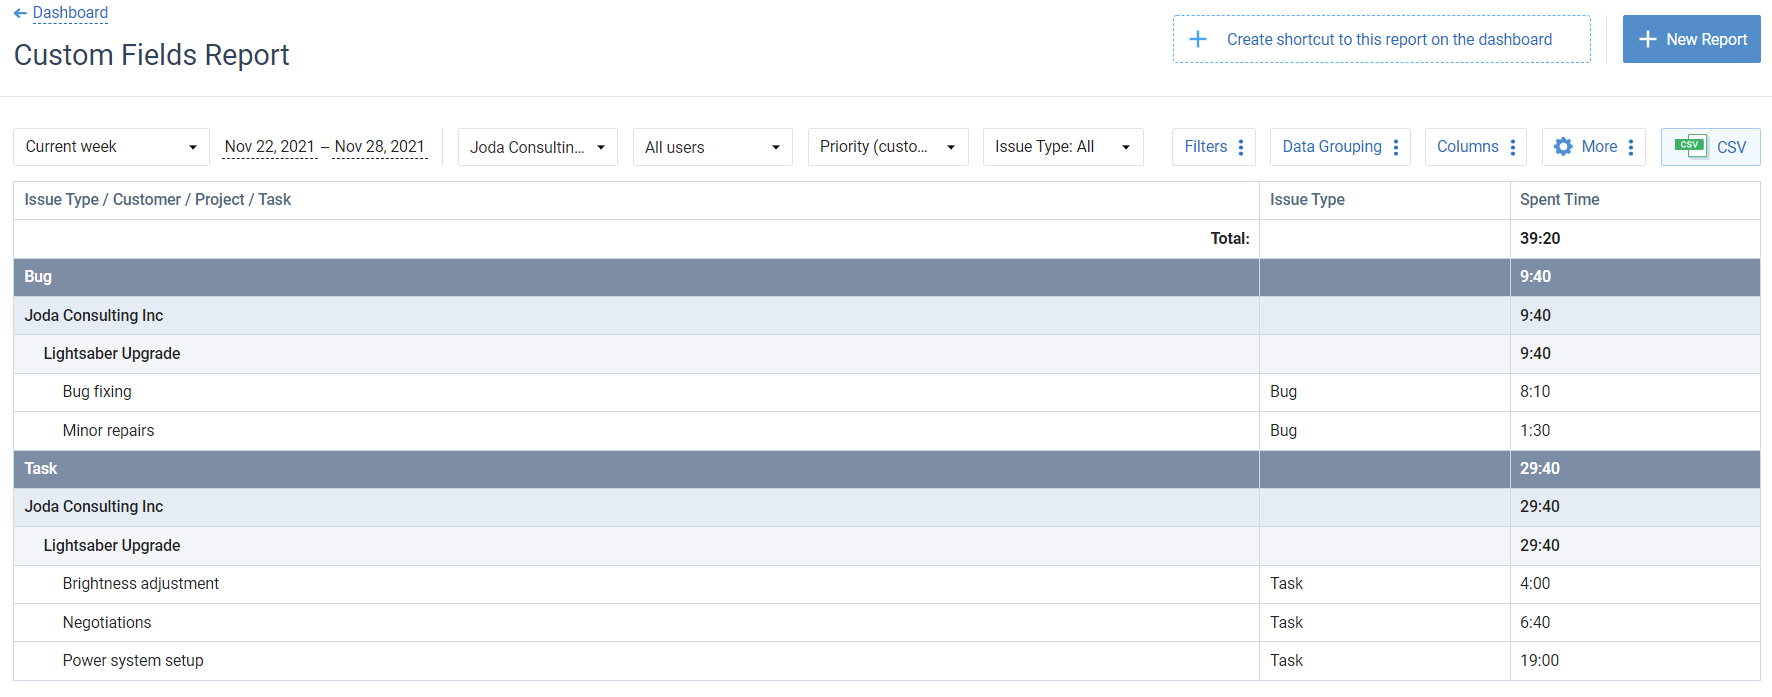
The Custom Fields Report has a highly flexible configuration – you can move the columns around, decide how to group your data and what to exclude from the picture to get a clearer view.
Though this last Jira time tracking step is rather optional, it offers many benefits, including better insight into productivity and more accurate task estimation. So, to learn more about how to use custom fields in actiTIME, don’t hesitate to check out this post. 👈
Ready to Introduce Jira Time Tracking?
With actiTIME, you will significantly improve the accuracy of Jira time tracking. Moreover, you’ll gain access to comprehensive time reports and will be able to analyze both the productivity trends in your team and the financial performance of your projects in depth.
If you’re worried about the price of actiTIME subscription, we have great news! The tool is absolutely free for small teams and single users. Besides, there is a 30-day no-cost trial during which you can test the product and see whether it satisfies your management needs well enough. Feel free to sign up here, and be sure to integrate actiTIME with your Jira account for better project performance results.