Configuring actiTIME
Check out our short video on actiTIME Settings.
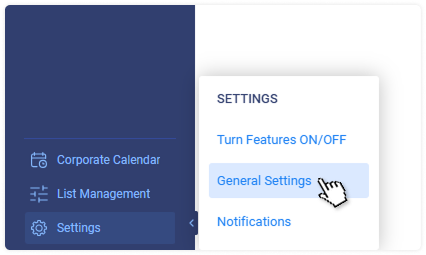
Before you start working with actiTIME, it would be a good idea to go through the available settings to set everything up. Please keep in mind that only users with permission to “Manage System Settings” can access the Settings and List Management menus.
Outside of standard parameters like schedules, time zones, and formats, the Settings menu also allows you to:
- Turn off any unwanted features
- Configure system-wide rules for PTO & sick days balances
- Configure your task workflow by creating custom statuses
- Manage types of work, along with the billing rates associated with them
- Manage leave types
- Manage task priorities
- Manage custom fields
- Manage locations
- Set up email notifications
- Upload your company logo and choose the color scheme
- Manage actiTIME and actiPLANS subscriptions
- Set up two-factor authentication
Turning Features On / Off
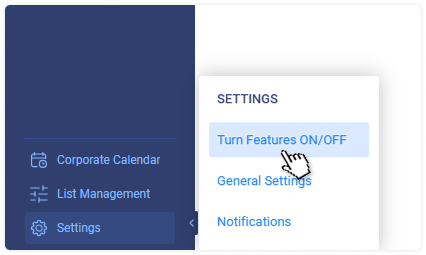
As an admin user with the “Manage System Settings” permission, you can decide which features you will use and which you won’t. We recommend going through all the features during the initial setup of actiTIME. You can also go back and adjust these settings at any time.
To review the list of all available features, go to the Settings → Turn Features On / Off interface:

Turning the feature off does not delete any related data. Feature controls and related data will be simply hidden from the actiTIME interfaces. If you turn the feature back on, all previously entered data will be available again.
Below you can find detailed information on all features available in actiTIME.
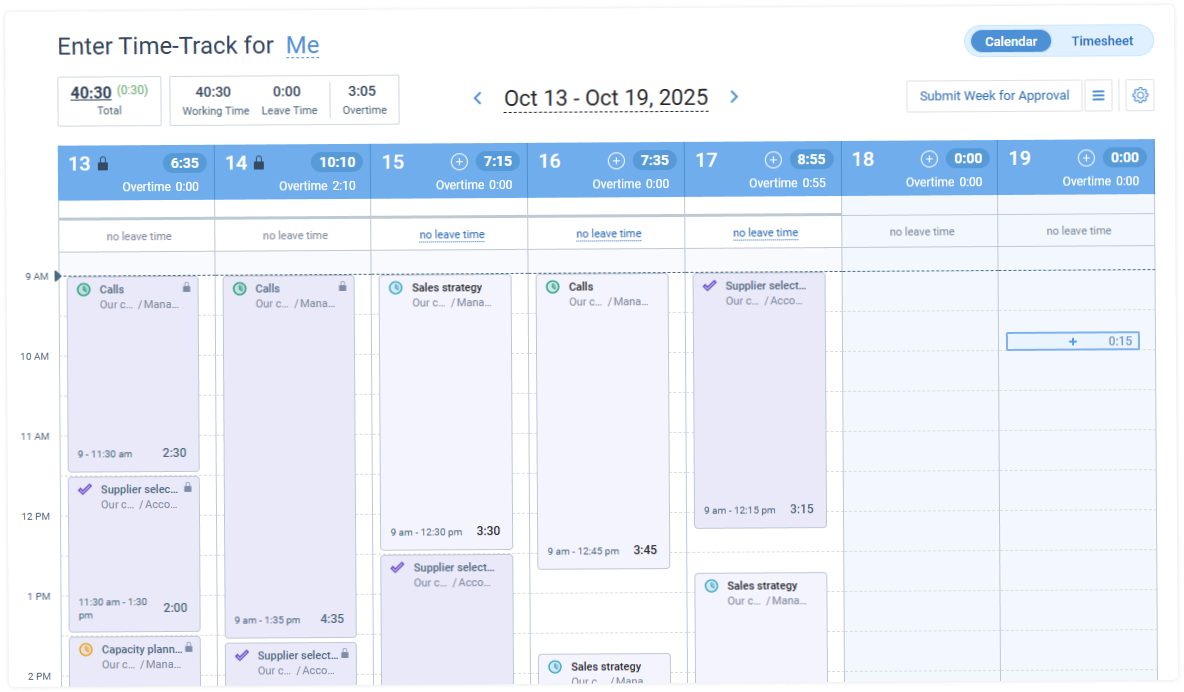
Calendar View
This feature allows you to track hours in the calendar format and indicate the start and stop time for each task you work on during the day.
When the feature is turned on, users can:
- Switch between the Timesheet View and the Calendar View in the Enter Time-Track interface.
- Log the exact start and stop time for tasks on drag-and-drop time cards.
- Run the Task Performance Time Cards Report (with personal data if you’re a regular user or team data if you’re a manager).
Timesheet View
This feature allows you to track working hours and submit time off requests in the traditional weekly timesheet format. It can be customized to display such vital task information as progress status, estimates, deadlines, etc. Plus, users may attach comments to any time entry here.
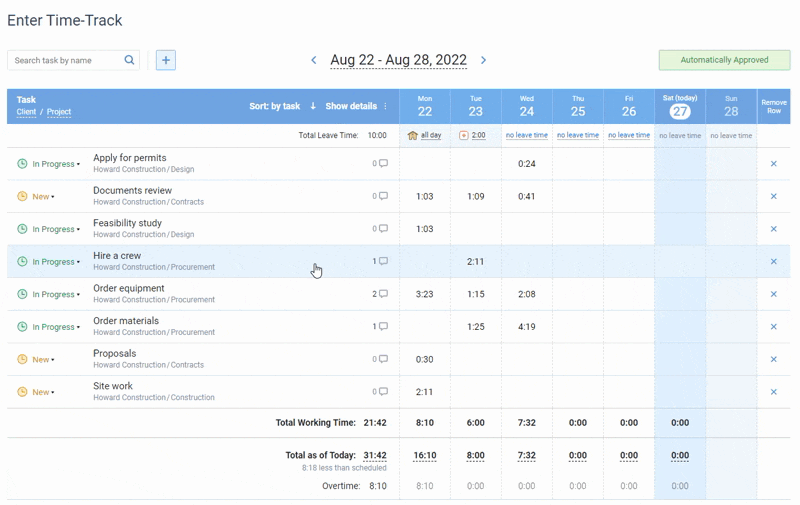
When the feature is switched on, users can switch between the Timesheet View and the Calendar View in the Enter Time-Track interface as they please (provided that the latter is switched on too). Yet when it’s switched off, they can track time in the Calendar View alone.
Working Time Entry for Future Dates
This feature allows you to enter working time and comments for future dates. Note that leave time can be reported in advance without enabling this feature.
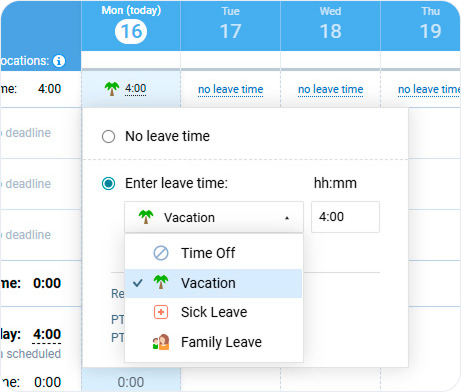
Leave Time Tracking
This feature allows you to report leave time. When it is turned on:
- Admin users can set up any number of leave types in the Settings → Leave Types interface.
- Managers can run the Leave Time Report and include leave information in other reports.
- Regular users can report leave time in the Enter Time-Track interface, choosing from the available leave types, and run a personal Leave Time Report.
PTO Balance Calculations
Paid Time Off (PTO) means paid leave time accrued by an employee. The bank of earned paid time off is called the PTO balance.
When this feature is turned on:
- Admin users can define default PTO accrual rules in the General Settings interface and create leave types tied to the PTO balance.
- Managers with the “Manage Accounts & Permissions” right can enable PTO control for employees and set up individual PTO rules for them in the Users → PTO Settings.
- Managers can run the Leave Time & PTO Report for their team or all system users, depending on their permissions.
- Regular users can view their PTO balance in the View Time-Track interface and run a personal Leave Time & PTO Report.
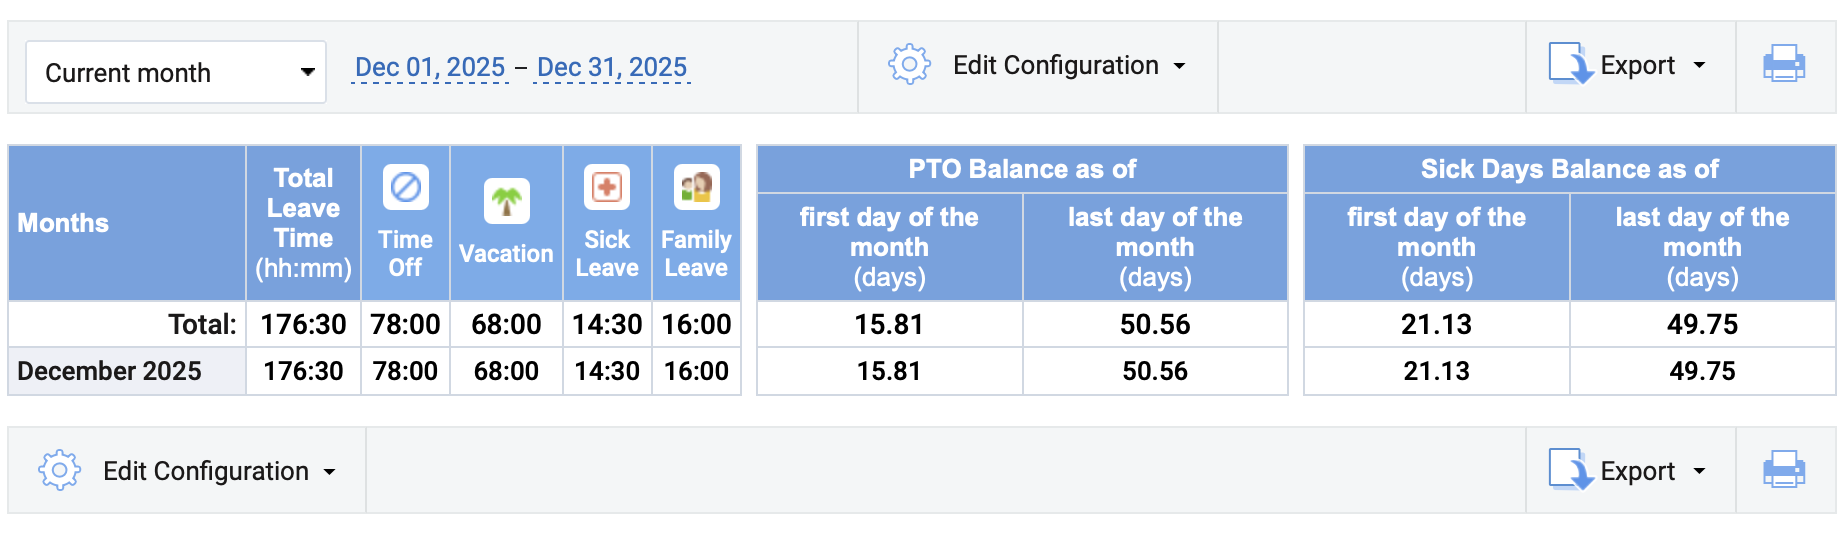
Sick Days Balance Calculations
Sick days refer to the number of days that an employee can take off due to illness, medical treatment, etc. The bank of earned sick days is called the sick day balance. It works the same way as the PTO balance feature.
When this feature is turned on:
- Admin users can define default sick days accrual rules in the General Settings interface and create leave types tied to the sick day balance.
- Managers with the “Manage Accounts & Permissions” right can enable sick days control for employees and set up individual sick days calculation rules for them in the Users → Sick Days Settings.
- Managers can run the Leave Time & Sick Days Report for their team or all system users, depending on their permissions.
- Regular users can view their sick day balance in the View Time-Track interface and run a personal Leave Time & Sick Days Report.
Locations
Locations are custom categories of working time that you may schedule and track in your actiTIME account.
When this feature is switched on:
- Managers can add bespoke types of locations (or other work-related entities) to the system via Settings → Locations.
- Regular users may schedule them right in their timesheets.
- Both managers and regular users can run the Locations Report to see how much time is used in different locations.
Overtime Registration
This feature allows you to automatically calculate overtime based on a user’s workweek schedule and workday duration. Any time reported in excess of a standard working day, on public holidays, or weekends is considered overtime. For more details, check the Time Balance & Overtime Report description.
When this feature is turned on:
- Admin users can define default overtime settings in the General Settings interface.
- Managers with the “Manage Accounts & Permissions” right can set up individual overtime settings for the staff members in the Users tab.
- Managers can run the Time Balance & Overtime Report for their team or all system users, depending on their permissions.
- Regular users can view their overtime in the Enter Time-Track interface and on personal reports (if allowed in the visibility settings).
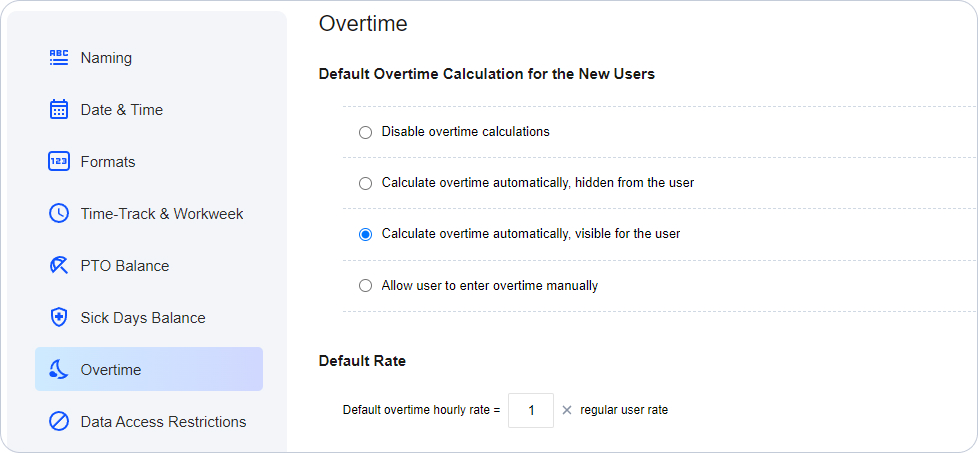
What else is good to know:
- Overtime values cannot be negative.
- You can select between automatic overtime calculation and manual entry. This is set up in the user’s settings panel.
- To see the balance of overtime and undertime (insufficient working hours), use the Time Balance parameter. It is available in the View Time-Track interface and in the Time Balance & Overtime Report.
- To set up an overtime pay rate, make sure that the User Rates & Cost of Work Report feature is turned on and configure rates in users’ settings panel.
Time-Track Approval
With this feature, you can set up the approval of weekly timesheets. When it is turned on:
- Managers with the “Manage Accounts & Permissions” right can set up approvers in the Users tab or enable automatic approval.
- Managers with the “Modify & Approve Users’ Time-Track” right can approve or reject timesheets for their team.
- Regular users can submit their timesheets for approval.
What else is good to know:
- Only a single approval is required, meaning that if a user has multiple approvers, timesheets need to be approved only by one of them.
- Time is approved by weeks and not on a per-project basis.
- You can filter time by its approval status in a number of reports (Staff Performance, Time-Track In Detail, Billing Summary).
- You can allow managers to modify timesheets of users with enabled auto-approval by selecting a special setting in the General Settings.
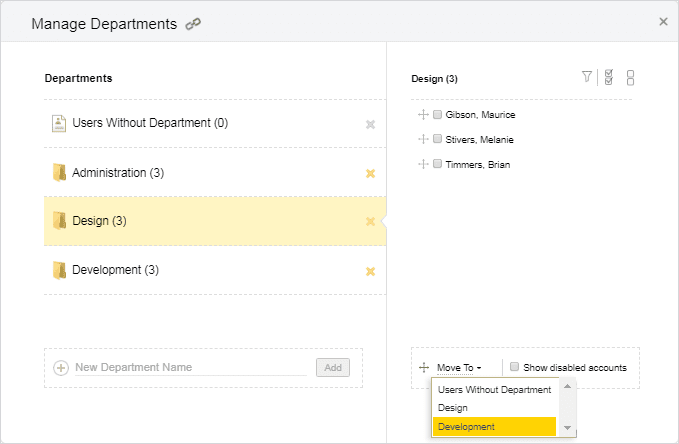
User Departments
This feature allows you to join users into departments, teams or any other group of your choice. When it is turned on:
- Admin users can set up any preferred name for departments in the General Settings interface.
- Managers with the “Manage Accounts & Permissions” right can create departments and group users as necessary in the Users tab.
- Managers get an additional grouping option on reports and charts.
Time Zone Groups
This feature allows you to join users in offices or branches that are located in different time zones. When it is turned on:
- Managers with the “Manage Accounts & Permissions” right can create time zone groups and allocate users as necessary in the Users tab.
- Managers get an additional grouping option on reports and charts.
When the feature is turned off, you can still set up a time zone in the user settings panel, but cannot group users by this parameter.
Task Estimates
With this feature, you can enter time estimates for tasks and see the variance between the estimated and actual time spent by your team. When it is turned on:
- Admin users can set up email notifications on exceeded estimates in the Settings → Notifications.
- Managers with the “Manage Scope of Work” permission can enter and edit estimates for tasks from their scope.
- Managers can run the Estimated vs. Actual Time Report for their team or all system users, depending on their permissions.
- Regular users can review task estimates in the task properties and run a personal Estimated vs. Actual Time Report.
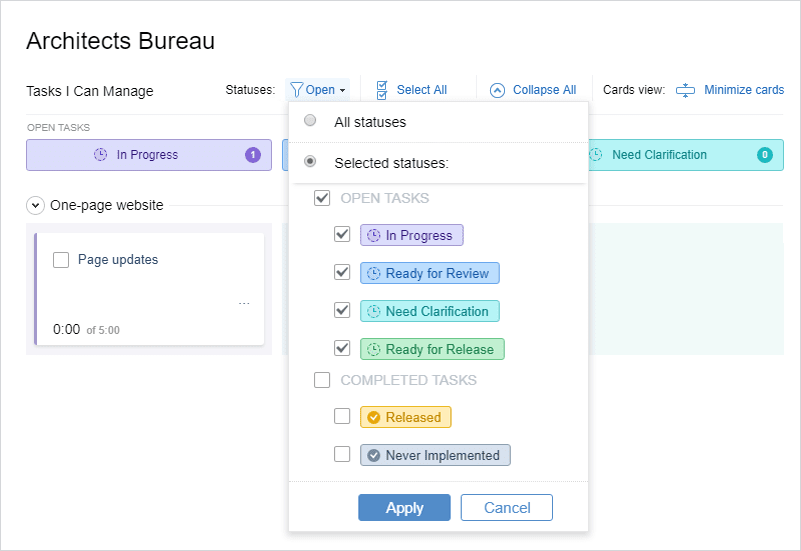
Task Workflow
With this feature, you can create any number of workflow statuses for tasks. This is helpful for keeping track of the work process and making it more transparent. Additionally, you can review tasks sorted by statuses in the Kanban view of the Tasks. When it is turned on:
- Admin users can set up workflow statuses in the Settings → Workflow Settings.
- Everyone can change workflow statuses for tasks assigned to them and switch to the Kanban view in the Tasks interface.
If you turn this feature off, tasks can have only two statuses: Open and Completed.
Work Assignments
With this feature you can allocate work to your team, allowing them to report time to selected tasks. Not assigned part of the scope will not be visible to the users.
When this feature is turned on:
- Managers with the “Manage Scope of Work” permission can assign work to their team in the Users → Work Assignments interface.
- Regular users can view assigned customers, projects and tasks in the Tasks tab, add such tasks to their timesheets and report time for them.
Turning this feature off means that all users with the “Enter Time-Track” permission will be able to view all customers, projects and tasks in the system, and track time to all tasks.
Custom Fields for Tasks
Using this feature, you can create custom categories for your tasks and collect additional types of task data that aren’t presented in actiTIME by default.
When the custom fields functionality is activated:
- Users with the “Manage System Settings” permission can add new custom fields, and edit or delete them via Settings → Custom Fields for Tasks.
- Users with the “Manage Scope of Work” permission can assign custom field parameters to actiTIME tasks in the Tasks interface.
- All users may review custom attributes for the assigned tasks in the list of tasks.
- Users can generate the Custom Fields Report to analyze either personal or collective time tracking data for custom groups of tasks.
If you switch this feature off, you will neither be able to add custom task attributes to the system nor run the Custom Fields Report. Plus, the already created custom fields will become hidden from the Tasks interface.
Task Priorities
This feature allows you to prioritize your project tasks by urgency and importance.
When it’s activated:
- Users with the “Manage System Settings” permission can create new task priorities, and edit or delete them via Settings → Priority.
- Users with the “Manage Scope of Work” permission can assign priorities to actiTIME tasks via the Tasks interface (or individual task settings).
- All users may see the created task priorities and sort the assigned work by priority via the list of tasks, the Enter Time-Track interface, and the Time-Track Report.
- Users can generate the Time-Track Report to analyze either personal or shared time tracking data for tasks with different priority levels.
User Rates & Cost of Work Report
This feature allows you to set up hourly pay rates for users. There are three types of them in actiTIME: regular, overtime, and leave time rates. They are called cost of work rates.
When this feature is turned on:
- Admin users can set up email notifications on personal earnings and exceeded project budgets in the Settings → Notifications.
- Managers with the “Manage Accounts & Permissions” and “Manage Cost & Billing Data” rights can enter and edit pay rates in the user settings panel.
- Managers with the “Manage Cost & Billing Data” permission can run the Cost of Work Report and generate charts based on user rates.

Types of Work
This feature allows you to categorize tasks as billable or non-billable, as well as group them by activity type. When it is turned on:
- Admin users can create and edit types of work in the Settings → Types of Work.
- Managers with the “Manage Scope of Work” and “Manage Cost & Billing Data” permissions can select types of work for tasks from their scope.
- Managers with the “Manage Cost & Billing Data” permission can run the Billing Summary Report for their team.
- Managers and regular users can group data by type of work on selected time reports.
Hourly Billing Rates, Invoices and Profit / Loss Report
With this feature, you can set up billing rates for tasks by associating them with types of work. Billing rates can be used to calculate billable amounts and create invoices.
When it is turned on:
- Admin users can specify billing rates for types of work in the Settings → Types of Work menu.
- Managers with the “Manage Scope of Work” and “Manage Cost & Billing Data” permissions can set up billing rates for tasks by associating them with particular types of work.
- Managers with the “Manage Cost & Billing Data” permission can run the Billing Summary and Profit / Loss Report, as well as generate invoices.
Basic System Settings
You can configure actiTIME to fit your company’s specific requirements and workflow processes. To do this, go to the Settings → General Settings. You need to have the “Manage System Settings” permission to access this interface.
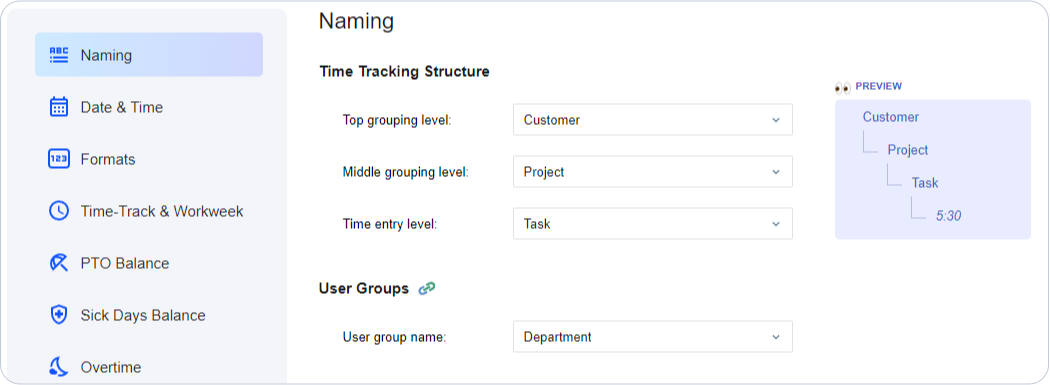
Structure Levels Naming
actiTIME allows you to set up custom names for the Time-Track Hierarchy Levels and User Groups. By default, they are called Customers, Projects, Tasks, and Departments, respectively.
For each level, you can select any other predefined names or enter custom ones of your choice. The new names will be instantly applied to all related interfaces.
Date and Time Settings
You can set up the following time settings:
- Calendar layout – Set up the first day of the workweek here, for example, to start it on Sunday, Monday or Saturday.
- Date format – Select a date format according to your company’s standards. This setting affects all pages where a date is displayed (for example, task lists and reports).
- Default time zone group – Choose the time zone that will be applied to all new users by default. If it is different from the default, you can adjust it later in the user settings panel.
- Time format – Select a time format for the Calendar View in the Enter Time-Track interface and the Task Performance Time Cards Report. You may choose from the 12-hour clock or the 24-hour clock format here.
Format Settings
In this section, you can configure the following formats:
- Number format (decimal and thousand separators)
- Currency
- Format of a CSV report
- Default time format in reports and charts (except for CSV reports which always use the decimal time format)
Timesheet and Workweek Schedule Parameters
In this section, you can set up the following parameters:
- Maximum reported time per day – Limit the number of hours reported by one user for one day (up to 24 hours) or set it to unlimited. Removing the limit is useful when several people report time as a single user (for example, multiple subcontractor’s employees).
- The default workweek schedule – Define the system-wide workweek schedule that will be automatically applied to new users. If a user’s schedule is different from the default, you can adjust it in the user’s settings panel.
- The default workday duration – Define the standard length of a working day here. It will be used for the conversion of leave time balances from hours to days.
PTO and Sick Days Settings
Here you can configure default PTO and sick days accrual rules that will be automatically applied to new users. Besides, these settings let you set a PTO and sick days balance cap that will prevent users from submitting new leave requests if they don’t have enough accrued time off.
For more information on the available leave accrual rules, please see How to Manage Paid Time Off and Sick Days Settings.
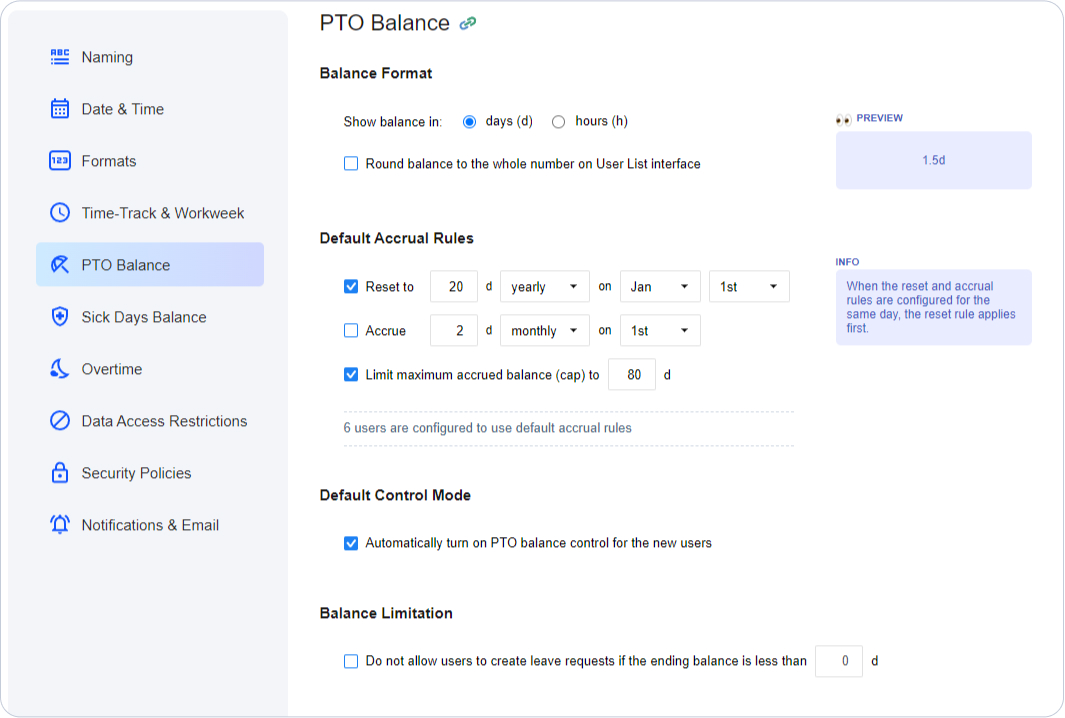
You can also configure individual accrual rules for any system user in the Users → PTO Settings or Users → Sick Days Settings tabs. Note that you need to have the “Manage Accounts & Permissions” right to access this interface.
These settings are only available if you have the PTO Balance Calculations and Sick Days Balance Calculations features turned on in actiTIME.
Overtime Settings
In this section, you can configure the following:
- Default overtime calculation mode that will be automatically applied to new users. If a user’s overtime settings are different from the default, you can adjust them in the user’s settings panel.
- Default overtime pay rate is set up as a coefficient of a regular user rate.
These settings are only available if you have the Overtime Registration feature turned on in actiTIME.
Data Access Restrictions
In this section, you can fine-tune levels of access for system users in addition to the core user permissions. Here is what you can do:
- Allow certain users to access everyone’s data on time reports and in tasks
- Hide time-track details in certain interfaces
- Hide the list of not assigned users in the Users tab
- Allow managers to edit automatically approved timesheets
- Allow or disallow regular users to change task statuses
- Allow managers to record leave time for the assigned users during PTO blackout days
- Allow users whose leave requests are approved automatically to log time off during PTO blackout days
See the How to Manage Permissions section for a detailed description of all options.
Security Policies
Password policy
In this section, you can set up password length and complexity level to meet your company’s password strength requirements. These rules will apply to all actiTIME users. The following parameters can be set up:
- Minimum password length in characters
- Password complexity requirements: characters in upper and lower case, numbers, special characters
After modifying the password policy, you can reset passwords for all active users in actiTIME. To do that, click Save Policy and Reset Passwords for All Users. This action requires entering your own password.
If you’ve configured a stronger policy than the previous one and want to reset all users’ passwords, you will be prompted to change your own password first. This helps ensure that the admin can access actiTIME after all passwords are reset.
After that, actiTIME users will receive emails with password reset instructions at the addresses specified in their accounts.
If you don’t want to reset users’ passwords, just save the modifications with the Save Settings button at the top or bottom of the General Settings. The policy will be applied to new passwords only. Passwords configured before the policy change will not be affected.
Lockout policy
A lockout policy is a standard tool used by administrators to block users from entering their accounts after a certain number of unsuccessful sign-ins. Such a measure serves to reduce the threat of malicious attacks and minimize the risk of account abuse.
Under the default security settings in actiTIME, users are automatically locked out of their accounts for 30 minutes after failing to log in 6 times in a row. However, admin users can set up preferred lockout policy rules in the Lockout Policy section of the general settings.
To do so, check the Use lockout policy box and then specify desirable values for:
- Lockout duration – A period for which an account gets temporarily disabled after a series of login failures. The timeframe can vary from 0 to 1440 minutes, whereas the value of 0 means that disabled user accounts can be unlocked only manually by admins (in other cases, it happens automatically).
- Lockout threshold – The number of possible sign-in attempts before an account gets blocked. The threshold value can be anything from 0 to 999, whilst 0 indicates that the number of unsuccessful logins is unlimited, and users never get locked out.
- Reset lockout counter after – A period during which a user can retry to log in after the first failure until the sign-in attempt counter is reset to 0. This period can last from 0 to 1440 minutes. If the selected threshold value is more than 0, the reset value must be either less than or equal to the lockout duration value.
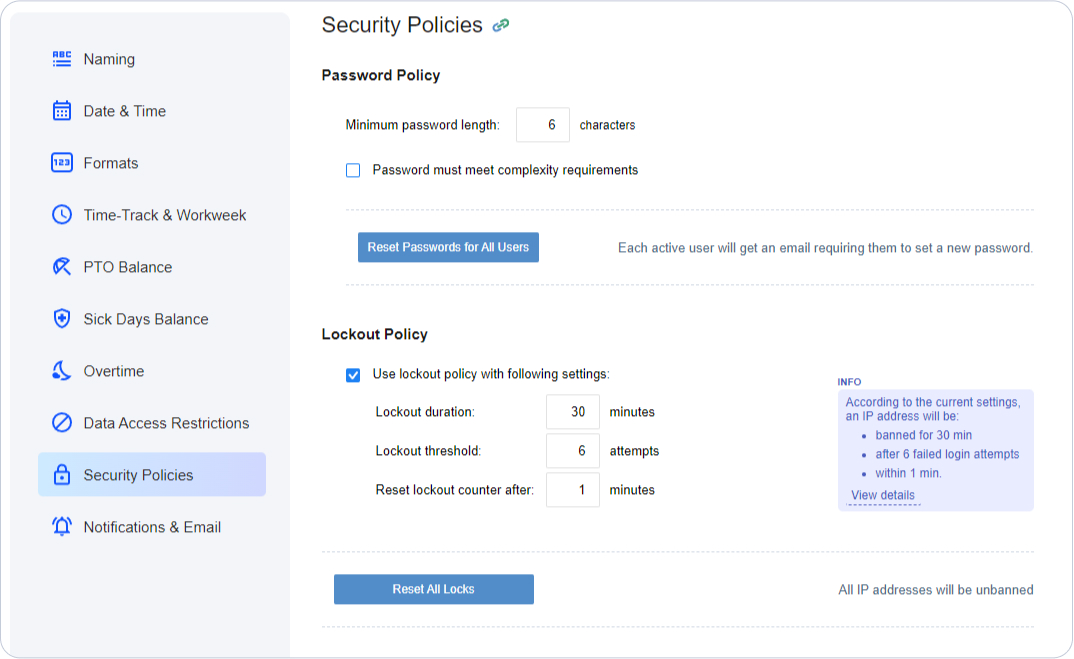
Whenever you need to unlock some of the blocked IPs manually, you may use the Reset All Locks button. After the reset request is successfully processed, you will receive an on-screen notification in real time, and all the previously locked out users will be able to sign in to their accounts right away.
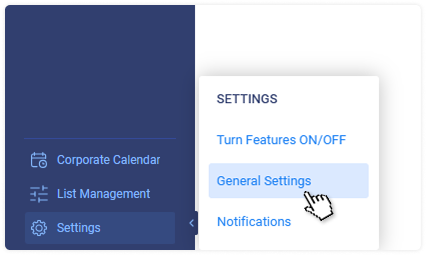
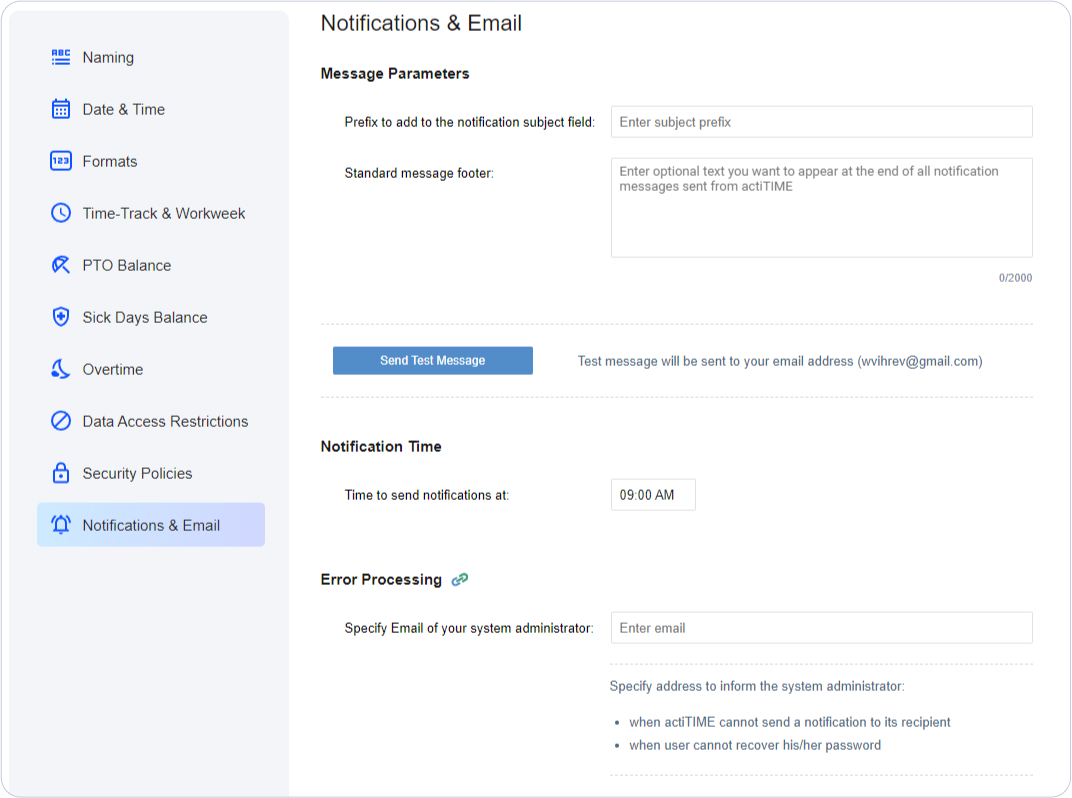
Notification Settings
In this section, you can configure the standard notification parameters, such as:
- Prefix in the subject field – You can use it for convenient filtering of actiTIME notifications in your inbox.
- Message footer text – Add some information or instructions for actiTIME users here.
- Time to send notifications at – This setting will apply to all email notifications configured in the Settings → Notifications interface. Note that all users will receive the notifications in their time zone, for example at 10 am local time.
Email Settings
In actiTIME Online, you can specify the email address of the system administrator who should be informed when actiTIME cannot send a notification to its recipients or a user cannot recover their password.
In actiTIME Self-Hosted, you also have additional settings:
- Mail server parameters such as SMTP server name or port. You have to specify them in order to make the notifications work. For more detailed instructions please see our Administration Guide. Note that you can only use the encrypted connection option when you are running a custom installation of actiTIME.
- Message parameters such as “From” address for system notifications and the URL of your actiTIME installation. It will be used to direct you to relevant actiTIME interfaces right from the email notifications. See the FAQ section on how to find out the correct URL address.
Logo & Color Settings
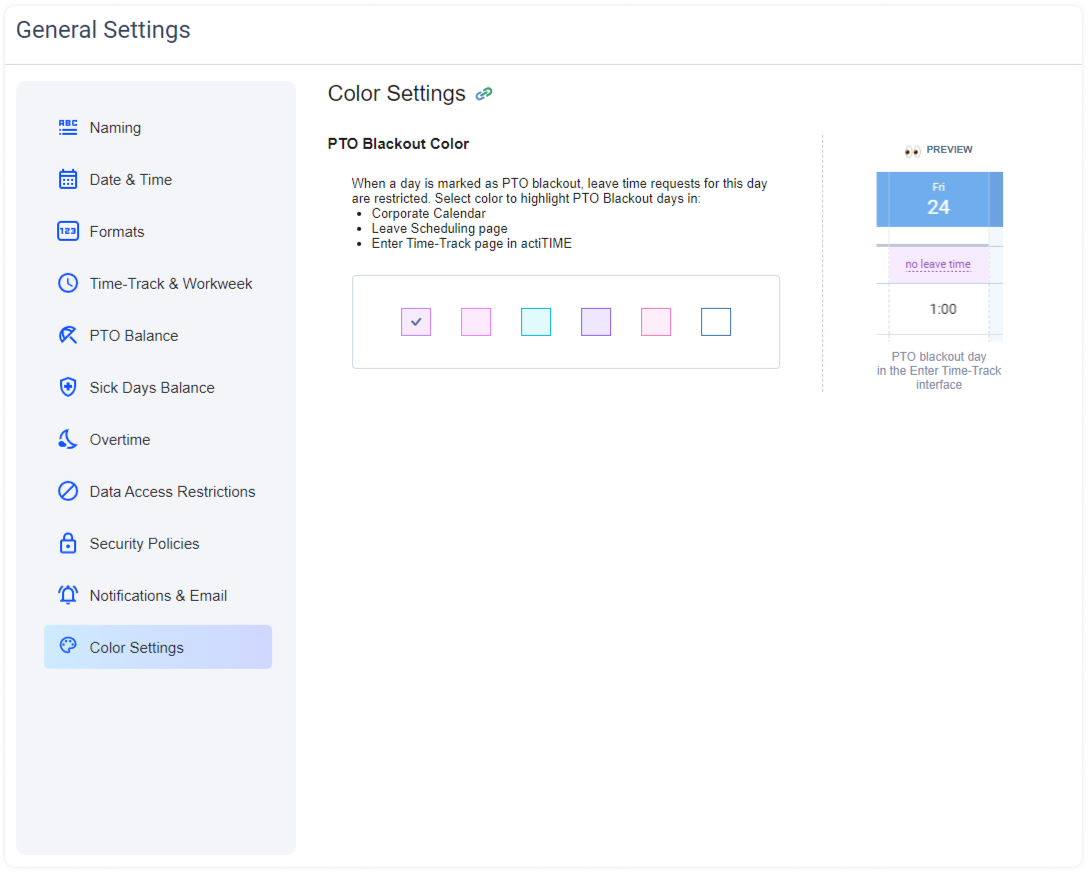
In this interface, you can upload your corporate logo to actiTIME interfaces and select a preferred color for PTO blackout days, which will be displayed in the following interfaces:
- Corporate Calendar
- Enter Time-Track
- Leave Scheduling in actiPLANS
Workflow Settings
Workflow statuses help you manage the process more efficiently, organizing tasks by work phases. You can set them up in the Settings → Workflow Settings. To access it, you should have the “Manage System Settings” permission.
There are two types of workflow statuses: Open and Completed. To create a new status, press the + Add new status button in the relevant box and specify its name and color.

For each type, you can set up any number of specific statuses. For example: Under consideration, Design, Development for open tasks, and Released, Archived and Never Implemented for completed tasks.
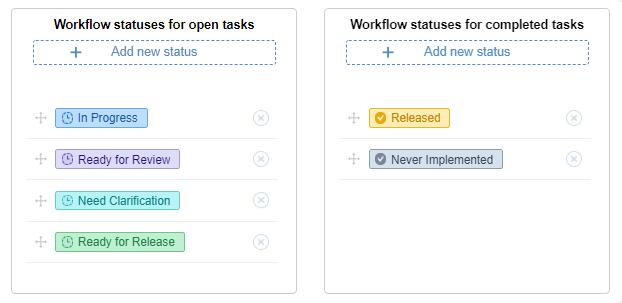
The statuses will appear in the interfaces in the same order as they are shown here. You can drag and drop them within each group as you need.
By default, new tasks will be created with the first status for open tasks specified in this interface.
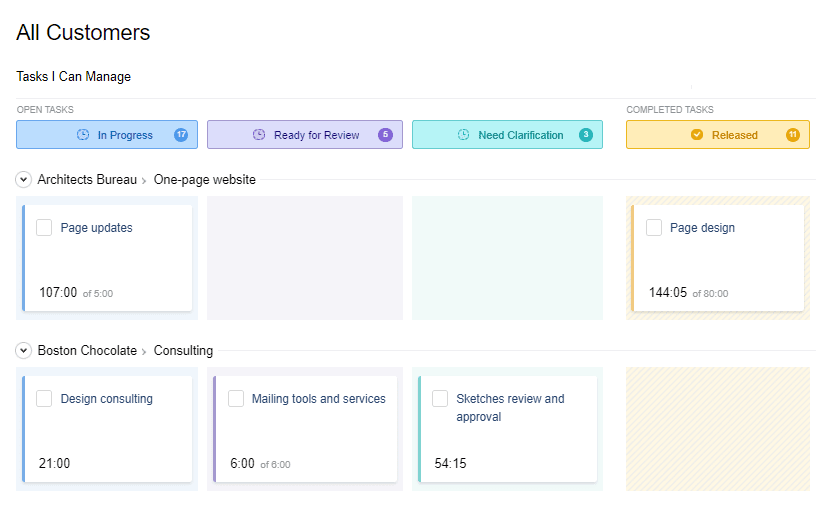
Workflow statuses are used to group tasks in the Kanban view of the Tasks interface. To read more about this view, see the How to Manage Tasks section.
Note that you can only delete a workflow status if there are no tasks with this status in the system.
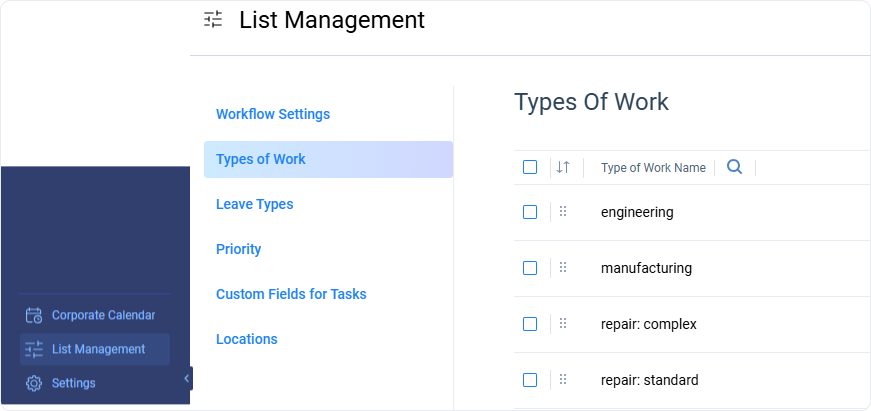
Types of Work
Types of work are used for tracking billable vs. non-billable hours, as well as calculating billable amounts and comparing them to project costs. You can use them to run reports (such as Billing Summary or Profit / Loss Report) and generate invoices. Additionally, you can use types of work as an additional way of grouping on time reports.
You can manage types of work in the Settings → Types of Work menu. To access it, you should have the “Manage System Settings” permission.
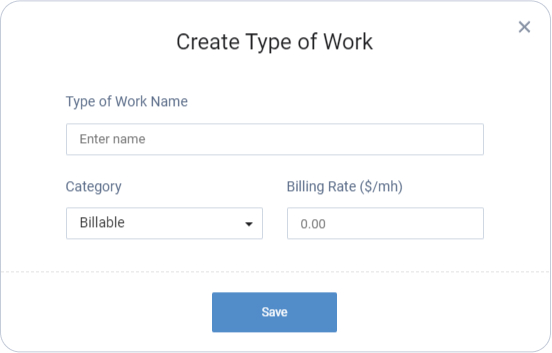
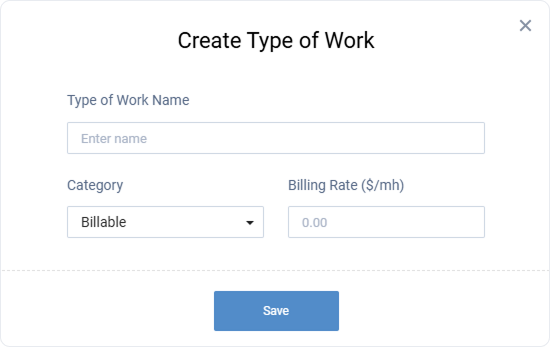
To add a new type of work, press + New Type. Then, in the opened pop-up window:
- Give a unique name to the work type
- Specify which category it should belong to (billable or non-billable)
- Set a billing rate for it if appropriate
You can set one of the created types of work as a default type in the system. To do so, just hover above a necessary item on the list and click the Set as default button.
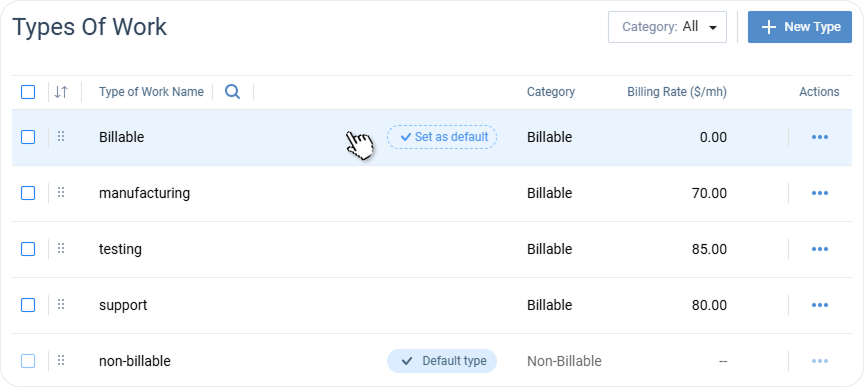
This default type of work will be automatically assigned to all new project tasks in case you don’t appoint any different categories for them.
To change the position of work types in the list, you may simply drag and drop them in the necessary location. Besides, it’s possible to sort your types of work in several preferable ways (by name, category or rate) and pick which work type categories to see or exclude from the view for any given moment.
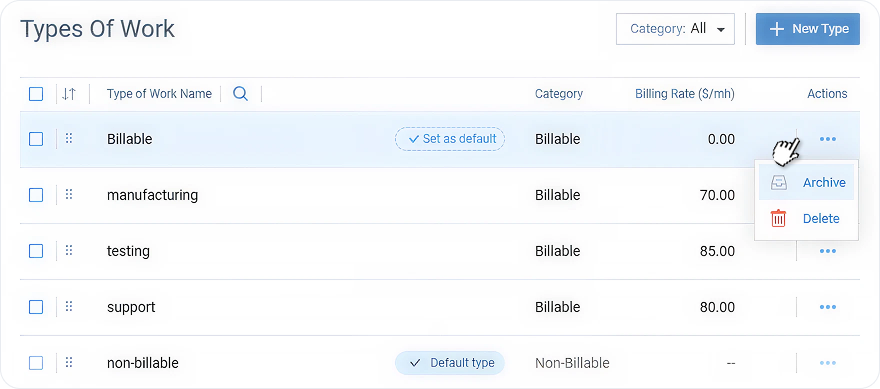
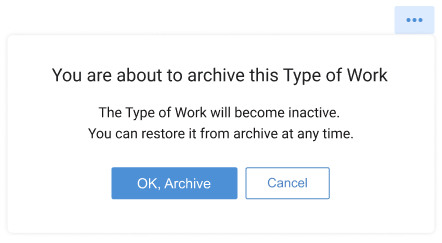
To edit a work type, just click on its name in the list. And in case you need to archive or delete an item, press the Actions button and choose the necessary option.
Please note that it’s impossible to delete a work type assigned to at least one of the tasks – such work types can only be archived, and you can view or reactivate them via Archived Types of Work.
Once you have set up types of work in the system, you’ll need to associate your tasks with them. Any user with the “Manage Scope of Work” or “Manage Cost & Billing Data” permission can change types of work for tasks assigned to them.
To associate a task with a type of work:
- Go to the Tasks tab and find the task in question
- Click on the task name to open the properties panel
- Select the required type of work in the drop-down menu
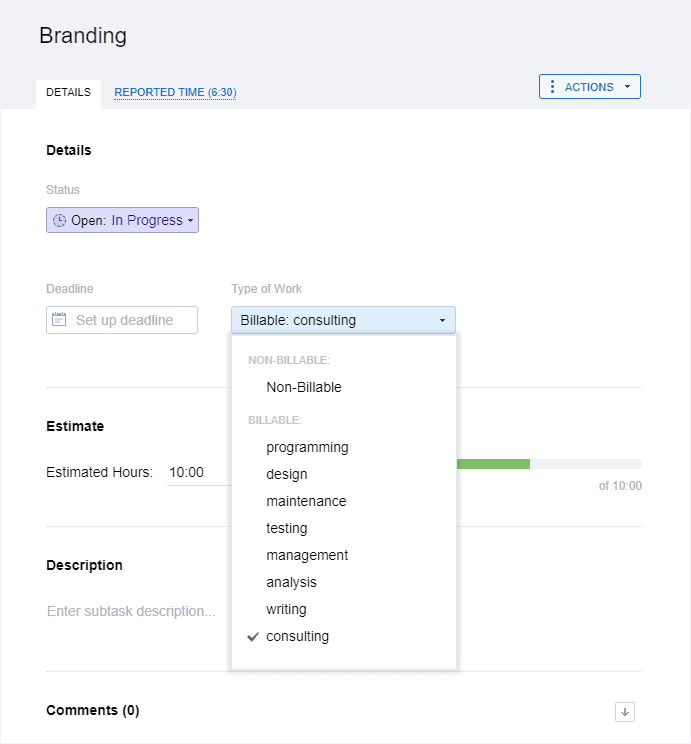
After configuring types of work for tasks, you’ll be able to see billable time and amounts on charts and reports, as well as create invoices in the Reports section.
Note that you can only delete a type of work if there are no tasks associated with it in the system. If you don’t want a certain type of work to be displayed as an active option in the task properties, you can simply archive it in the Settings → Types of Work interface.
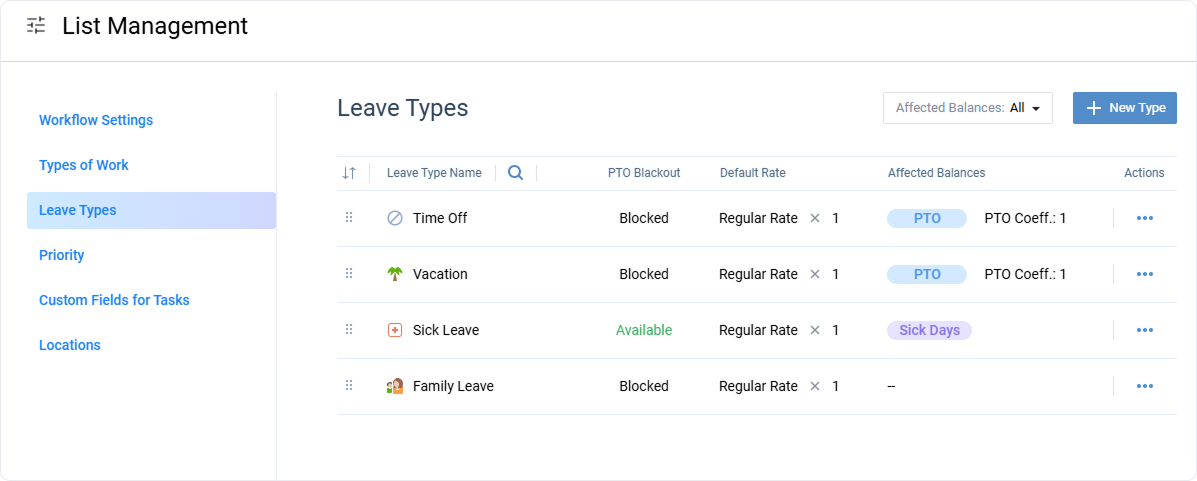
Leave Types
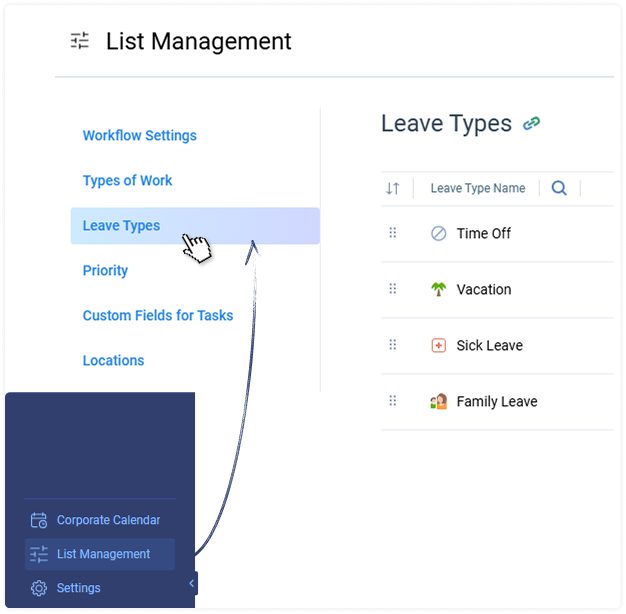
You can create, edit and delete leave types in the Settings → Leave Types menu. To access it, you should have the “Manage System Settings” permission.
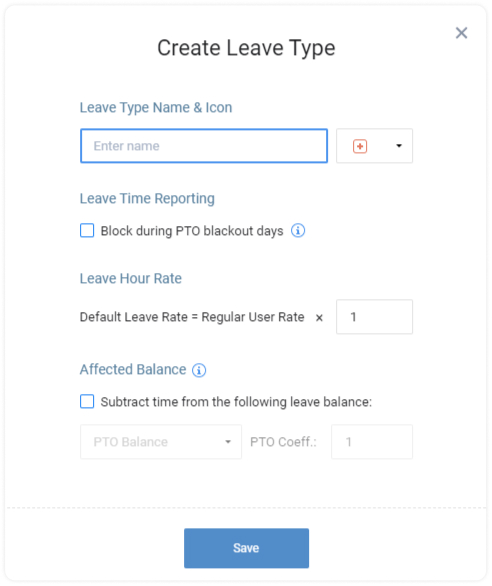
To add a new leave type to your account, click + New Type. In the opened pop-up window, you can:
- Enter a name
- Select an icon
- Set up an hourly pay rate – It will be used to pre-set the leave time rate in the user settings panel
- Associate it with the PTO or sick days balance and set up a coefficient for subtracting leave time from the balance (you can also leave this box unchecked if you don’t want the leave to affect any of the balances)
- Specify whether it must be blocked during PTO blackout days
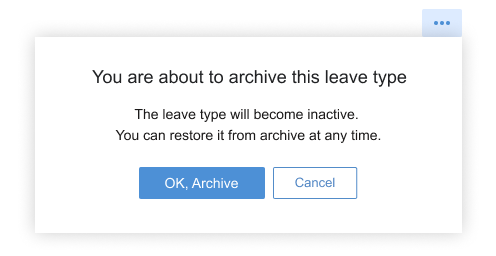
You may delete unnecessary leave types by clicking on the Actions button. Another option is to archive the leave types that are temporarily not used. They will be stored in the collapsible Archived Leave Types section, where you may review and reactivate them again.
Note that you can delete a leave type if there is no reported time for it in the system. Already used leave types can only be archived.
To edit an existing leave type, simply press on its name in the leave types list. Then, make the necessary changes and confirm.
You can change the order of leave types in the list by dragging and dropping them in the required location. Using the Affected Balances menu, it’s also possible to exclude any leave type category from the view when you don’t wanna see it.
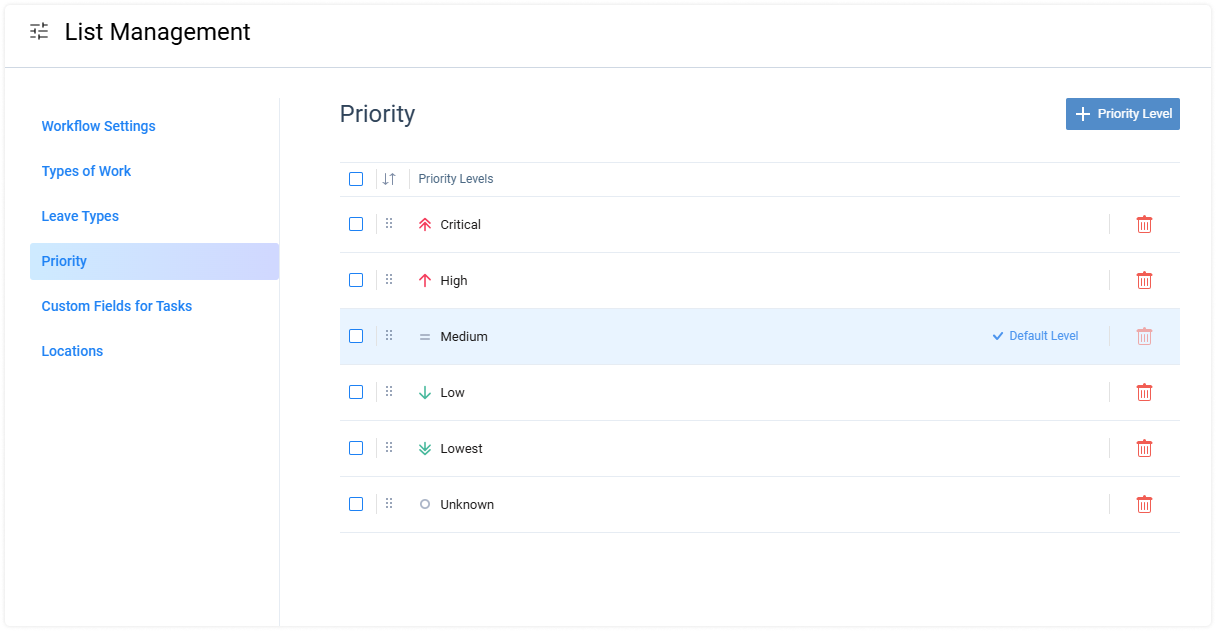
Priority
You can create, edit, delete, and select task priorities in the List Management → Priority. To access it, you should have the “Manage System Settings” permission.
To add a new priority, click + Priority Level. In the opened pop-up window, you can:
- Enter a name
- Select a color
Click on the bin icon to delete a priority from the list, click on the priority name to edit it, or hover over it and click Set as default to make it a default priority for all newly selected tasks.
Custom Fields for Tasks
You can create unique custom fields to categorize tasks by various parameters not presented in actiTIME by default (e.g., cost estimates, legal codes, budgets, etc.).
There are two types of custom fields for tasks:
- Text – Here you can freely enter data in multiple formats: text, numbers, and percentages.
- Drop-down menu – Here you can limit the number of task attributes for users to choose from.
- Number – Here you can enter numerical data in the specified format.
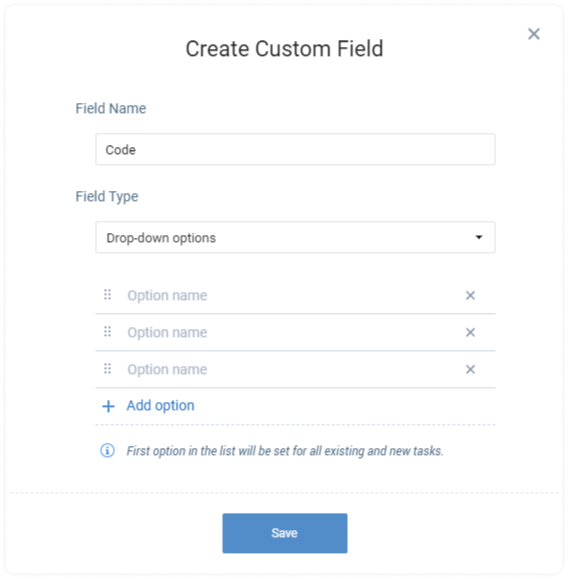
To create a new custom field:
- Open Custom Fields for Tasks via actiTIME settings
- Click on + New Field
- Type the name of your custom field and select its type
- In case you’re creating a drop-down custom field, type the names of alternative task attributes to display in the selector too
- In case you’re creating a numeric field, you need to specify Decimal places (the number of digits after the decimal point), Custom label (the measurement unit for your custom field and its position0n), and the minimum and maximum limits for the numeric value you plan to track
Locations
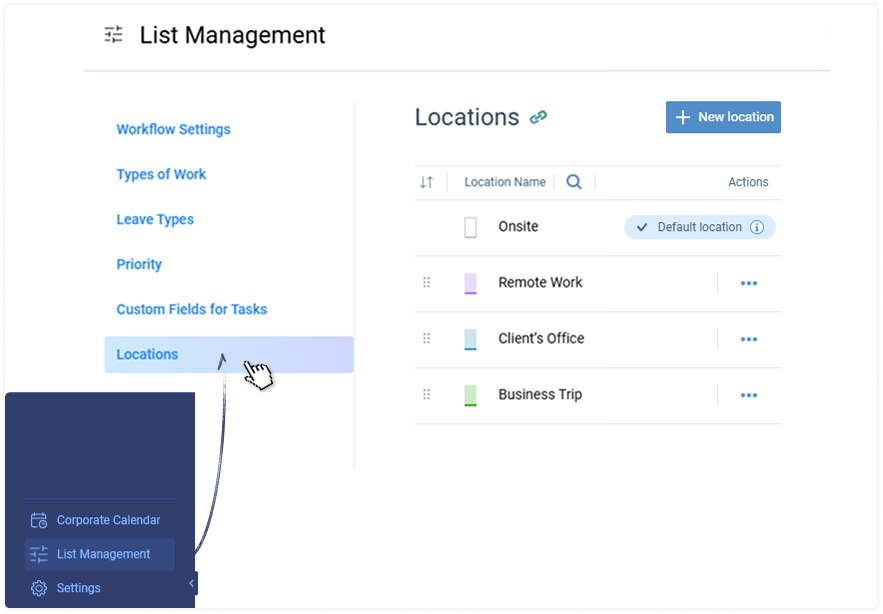
Locations are the custom categories of working time. You may use them to track where your team members work from (or schedule any other kinds of work activities that make sense in your unique case, such as business events, employee shifts, etc.).
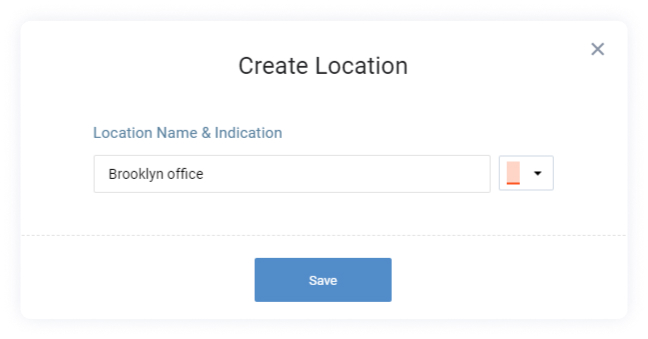
To create a bespoke location in your actiTIME account, follow these simple steps:
- Open the Locations settings in List Management
- Click + New location
- Write down its name
- Choose a color code
- Hit the Save button once done
You can view the full list of all the created locations in the Locations interface. There, it’s possible to modify, archive or delete them whenever necessary.
Note: You can delete merely unused locations. If a location was scheduled in anyone’s timesheet at least once, it can only be archived.
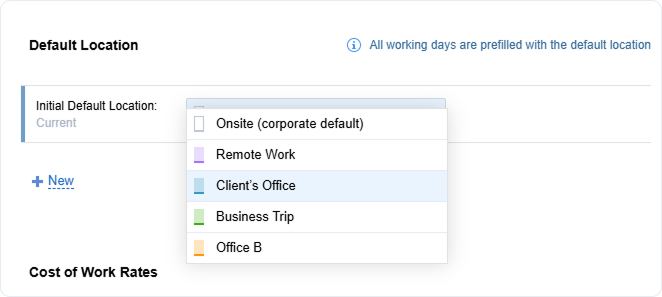
actiTIME has a default location. It always remains at the top of the Locations list, it’s marked in white, and it cannot be removed. Nevertheless, you are free to rename this default location as you please.
Besides, it’s possible to set default locations for users individually. To do so:
- Go to the Users list,
- Click on the name of the necessary user to open settings,
- Locate the Default Location section and pick a preferred item from the drop-down menu.
Corporate Calendar
actiTIME allows you to set up your company’s work calendar with corporate and public holidays, custom working/non-working days, and PTO blackout days. This can be done in Corporate Calendar settings.
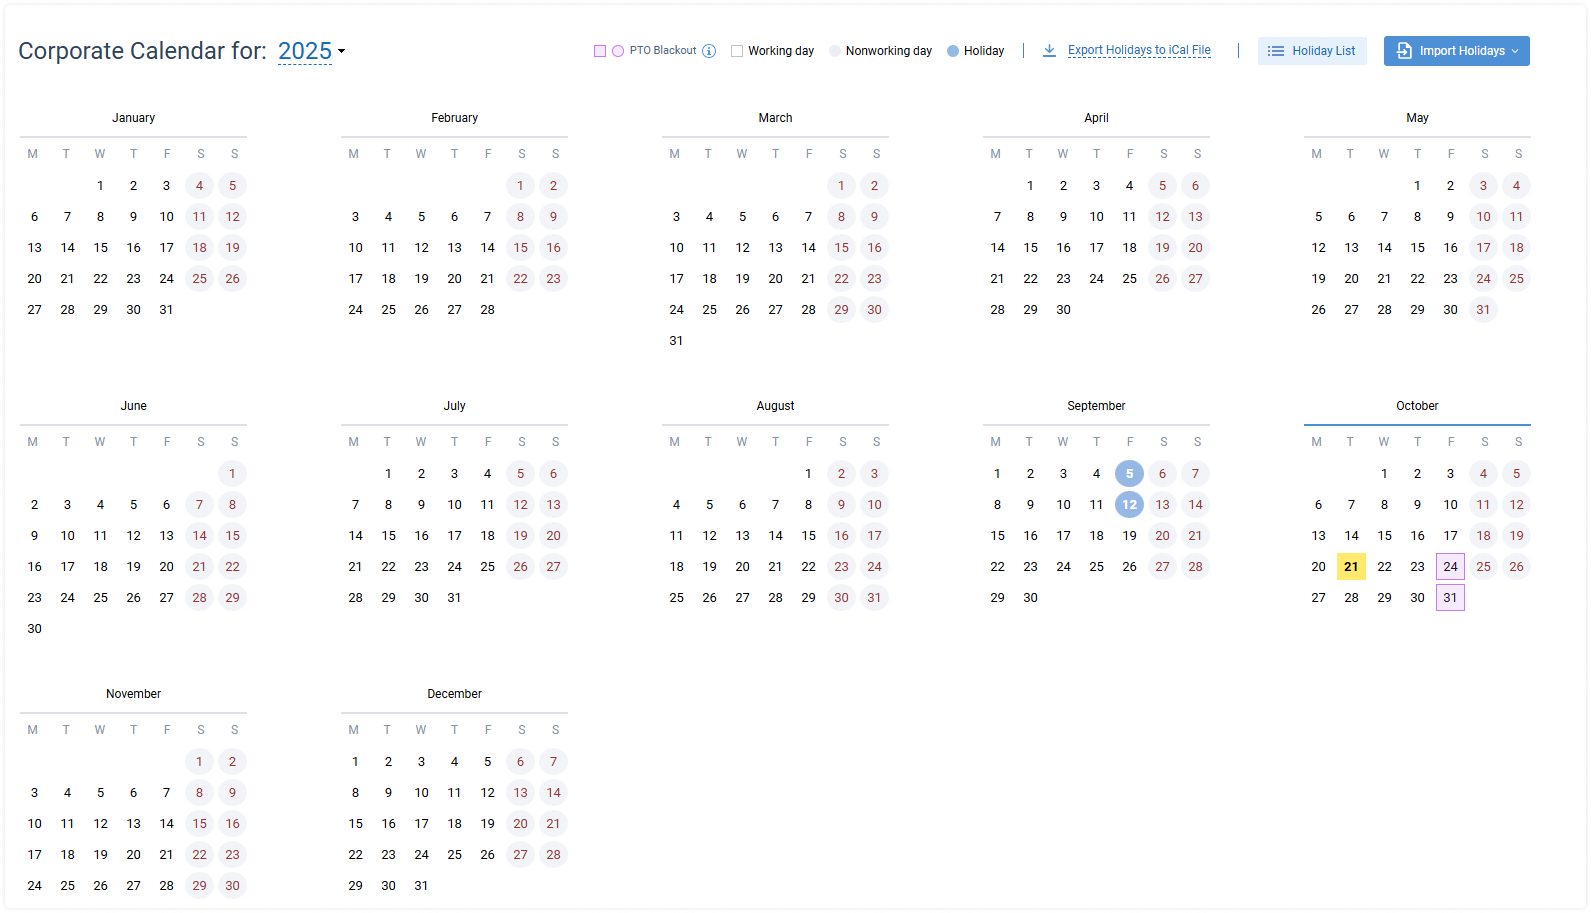
In the calendar, holidays and non-working days are highlighted in circles, while current working days and PTO blackout days are highlighted in squares.
You can set a custom PTO blackout color via Logo & Color settings.
Nonworking days are set by default to Saturdays and Sundays. You can change this default workweek schedule setting in Settings → General Settings → Time-Track & Workweek section.
You need to have the “Manage System Settings” permission to access this interface.
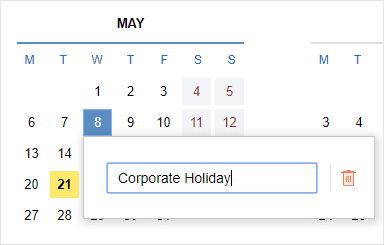
To configure your corporate calendar, you can:
- Change days’ statuses: working days, non-working days, holidays, and PTO blackout days. Click on the day to change its status. Enter holiday name if necessary:
Import national holidays for any country and remove holidays. Under the Import Holidays button, select the country to import national holidays for:
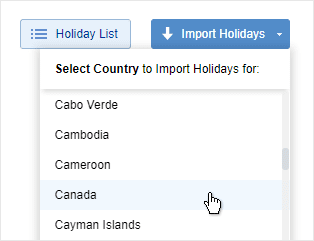
Review the list and confirm the import. Holidays will be imported for the remaining part of the year starting from the current date.
Later you can review the list under the Holiday List menu, remove the entire list of holidays, edit specific holidays, or remove them individually.
Upload holidays from an iCal file. Under the Import Holidays button, select the Import Holidays from an iCal File option:
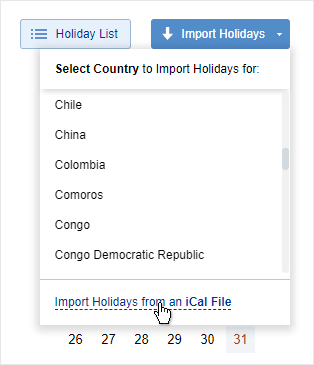
Upload the file, review the list of imported holidays, and confirm the import.
Notifications
With actiTIME email notifications you can configure automatic messages so as to:
- Inform users about an upcoming deadline
- Remind about incomplete time report
- Warn when they approach estimated task budget, etc.
The notifications will be triggered automatically when certain conditions are met.
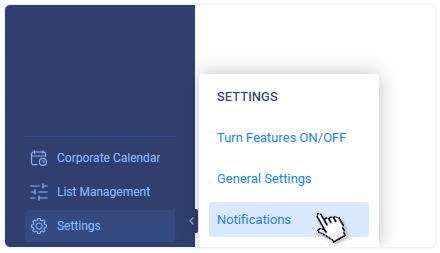
Enabling Notifications
Notifications can be enabled in the Settings → Notifications interface. You need to have the “Manage Account & Permissions” and “Manage System Settings” permissions to access this section.
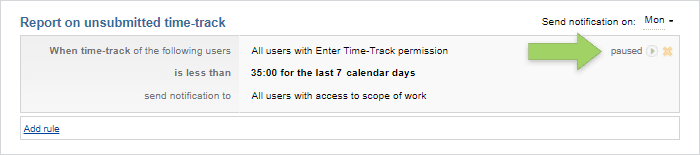
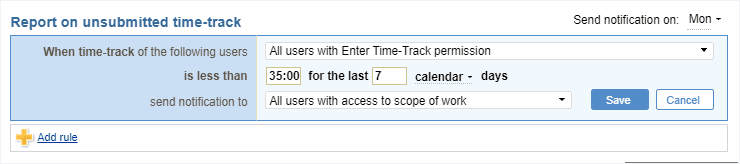
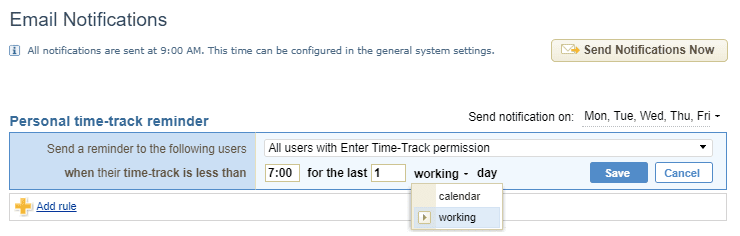
For each notification, you can create an unlimited number of rules defining who and when should receive the notification messages.
All notifications may be configured to be sent daily, or on selected weekdays. When you create a new rule, by default it is turned on. To put it on pause, press the Pause button.
Notification Types
Altogether there are 6 notification types listed below:
- Personal time-track reminder – Users will be reminded to fill in their timesheets if they reported fewer hours than expected.
- Report on unsubmitted time-track – Managers will receive a list of employees whose timesheets are incomplete.
- Notification of upcoming deadlines – Users will be alerted of the missed or coming deadlines of the open tasks from their scope.
- Notification of worked-out task estimate – Users will be alerted when the time reported for a task reaches a specified % of the estimate.
- Notification of overrun project budget – Managers will be notified when the project cost (based on users’ pay rates) exceeds the budget.
- Notification of personal earnings – Managers will receive a list of employees whose cost of work reaches some pre-defined value.
Notification Recipients
You may choose who will receive each notification either by specifying particular users, departments, or time zone groups or by selecting a group of users with certain permissions as described below:
- All users with the “Enter Time-Track” permission (for personal time-track reminders)
- All users with access to the scope of work (for reports on unsubmitted time-track)
- All users with the “Manage Scope of Work” permission (for notifications on upcoming deadlines and Worked out task estimates)
- All users with the “Manage Cost & Billing Data” permission (for project budget overrun and personal earnings notifications)
Please note: Notifications will NOT be received by the following groups of users, even if they are explicitly selected:
- Users with disabled access (for all notifications)
- Users without an email address (for all notifications)
- Users without necessary permissions
Configuring Notifications
actiTIME allows you to configure several notifications of the same type. For example, you can configure financial notifications to show weekly and monthly over-budget amounts, and for project budget, there is an option to see total overrun in addition. This is useful if you prefer to have detailed notifications.
Edit all fields as necessary by clicking on the rule and adjusting the values or selecting options from a drop-down.
Notifications of each type may be conveniently set according to both calendar and working days. Select working days if you want to exclude public holidays from the calculations.
The exact time when notifications are sent may be specified in the Settings → General Settings interface. It is the same for all users, but each user will receive the notifications in their local time zone.
Licenses
In the Licenses interface, you can:
- Review and manage your actiTIME and actiPLANS subscriptions
- Add billing information
- Choose payment methods
- Enable and disable license managers (selected from the list of active users)
Only confirmed license managers can access this interface and perform the above operations. There are several ways to become one:
- In the beginning, a user who initiates the product trial becomes a license manager automatically.
- Consequently, this first license manager can assign the permission to manage product subscriptions to other users of choice: License Managers → Edit → Choose users who can manage licenses.
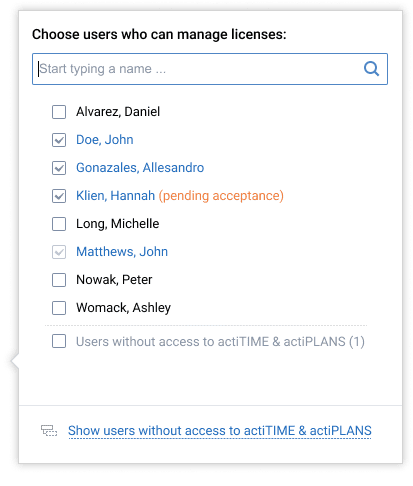
- Once a user is granted the permission, they need to accept or reject it by following the instructions sent with an email notification OR choosing the Accept / Decline option in the Licenses interface directly. Until this step is completed, a new license manager has the Pending Acceptance status, and their access to the Licenses interface is restricted.
Note: The acceptance request may be re-sent multiple times by clicking on the envelope icon next to a user’s email address.
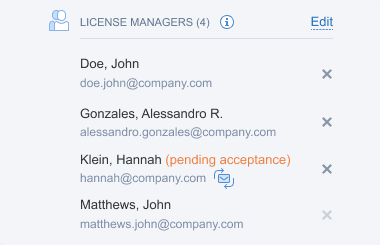
- After a license manager’s status is confirmed, they become able to edit the License Managers list, add new users to it or delete the existing ones (everyone except themselves).
License Managers’ Rights and Responsibilities
Besides the exclusive rights to run all the subscription-related transactions in the Licenses interface, confirmed license managers can initiate actiTIME-actiPLANS integrations and log in to their product accounts even after the license expires (while other users cannot).
Contact information of confirmed license managers will be used by actiTIME Inc. to deliver service-related messages and notifications. Thus, by accepting the license management permission, users agree to participate in communications with the company and provide their consent for personal data processing in accordance with the GDPR.
Still have questions? Let us help you.
Two-Factor Authentication
This feature allows admin users to enable or disable two-factor authentication and create tailored security protocols based on organizational needs.
After 2FA is turned on, users will be required to secure access to their accounts using an authenticator app on their next login.
- The user will log in with a username and password or with OTP received via the actiTIME site.
- The system will show an additional screen with a QR code and instructions for configuring an authenticator app.
- The user will be able to use Google Authenticator, Microsoft Authenticator, or any other compatible application.
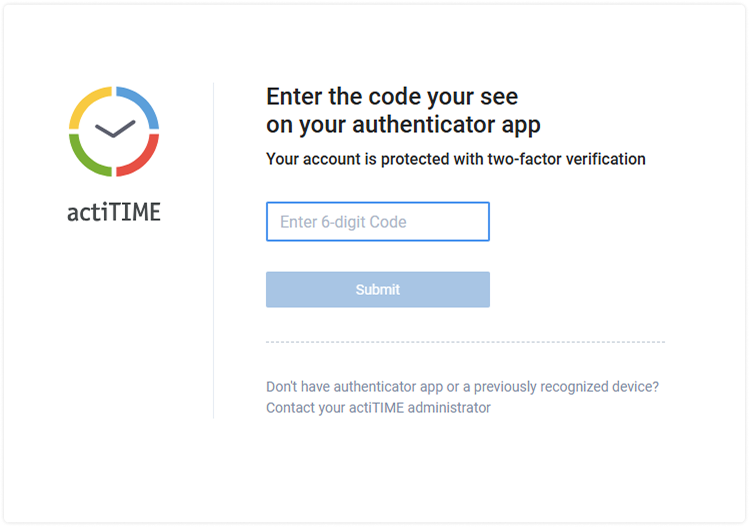
- Once the two-factor authentication is configured for a user, the system will require the user to enter a code from their authenticator app after logging in with a username and password or OTP.
Enabled two-factor authentication will not affect the actiTIME function “Keep me logged in” – successfully authenticated user will be able to keep working with the product.
Setting up Two-Factor Authentication
2FA can be turned on and off via the Security Policies section of actiTIME General Settings.
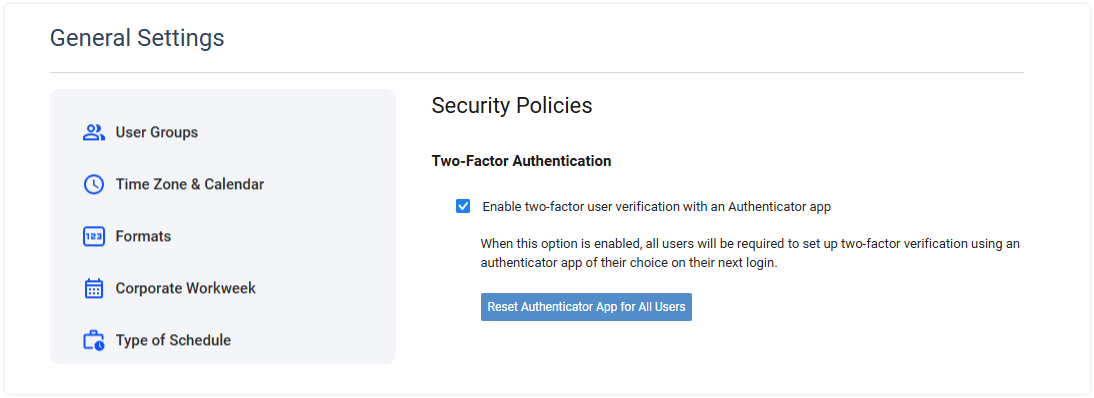
To enable or disable two-factor authentication, the administrator is required to enter their actiTIME password.
If the administrator turns two-factor authentication off and then back on, the system will keep all authenticator app parameters already configured for users’ accounts.
Configuring the Authentication App on Login
Once the two-factor authentication is enabled, users will be required to secure access to their accounts using an authenticator app on their next login.
The screen for configuring an authenticator app will be shown after a successful login with a username and password or with OTP received via the actiTIME site.
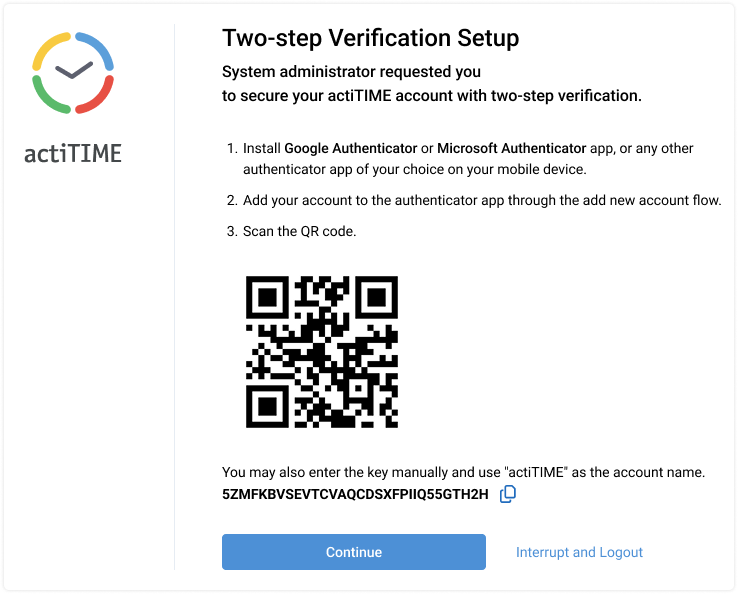
The user should install the authenticator app, add their account, scan the provided QR code, and then click Continue. After the code is successfully verified, the user will proceed to the regular actiTIME interface.
Logging in Through the Authenticator App
Once the two-factor authentication is configured for a user, the system will require the user to enter a code from their authenticator app after each successful login with a username and password or OTP received via the actiTIME site.
Resetting Two-Factor Authentication
The actiTIME system administrator will be able to reset a user’s authenticator app in the user management interface so that the users could configure their authenticator apps again on the next login.
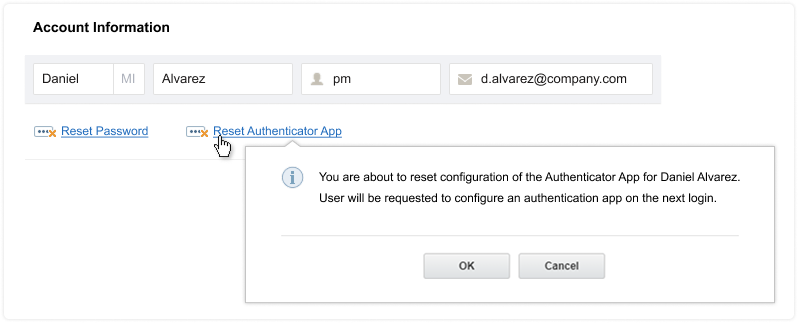
After the reset, the user will be required to configure their authenticator app again on the next login, as if it were never set up.
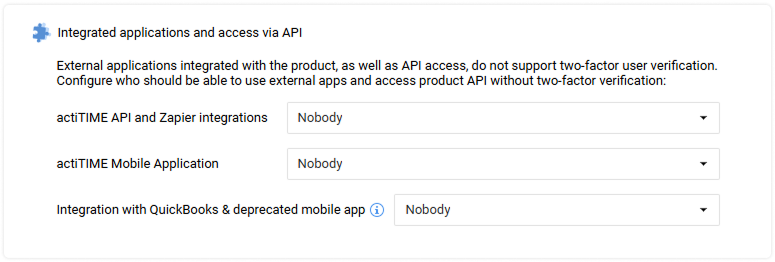
Using External Applications
The mobile application, as well as external integrations and API access, do not support two-factor authentication.
To keep your data secure, you need to configure which of your team members will be able to use these applications and access the product API without 2FA.